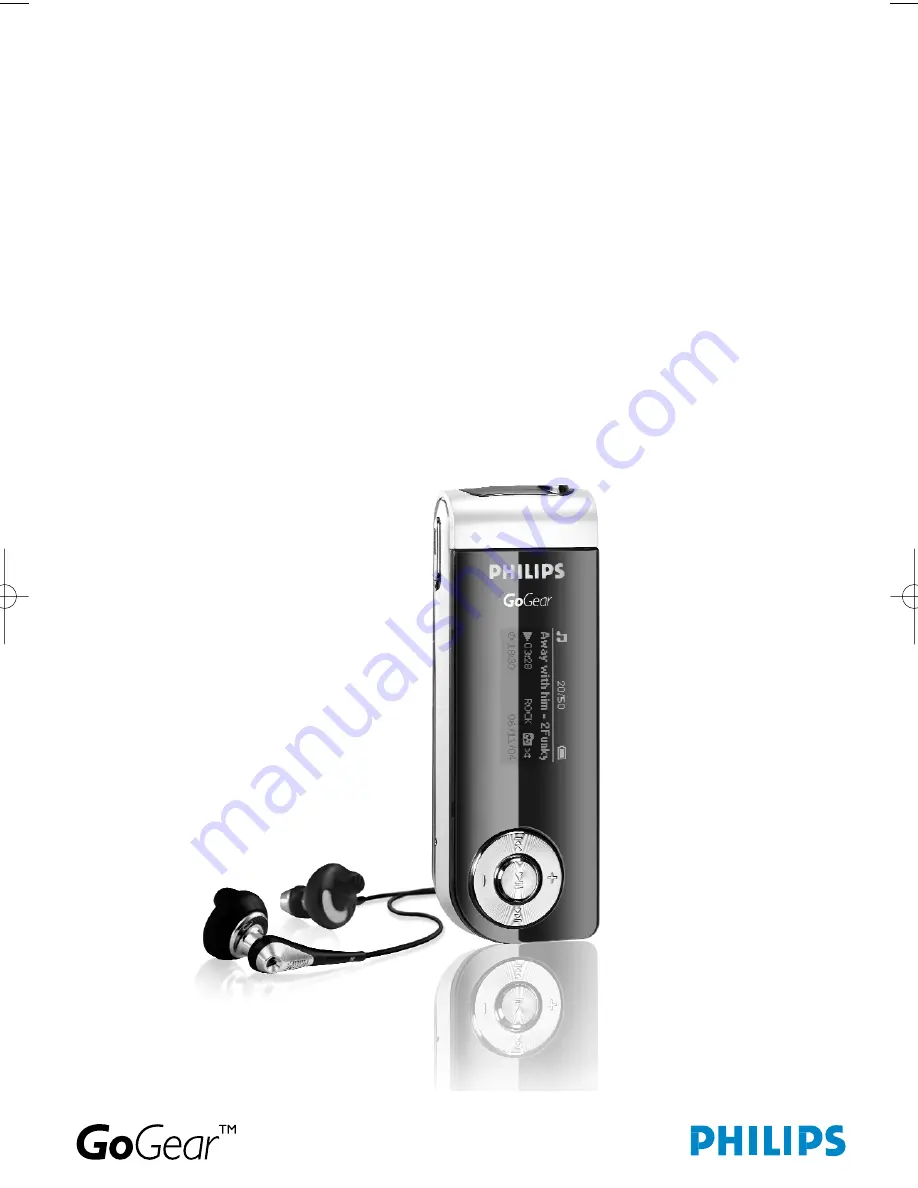
background image

user manual

manuel d’utilisation     | benutzerhandbuch 

| manual del usuario

gebruikershandleiding | manuale per l'utente

| manual do usuário

användar-handbok

Digital Audio Player

Lecteur audio numérique | Digitaler Audio-Player | Reproductor de audio digital
Digitale audiospeler

| Lettore audio digitale | Leitor Áudio Digital

Digital ljudspelare  

SA170 COVER 1  8/25/05  12:11 PM  Page 1

Содержание 512MB-FLASH AUDIO PLAYER SA178 -

Страница 1: ...uario gebruikershandleiding manuale per l utente manual do usuário användar handbok Digital Audio Player Lecteur audio numérique Digitaler Audio Player Reproductor de audio digital Digitale audiospeler Lettore audio digitale Leitor Áudio Digital Digital ljudspelare ...

Страница 2: ... so we can inform you as soon as new free upgrades become available The model and production numbers can be found on the label close to the USB connector About your new product With your newly purchased product you can enjoy the following MP3 and WMA playback see MUSIC MODE section FM radio see RADIO MODE section Recording FM and voice see MAKING RECORDINGS section FM radio is only available to so...

Страница 3: ...track information 6 J K Rewind Fast forward Up Down to 1 level 2 Power on off and Play Pause confirms a menu setting Volume Volume control Scroll Skip to previous next 7 REC Start or Stop Voice FM recording 8 A B Repeat or loop a sequence 9 MENU For menu options 0 USB slider Push USB connector in out USB USB cable connector FM radio is only available to some regional versions ...

Страница 4: ... stops blinking Note You cannot charge your player when your computer is off Organize and transfer your music Your player will appear as a new USB mass storage in Windows Explorer You can organize files and transfer music to your device during USB connection 1 Click and highlight one or more music track to transfer between your player and your computer 2 Use drag and drop actions to complete your ...

Страница 5: ...played for the duration defined in SETTINGS TIME OUT Indication of power level You can see the approximate power level of your batteries on the display Battery full Battery two thirds full Battery half full Battery low Battery empty TIP When the batteries are nearly empty the battery low screen blinks Your device will power down in less than 60 seconds Your device will save all settings and un fin...

Страница 6: ... guide you through various settings and operations Use J K to browse through menus Press 2 to confirm your selection To exit any current mode or play activity press MENU or the J key Music enter to play your digital music tracks Radio enter to listen to your radio presets Recordings enter to play and manage recordings Folder enter to browse your music tracks or recordings by folders ...

Страница 7: ...lphabetical order From the root menu select FOLDER to enter the folder view The FOLDER view will display your music according to how you arrange them in folders when you transfer by drag and drop Folders and tracks will be listed according to alphabetical order 2 Use the key to go to the previous track or folder Use the key to go to the next track or folder Use the K key to go into a folder Use th...

Страница 8: ...vice to play music tracks randomly Shuffle and or repeatedly repeat Changing play modes 1 Press MENU Select Play modes 2 Use scroll controls to select the following options Off Normal playback Repeat 1 Play one track repeatedly Repeat all Play all tracks repeatedly Shuffle Play all tracks randomly Shuffle repeat Play all tracks randomly and repeatedly Repeat folder Play all tracks within folder re...

Страница 9: ...he Equalizer custom setting provides 5 adjustable bands Bass Low Mid High and Treble 1 Press MENU Select EQUALIZER Custom 2 Press J or K to select your band Selected band flashes 3 Press once or more to increase the band setting Press once or more to reduce the band setting 4 The newly set custom eq can be immediately heard if you are playing music TIP The Custom EQ screen times out when there is ...

Страница 10: ... the next available station 4 Press 2 to save your preset Auto tune 1 Press MENU Select Autotune Press 2 to confirm Your device will automatically select up to 30 strongest available stations Playing a preset station 1 From the root menu select RADIO to enter the radio mode and tune to your preferred station 2 Press J to scroll up or K to scroll down for your preset 3 The preset will be automatica...

Страница 11: ... shows the recording state 3 Press REC again to stop FM recording Device shows the saving state Your FM recording will be saved on your device filename FM REC FM xxx wav xxx track number FM radio is only available to some regional versions Playing recordings You can find your recordings in the RECORDINGS library or via Folder View see related chapter Searching for your desired recording 1 From the...

Страница 12: ...lete Power Save On Off Scroll status Normal Slow Fast Screen saver Display Clock vertical Clock horizontal Animation Time 60 sec 30 sec 10 sec Off Time out 3 minutes 5 minutes 10 minutes 30 minutes Off Sleep timer 15 minutes 30 minutes 45 minutes 60 minutes Off Resume On Off Set day and time Day and Time screens Language English French German Spanish Italian Dutch Portuguese Swedish Polish Informa...

Страница 13: ...e Manager 1 Insert the supplied CD into your computer sCD ROM drive 2 Follow screen instructions to begin and complete installation Update and restore firmware 1 Insert the supplied CD into your computer s CD ROM drive 2 Install Firmware Manager from the supplied CD to your computer 3 Connect to the Internet Launch Firmware Manager 4 Follow on screen instructions to complete firmware restore ...

Страница 14: ...l Connect your device to the computer Delete unwanted files Unplug safely Record again Symptom Solution Troubleshooting If a fault occurs first check the points listed in the following pages For further help and other troubleshooting tips please also check out FAQs at www philips com support If you are unable to find a solution by following these hints consult your dealer or service center WARNING...

Страница 15: ...ed or not readable legible About operating and storage temperatures Operate in a place where the temperature is always between 0 and 35oC 32 to 95oF Store in a place where the temperature is always between 20 and 45oC 4 to 113oF Battery life may shorten in low temperature conditions Take care when using headphones Hearing safety Listen at a moderate volume Using headphones at high volume can impai...

Страница 16: ...ch can be recycled if disassembled by a specialized company Please observe the local regulations to dispose of packaging exhausted batteries and old equipment Disposal of your old product Your product is designed and manufactured with high quality materials and components which can be recycled and reused When this crossed out wheeled bin symbol is attached to a product it means the product is cove...

Страница 17: ...and on the user is encouraged to try to correct the interference by one or more of the following measures Relocate the receiving antenna Increase the separation between the equipment and receiver Connect the equipment into an outlet on a circuit different from that to which the receiver is connected Consult the dealer or an experienced radio TV technician for help Notice for Canada This Class B di...

Страница 18: ...e Media SA170 128 MB NAND Flash SA174 256 MB NAND Flash SA175 256 MB NAND Flash SA177 512 MB NAND Flash SA178 512 MB NAND Flash SA179 1 GB NAND Flash available storage capacity will be less Tuner Reception Transmission Auto store Tuner band FM FM radio is only available to some regional versions Connectivity Headphone 3 5 mm USB 2 0 Music transfer via Windows Media Player or Windows Explorer Data ...

Страница 19: ...layer and Firmware Manager 1 Insert the supplied CD into your computer s CD ROM drive 2 Follow screen instructions to begin and complete installation 3 Install Windows Media Player 4 Fill in necessary information when prompted to do so Note Copy protect DRM music that has not been transferred to your device using Windows Media Player can not be played on your device ...

Страница 20: ...computer using the supplied USB cable The USB connection screen will automatically appear 2 Launch Windows Media Player TIP Please refer to your computer s manual for the exact position of your USB port Look for the USB symbol on the processing unit of your computer ...

Страница 21: ...s to the Library 1 Go to File menu Click Add to Library By Searching Computer 2 Click Browse in the dialog box to point to the folder you want to add to 3 Complete the information in the dialog box and then click Search 4 Files will be added to the Library ...

Страница 22: ...your computer or when you change synchronization settings The Player synchronizes your entire library if it can fit or the Player synchronizes your favorite content first Manual With this option you pick specific files or playlists you want to synchronize each time you want to make changes to the content on your device 1 Click on Sync 2 In the Items to Copy pane show the playlist category or other...

Страница 23: ...s to i e GoGear Audio Philips GoGear Clear the check boxes next to any files you do not want to copy 4 Click the Start Sync button TIP For further details of music transfer on WMP 10 go to the help section of Windows Media Player and click Help Synchronizing content to devices ...

Страница 24: ...t Add to Additional Playlist 3 From the Add to Playlist pop up window select an existing playlist or add new one 4 The selection is added to playlist TIP Press and hold Ctrl on your keyboard and click to select more than one item To select consecutive items click the first item press and hold Shift on your keyboard and then click the last item ...

Страница 25: ...ur keyboard and click to select more than one item To select consecutive items click the first item press and hold Shift on your keyboard and then click the last item Delete Tracks and Playlists 1 Click to highlight an item 2 Right click and select Delete to delete ...

Страница 26: ...25 Actual display varies with use Edit Track Information 1 Click on a track 2 Right click and select Edit 3 Click on the text boxes to edit relevant information ...

Страница 27: ... varies with use Search for Tracks 1 Type a search string in the Search field 2 Click on Search to start searching 3 You will see tracks that contain the search string 4 You can play transfer delete or add these tracks ...

Страница 28: ...1 Install the latest Philips Firmware Manager from the bypacked CD Philips Firmware Manager will automatically notify you if any new updates are available 2 Connect your device to your computer powered by the supplied AC DC adapter if applicable 3 Launch Firmware Manager User Interface by right clicking on this icon in the taskbar and selecting Launch Firmware Manager or from the Desktop icons or ...

Страница 29: ...subject to change without notice Trademarks are the property of Koninklijke Philips Electronics N V or their respective owners 2005 Koninklijke Philips Electronics N V All rights reserved www philips com Printed in China ...

Отзывы: