OneTouch ONE POS, User Manual
Introducing the OneTouch ONE POS system. Ensure seamless operations with our comprehensive User Manual that can be easily downloaded for free from our website. This manual provides detailed instructions on how to maximize the features of our product. Get your copy today and streamline your business processes.
Share
Download


Reviews:
No comments
Related manuals for ONE POS

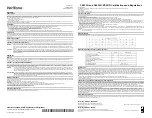
HT630
Brand: Unitech Pages: 7
C680 3G
Brand: VeriFone Pages: 2

PT-5900
Brand: Partner Pages: 50

Ingenico i5100
Brand: Skyzer Pages: 38

iUP 250
Brand: Ingenico Pages: 2

RockSolid POS
Brand: True Value Pages: 18

OPU-D42-W50
Brand: Vector Pages: 2

D200
Brand: Pax Technology Pages: 7

IM20
Brand: Pax Technology Pages: 10

E600
Brand: Pax Technology Pages: 8

TA-8000 SERIES
Brand: Safescan Pages: 21

TC603
Brand: iMotion Pages: 88

TB-4162
Brand: National Instruments Pages: 12

NPT-5851
Brand: Nexcom Pages: 45

Data Collection Terminal DC7000
Brand: Acroprint Pages: 36

V39 POS
Brand: Aisino Pages: 14

NanoFace
Brand: eyeLock Pages: 38

PRD1
Brand: AERMEC Pages: 24


