

Netopia Part Number:
6180017-00-02
Copyright 2002, Netopia, Inc. All rights reserved
Cayman 3500 Series
ADSL Gateway
Quickstart Guide
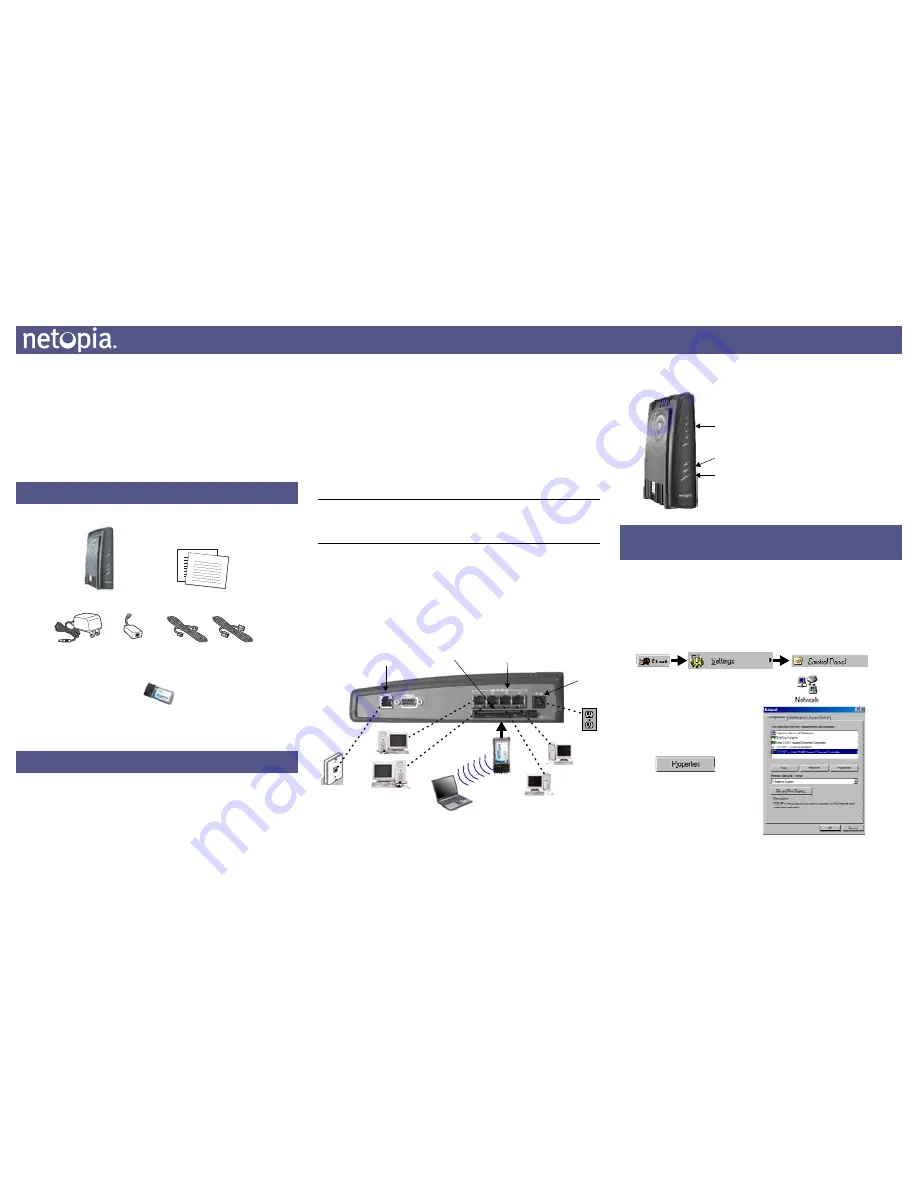
1.After unpacking your Cayman Gateway shipping carton, decide where
you want to locate the Gateway.
You should install the Gateway near your PC or another location that permits
easy access and visibility. You can lay the Cayman Gateway flat, stand it
upright, or mount it on a wall. Make sure any Ethernet cables are kept away
from power cords, fluorescent lighting fixtures, and other sources of electrical
interference. Put the Gateway in a location where air can circulate freely
around it.
2.Connect the Gateway to the devices on your Ethernet local area network
(LAN).
Connect each computer or other device to a switch port on the back of the
Gateway with an Ethernet cable (maximum length 100 meters). If you need
more than four ports, connect another hub to the Gateway with a standard
Ethernet crossover cable or connect a port on the Gateway to the uplink port
on the other hub with a standard Ethernet cable.
3.Connect the Gateway to the wall jack that supports your DSL service.
Insert one end of the telephone cable in the DSL port on the Gateway back
panel until you feel it lock. Insert the other end of the telephone cable into the
telephone jack connected to your ADSL service.
Note:
You may need to use the included DSL line adapter in order to accommodate
the type of phone lines in your location. Some telephone connections have the copper
line cable pairs (the inner and outer pair on your phone jack) reversed. If your first con-
nection attempt fails, use the enclosed line adapter to compensate for this configuration.
4.
(Optional) If your Gateway has a wireless 802.11b PCMCIA card, install the
card in the slot.
Some 3500-Series Gateway models are bundled with a Netopia-supplied
802.11b wireless card. Insert the card in the available slot. The Gateway will
sense its presence automatically and no further configuration is required.
Each computer using the wireless network requires its own 802.11b adapter
to be installed in the PC.
5.Connect the power transformer to the power jack on the Gateway back
panel. Plug the power transformer into an appropriate electrical outlet.
When all of your connections are made, the status LEDs on the front of your Cayman
Gateway will light, according to the following diagram:
The following instructions assume that you want to use the automatic configuration and
address sharing features of the Gateway to provide IP information to devices on your
local Ethernet network.
1.Configure your computer to use an IP address on the same TCP/IP net-
work as the Cayman Gateway.
• Windows 95/98 or Windows ME:
Checklist
Set up your Gateway
Cayman Gateway
Quickstart
Guide
Power
Supply
RJ-11
Telephone
Cable
RJ-45
Ethernet
Cable
DSL Line
Adapter
PCMCIA Wireless Card
(optional on some models)
DSL
10/100BT LAN
5V 3A
DC Power
(optional on some models)
PCMCIA Wireless Card Slot
Configure Your Computer for Dynamic
Addressing
SYSTEM -
Green
when power is applied
WAN - Flashes
amber
when training;
LAN - Flash
amber
for activity
Solid
green
when trained
on each attached port on the LAN.
In the list of network components,
highlight the entry that says
“TCP/IP ([your Ethernet card here])”.
Click
Open the Network window by clicking the Network Icon
On your computer, go to:
1
2
3
M
AKING
B
ROADBAND
W
ORK
™


