

U
SB
U
SB
comes with Gateway
NB620W Gateway
NB620W Super-G Wireless Broadband Gateway
Thank you for choosing this NetComm Super G
Wireless Gateway. Your gateway is pre-
configured for easy installation. If you are not
sure wheather your Gateway has the default
setup, please reset the unit back to factory
defaults first. (Press the Reset button located
on the back of the unit for 15 seconds while
powering on).
Next make sure that you have installed your
network adaptor properly. It will make the
installation of this router easier and smoother.
To connect the ruoter to the Inetrnet , please
follow this guide or the tutorial on the CD.
Check what type of Internet connection you
have subscribed to. Ask your ISP for your User
Name and Password. If you have a PPPoE
service, please remove the PPPoE dial-up
program from your computer.
Use this Quick Installation Guide to setup your
Etherent or Wireless network with an internet
connection.
1.
Network Installation
To setup your hardware and wiring.
2.
Configure your PC's
Getting your PC ready. You will either need
to install a new network adaptor, or you
will need to check the configuration of an
existing adaptor.
3.
Configure the Gateway
The gateway has a default setup for a
cable modem connection. If you are using
an ADSL connection, you will need to
setup the ADSL settings in this Gateway
with the information provided by your ISP.
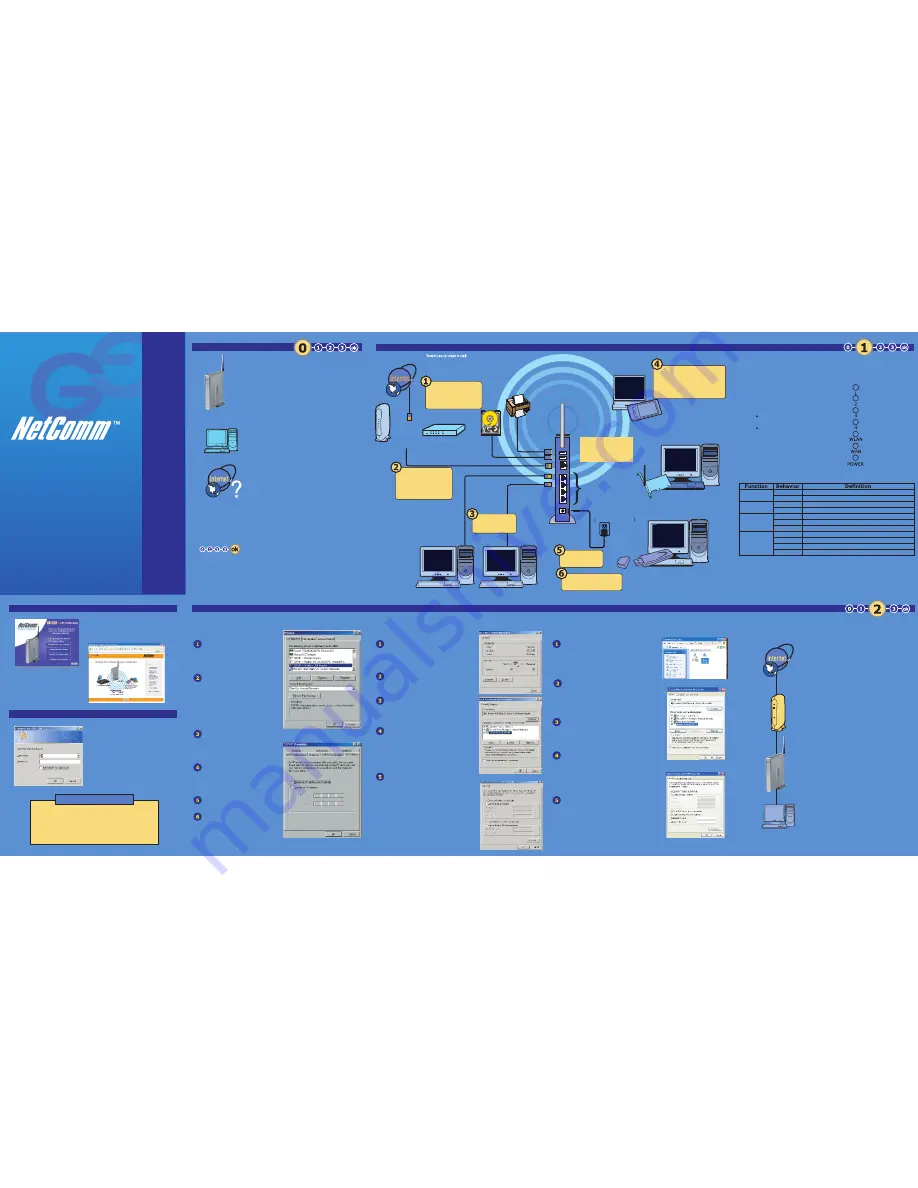
NetComm NB620W
Super-G Wireless Gateway
with 4 port switch
Plug in your Power adaptor
and connect the lead to the
Gateway.
Install your wireless client
adaptors and you are ready to
go. Use your Wireless Utility to
connect to the SSID of the
NB620W when the Gateway is
plugged in.
Now check the network
indicator LED's to:
Make sure that your Gateway is
starting correctly.
You have checked the Gateways
LED indicators to see the
network status.
Network LAN LED's
When you insert your NetComm CD, you
can choose to use the On-line Tutorial
to configure your Gateway or you can use
this printed Quick Start Installation Guide.
If you need to reset your NetComm NB620W Gateway back
to factroy defaults, use a ball pen or pencil to depress the
reset button located on the back panel of your Gateway.
Depress the reset button while powering on the Gateway
and keep it depressed for at least 15 seconds. The gateway
will restore factory defaults and restart again.
Open the Control Panel window by
clicking Start > Settings > Control
Panel. Then click on the Network
Icon, the network control panel will
appear.
Click on the Configuration Tab to
bring up the configuration screen.
Select the Network components
labeled TCP/IP by clicking on it. if you
have multiple TCP/IP listings, make
sure your select the one associated
with your network adaptor, then click
on the Properties button to bring up
the TCP/IP Properties window.
Select the IP Address tab to bring
up the IP adress setting dialog box.
Select the - Obtain an IP address
automatically function by checking
the button.
Next click on the DNS Configuration
tab to bring up this dialog box.
Select the - Obtain an IP address
automatically function by checking
the button.
Click OK twice to confirm and save
your changes.
You will be prompted to restart your
computer.
Open the Control Panel window by
clicking Start > Settings > Control
Panel. Then click on the Network and
Dial-up Icon, the Network and Dial-up
Connection window will appear.
In Network and Dial-up Connections
window, double-click the Local Area
Connection icon.
In the Local Area Connection
Properties dialog box, select the
Internet Protocol (TCP/IP) and then
click on the Properties button to bring up
the properties dialog box.
In the Internet Protocol (TCP/IP)
Properties dialog box, select the -
Obtain an IP address automatically
function by checking the button.
Additionally, select the - Obtain DNS
server address automatically function
by clicking the button.
Click OK twice to confirm and save your
changes and close the Control Panel.
After you have completed your
Network Installation and Gateway
Configuration, you will need to restart
your entire network to make sure the
settings you have made take effect.
Please power down all network
components waiting for at least 30
seconds, then:
1. Power on your Cable/ADSL Modem.
Wait until it has booted up.
2. Power on the NB620W Gateway
and wait until it has finished
booting up.
3. Power on your PC. During the
boot-up process, your computer
will sense the network changes and
setup your new settings.
-
Click on each install topic
to help you install the
Gateway.
-
Start from the first one and
work your way down.
Open the Control Panel window by
clicking Start > Control Panel. Then
click on the Network and Intenet
Connections icon, and then Click
Network Connections. The Network
Connections window will appear.
In the Network Connections window,
right click the Local Area Connection or
the Wireless Network Connection icon,
depending on which connection you are
using for this computer
, and select
Properties.
In the Connection Properties dialog
box, select the Internet Protocol
(TCP/IP) and then click on the
Properties button to bring up the
properties dialog box.
In the Internet Protocol (TCP/IP)
Properties dialog box, select the -
Obtain an IP address automatically
function by checking the button.
Additionally, select the - Obtain DNS
server address automatically function
by clicking the button.
Click OK twice to confirm and save your
changes and close the Control Panel.
Introduction
Introduction
Step 1 Network Installation
Step 1 Network Installation
Step 2 Configure your PCs
Step 2 Configure your PCs
Starting your installation
Starting your installation
Check your physical network
Power
Off
Power Off
Green
Power On
WAN
Off
WAN link abset or power off
(Internet)
Green
Indicates ISP connection up
WLAN
Off
Wireless Link absent or off
Green
Wireless link established
Flashing
Wireless link data active
Network LAN
Off
LAN link absent or power off
LED's(1-4)
Green
100Mbps Ethernet link established
Amber
10Mbps Etherent link established
Flashing
(Any Color) Ethernet link data active
Default Setup
Default Setup
How to Set back the default?
Management Utility:
http://192.168.1.1
User Name & Password:
Enter
User name:
admin
Password
admin
Then press
OK
to login.
Windows 95/98/ME
Windows 2000
Windows XP
(XP Interface)
Restart Network
Plug in your
Broadband
Cable/DSL Modem
Connect any Wired
computers at this
time.
Use your Ethernet cable
that came with your Cable /
ADSL Mdoem to connect to
the INTERNET/WAN port
of the NetComm Gateway.
Connect your DSL or
Cable Ethernet Modem to
the outlet. You will need
a phone line for DSL and
Coaxial line for Cable.
YML724 Rev.1
Cable modem
DSL modem
OR
Hard Disk
USB
USB
Ethernet Cable
Ethernet Cable
Ethernet Cable
Wireless PC Card
Wireless PCI Adapter
Wireless USB Adapter
Internet Port
(WAN)
Connect to Cable
modem or ADSL modem.
Local Ports
4 Switched local
Ethernet ports to
connect to local
computers or Switches.
Power Adapter
File Server
Web Server
Print Share
Quick Start Guide


