Lightkiwi.com
Copyright © 2017 Lightkiwi LLC, All Rights Reserved
Contact Customer Service at [email protected]
Landscape Lighting
Digital Timer
for Low Voltage Landscape Lighting Transformer
H5576
MO TU WE TH FR SA SU
CLOCK
PROG
AUTO
CTD
ON
OFF
AM
PM
PROG
A
C
B
D
E
F G
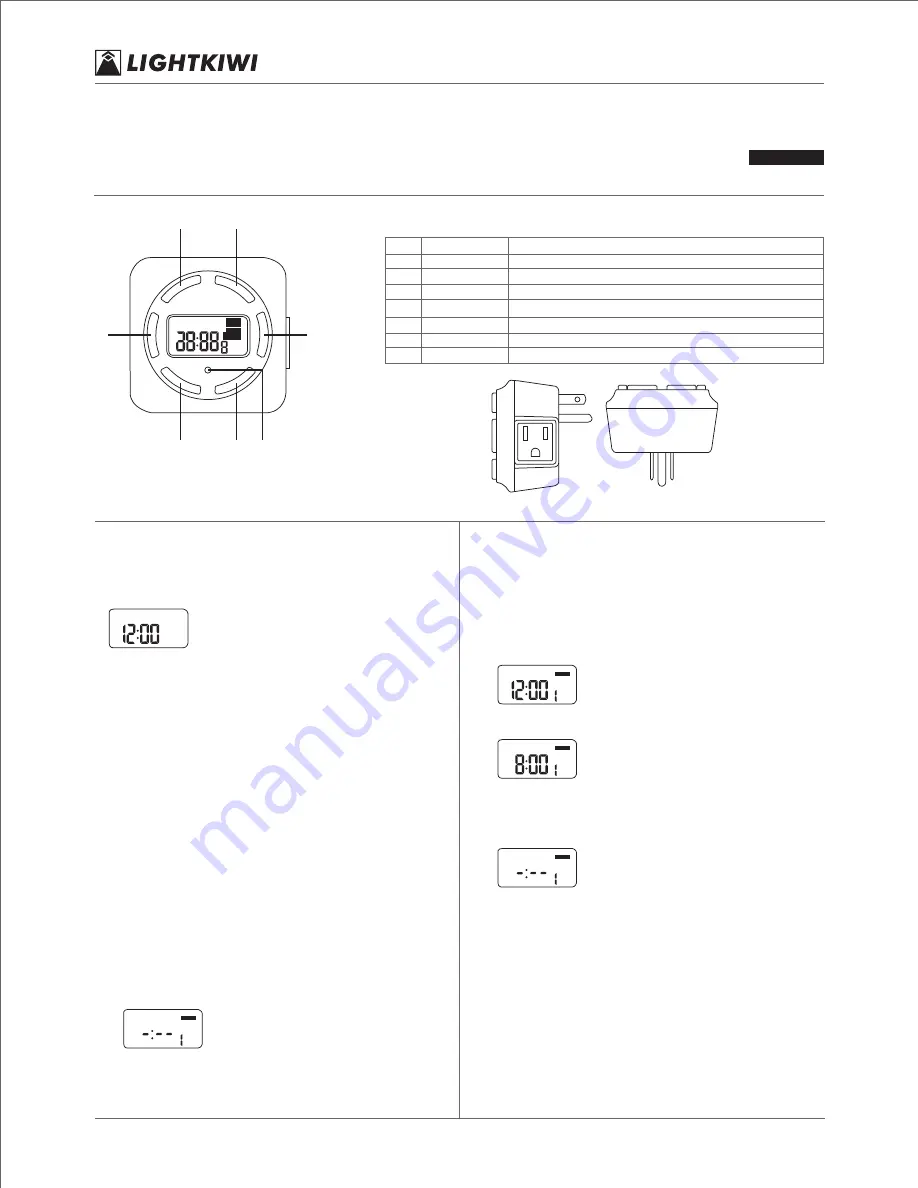
FUNCTION OF KEY
*For the first use, please press the RESET button key!
KEY
MENU
+
-
OK
COUNTDOWN
RESET
FUNCTION
shift between CLOCK and PROGRAM modes
increase the number by 1 or hold to roll fast
decrease the number by 1 or hold to roll fast
confirm the current setting
start the countdown function
reset the timer and clear all data previously setting
A
B
C
D
E
F
G
PART
MANUAL
shift between OFF/AUTO OFF/ON/AUTO ON modes
FUNCTION
RESET
Press
MENU
at clock display to start setting. OFF indicates that
the timer is in OFF mode.
1.
2.
3.
For the first use of press the RESET button, the LCD will fully
display for 2 seconds and then the clock will show:
MO
OFF
AM
The blinking colon means the clock is running.
SETTING THE CLOCK
A.
Press
OK
and ‘day’ will flash, use+/- to adjust.
B.
Press
OK
to confirm and hour will flash, use +/- to adjust.
Make sure AM/PM is correctly set.
C.
Press
OK
to confirm and minute now flashes, use +/- to adjust.
Note: When minute is set, the clock will go from 0 second.
D.
Press
OK
to confirm.
E.
Note: To set the clock once again, press
OK
and repeat the steps
from 2.B.
To set programs for the timer, press
MENU
and see Section 3.
To quit to clock display, hold
MENU
for 2 seconds or more.
If no key is pushed within 1 minute, the clock will be displayed.
SETTING PROGRAMS
Press
MENU
at clock display till
PROG
is shown on the screen. Up to
9 programs can be set for each day of the week. For instance, if you
want to set a daily program that starts at 8:00 AM and ends at
5:15 PM, please follow the following steps:
Press
MENU
till the screen shows:
A.
PROG
ON
PROG
1ON is code of the current program.
Press
OK
to start setting. ‘Day’ will flash at this stage, use
+
/
-
to
adjust. Press
+
, the options will show in such order:
(MO, TU, WE, TH, FR, SA, SU) MO > TU > WE > TH > FR > SA > SU
> (MO, TU, WE, TH, FR)
>
(SA, SU)
>
(-:--); Press
-
, these options
will show in a reversed order.
B.
MO TU WE TH FR SA SU
PROG
ON
AM
PROG
Press
OK
to confirm and hour will be flashing, use
+
/
-
to adjust.
In our case, we should select 8 AM:
C.
MO TU WE TH FR SA SU
PROG
ON
AM
PROG
Press
OK
to confirm and minute will flash, use
+
/
-
to adjust.
In our case, the minute shall be set to :00.
D.
Press
OK
to confirm and “PROG 1ON” is now correctly set.
E.
Press
MENU
and the screen will show:
F.
PROG
OFF
PROG
Press
OK
to start setting “PROG 1OFF”. Follow the steps 3.2 to 3.5.
In our case, day, hour and minute should be respectively set to
(MO, TU, WE, TH, FR, SA, SU) 5 PM and 15 MIN. Now the ON and
OFF time are both set.
G.
To have more programs set, repeat the above steps.
H.
When a program is set, press
MENU
to quit or hold
MENU
for 2 or
more seconds at any stage to go back to clock display. If no key is
pushed within 1 minute, the clock will be displayed.
I.
To edit a particular program, locate it using
MENU
and press
OK
to edit.
J.
To remove a particular program, locate it using
MENU
, press
OK
and set the day to -:-- using
+
/
-
.
K.
Note: -:-- is an invalid option and if it is selected, you can press
OK
again to restart setting. In our case, we should select
(MO, TU, WE, TH, FR, SA, SU):
CONTINUE ON THE NEXT PAGE >>>>>
1
2


