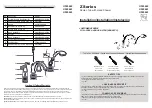
background image

www.kraususa.com   I   Toll Free: 1.800.775.0703   I   © 2018 Kraus USA Inc.   I   REV. October 26, 2020

Bellucci™ Quartz Granite

Composite Farmhouse Sink

KGF1-30 / KGF1-33
KGF2-30 / KGF2-33

KGF11-30 / KGF11-33
KGF12-30 / KGF12-33

R

INSTALLATION GUIDE

Summary of Contents for 00846639051712

Page 1: ...a com I Toll Free 1 800 775 0703 I 2018 Kraus USA Inc I REV October 26 2020 Bellucci Quartz Granite Composite Farmhouse Sink KGF1 30 KGF1 33 KGF2 30 KGF2 33 KGF11 30 KGF11 33 KGF12 30 KGF12 33 R INSTALLATION GUIDE ...

Page 2: ...any problems with your product Please contact our Customer Service Team 1 800 775 0703 customerservice kraususa com Have the model number available and retain a copy of your receipt with purchase date for reference If for any reason this product does not meet your expectations please be sure to repack this product in the original box and packaging material to avoid damage during transit DO NOT RET...

Page 3: ...or replacement parts please contact Kraus Customer Service and one of our representatives will be happy to help Toll Free 800 775 0703 or customerservice kraususa com The step by step guidelines in the installation instructions are a general reference for installing a Kraus Sink Should there be any discrepancies Kraus cannot be held liable It is recommended to install all Kraus products by hiring ...

Page 4: ...3 8 Min Cabinet Size 33 KGF2 33 32 7 8 x 20 3 4 x 9 3 8 Min Cabinet Size 36 27 686mm 20 3 4 527mm 17 431 2mm 10 254mm 20 3 4 527mm 17 431 2mm 10 254mm 9 3 8 239mm 9 3 8 239mm 16 407mm 16 407mm 16 407mm 16 407mm 6 3 4 170mm 26 5 8 675mm 6 3 4 170mm 23 1 2 597mm 6 3 4 170mm 23 1 2 597mm 6 3 4 170mm 26 5 8 675mm R5 8 15mm R5 8 15mm R1 1 8 30mm R5 8 15mm R5 8 15mm R1 1 8 30mm 2 3 8 61mm 29 3 4 755mm 2...

Page 5: ... 4mm 16 407mm 6 3 4 170mm 26 5 8 675mm 10 254mm 9 3 8 239mm 3 8 10mm 1 4 6mm 1 8 4mm 20 3 4 527mm 17 431 2mm 10 254mm 20 3 4 527mm 17 431 2mm 9 3 8 239mm 6 3 4 170mm 16 407mm 23 1 2 597mm 3 8 10mm 1 4 6mm 1 8 4mm 16 407mm 6 3 4 170mm 26 5 8 675mm 10 254mm 9 3 8 239mm 3 8 10mm 1 4 6mm 1 8 4mm R5 8 15mm R5 8 15mm R1 1 8 30mm R5 8 15mm R5 8 15mm R1 1 8 30mm 29 3 4 755mm 27 686mm 2 3 8 61mm 29 3 4 755...

Page 6: ...installer s discuss this with the customer and agree that this finished appearance is the desired effect Kraus is not responsible for improper sink or countertop installations KRAUS Recommended Installation Type 2 Cut Countertop Cut the opening in the countertop Countertop Silicone Caulk not furnished Sink Mounting Clip Fastener not furnished NOTE Please use the appropriate saw that best fits your...

Page 7: ...cation for mounting brackets around the frame at a distance of about 1 4 6 4mm from the edge Mounting holes should be 1 4 from the edge of the sink 3 Cut Cabinet Front Measure height of apron front Add 1 16 to the dimension when you mark base cabinet front cutout Use jigsaw to cut 1 4 6 4mm ...

Page 8: ...8 5 Drill Hole in Countertop Use 15 64 drill bit to drill the fixation holes at a depth of 3 8 in the indicated location 3 8 15 64 po Diameter Depth Stop Underneath the Counter ...

Page 9: ...9 6 Install Anchors Add adhesive optional in the holes and then insert anchors into drilled holes and lightly tap with a hammer until flush ...

Page 10: ...Secure Sink to Countertop Use a bead of silicone or preferred adhesive around the rim of the sink Check the alignment of the sink to the cutout in the countertop Place sink over cutout hole and press firmly ...

Page 11: ... Hardware Attach mounting hardware to secure bowl Remove excess sealant from inside lip Allow sealant to set for 30 60 minutes NOTE Use rubbing alcohol to remove any excess sealant BRASS INSERT SUPPORT METAL SCREW SEALANT ...

Page 12: ...o drain and water supply connections to the faucet according to manufacturer s instruction Run water into sink and check for leaks Note Before installation please check that the drain kit complies with ASME A112 18 2 CSA B125 2 and with CUPC certification ...

Page 13: ...ructions enclosed with your product Avoid using abrasive cleaners such as powders bleach ammonia alcohol or chlorine Avoid using abrasive pads steel wool or wire brushes as these will damage and wear down the finish This warranty does not apply to Products that have not been installed or operated in accordance with instructions supplied by Kraus and all applicable rules regulations and legislation...

Page 14: ...ght to change modify and or update the warranty policy at any time For the latest most up to date comprehensive warranty go to www kraususa com warranty If you are a homeowner please contact a Kraus Customer Service Representative at Kraus USA Inc 12 Harbor Park Drive Port Washington NY 11050 Toll Free 800 775 0703 Customerservice kraususa com If you are a plumbing contractor or trade professional...

Page 15: ...Register Your Kraus Product Activate Your Warranty Access Premium Customer Support Get Product Information REGISTER TODAY http www kraususa com registration R www kraususa com IMPORTANT ...

Reviews: