x8
x8
6/2020
330001
330003
20104
20108
20209
20210
20114
20127
20118
20128
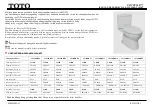
Gaius DUO
, installation instructions.
17782 wall drain with electric
17783 floor drain with electric
17785 wall drain with crank
17786 floor drain with crank
17782
17783
17782
17783
6219-Z
x8
x8
x8
x1
x1
x1
4pcs
2pcs
1
1pc L1500mm
Save this installation instruction for after use. Säästä tämä asennusohje myöhempää käyttöä varten.
17785
17786
17785
17786