background image

OneKEY

IR4 Keys, Chargers & OneKEY Manager

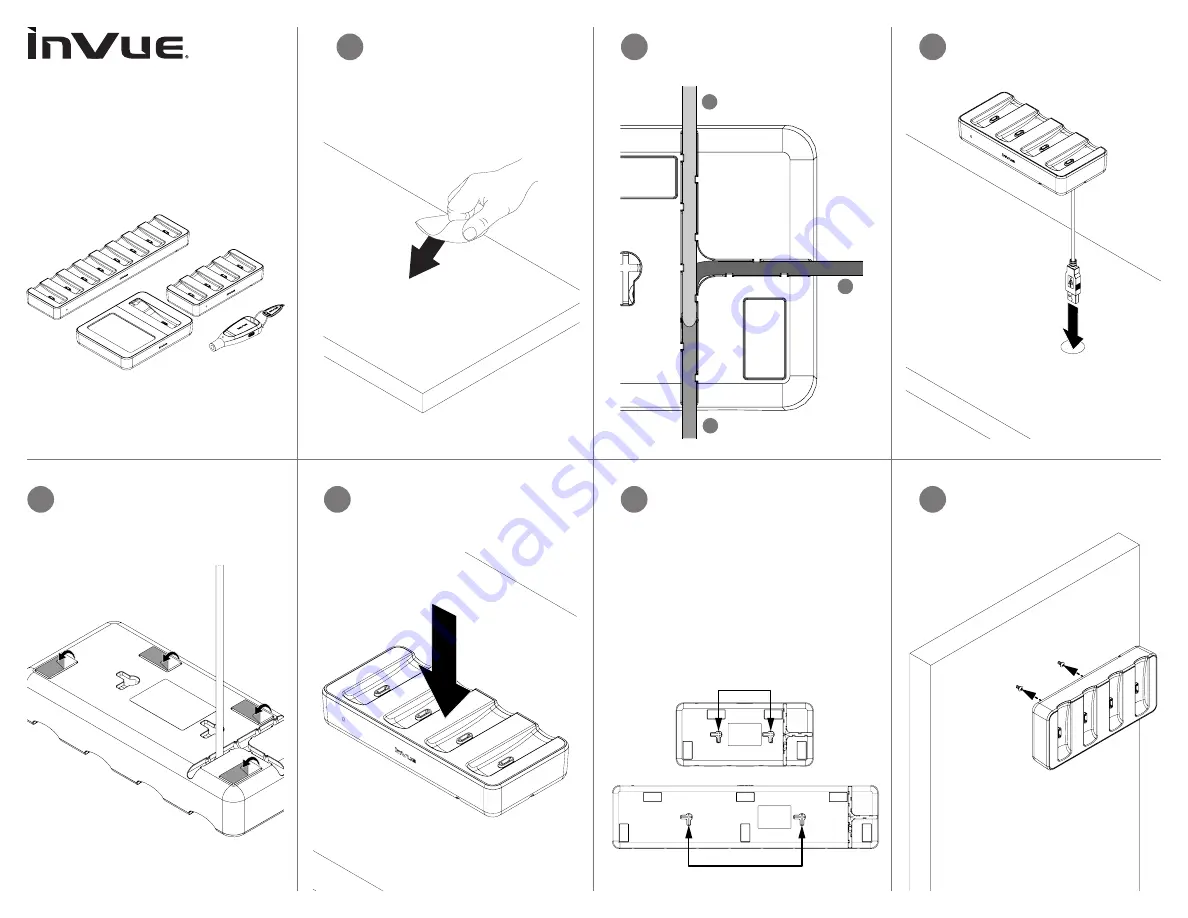
Section 1: Charger (4 & 8 

Position) Installation 

• Adhesive Mount - 

 Use the 

povided alcohol wipe to clean the 
area where the charger will be 
placed. Allow it to dry completely.

1a

CONTENTS: 

One pad saturated in 75%

Isopropyl Alcoho

l

DIRECTIONS:    


Apply topically as

needed to cleanse

 surface mounting area

.

FOR EXTERNA

L USE ONLY

KEEP OUT OF REACH OF

CHILDREN

KEEP AWAY FROM EY

ES

AND FIRE

Determine how the cable will be 
routed. There are 3 exits on the bot-
tom of each charger.

1b

Peel the clear film from the adhesives 
on the bottom of the charger (4 
adhesives on the 4 position charger 
and 6 on the 8 position charger).

1c

Route the cable as determined in 
Step 1b, place the charger where 
desired and apply pressure for at 
least 10 seconds.

1d

1

2

3

The cable can also descend down 
through the fixture if a hole or slot is 
present.

1c

2b

Place the charger onto the screws.

Screw Mount - 

Drill 2 small pilot 

holes based on the distances (either 
horizontally or vertically) below that 
correspond to your charger. 
• 4 Position Charger - 60mm (2 

3

/

8

 in).

• 8 Position Charger - 130mm (5 

1

/

8

 in).

Insert the screws (not provided, 
choose screws appropriate to the 
fixture’s material) into the pilot holes. 
Allow enough of the screw sticking 
out to hang the charger.

2a

60mm (2 

3

/

8

 in)

130mm (5 

1

/

8

 in)

Summary of Contents for OneKEY

Page 1: ...lear film from the adhesives on the bottom of the charger 4 adhesives on the 4 position charger and 6 on the 8 position charger 1c Route the cable as determined in Step 1b place the charger where desired and apply pressure for at least 10 seconds 1d 1 2 3 The cable can also descend down through the fixture if a hole or slot is present 1c 2b Place the charger onto the screws Screw Mount Drill 2 sma...

Page 2: ...a power outlet 7a Section 2 OneKEY Manager Installation Place the OneKEY Manager where desired and plug the PS512 power supply into the port on the back of the Manager Plug the power supply into a power outlet If using the Single Key Charger OK4101 slide the OneKEY into the charger Ensure that the charging contacts on the OneKEY align with the charging contacts on the charger 6 There are 2 version...

Page 3: ...customer invue am com Your Manager PIN Your Administrator User Name Password Your Adminstrator User Pin Your OKM Installer Code not needed if using the OKM without Access Manager The TCP port for the OKM If you do not have any of these credetials please reach out to the InVue Customer Service Team NA LATAM 704 752 6513 888 55 INVUE EMEA 31 23 8900150 APAC 852 3127 6811 9 9 Select Yes to proceed an...

Page 4: ...creen 15a 15a Locate the MAC address on the back side of the OKM near the ethernet port 15b 15b Match that to the corresponding entry in Access Manager 16 16 Ensure that the OKM is both Connected and Linked to the site Return to the OKM to finish setup 17a 17a Section 4 Create New Site Code You will then be asked if you are already using an InVue Onekey at your site Select No for a new installatio...

Page 5: ... OneKEY you are using IR4 will be for adding or replacing new OKMs Legacy IR2 or IR3 for existing IR ecosystems Transferring site codes from existing IR ecosystems is covered in Sections 5b 19a 19a Section 5a IR4 If IR4 is selected you will be prompted to place an existing key onto the OKM Place the Key onto the contacts on the OKM 19c 19c Once charged remove a OneKEY from the charger 19b 19b 19d ...

Page 6: ...ion 5bii IR3 If currently using the IR3 version contact InVue Customer Service to obtain a new IR2 Programming Station PK4401 and power supply PS512 Plug the power supply into the NEW Programming Station Note If currently using IR3 keys with an IR2 Programming Station use the existing station 22a 22a 22b 22b Place an IR3 OneKEY with the existing store code onto the Programming Station and press th...

Page 7: ...ged OneKEY from the charger 24 24 Ensure that this screen is displayed on the OKM 25 25 Place the Key onto the contacts on the OKM 26 26 The Key will sync with the OKM 27 27 If using Access Manger you will be prompted to enter your PIN to check out the key Note If not using Access Manager use the touchpad and press Check Out to activate the Key 28 28 Enter your PIN 29 29 The check out process will...

Page 8: ...n batteries The entire device should be recycled at an approved center for rechargeable batteries Do not immerse in water Do not place in a fire or excessive heat Do not disassemble punture or pierce 30 30 Your Key is now ready for use 31 31 Section 7 Checking in a OneKEY Ensure that this screen is displayed on the OKM 32 32 Place the Key onto the contacts on the OKM 33 33 The Key will sync with t...

Page 9: ...termined by turning the equipment off and on the user is encouraged to try to correct the interference by one or more of the following measures Reorient or relocate the receiving antenna Increase the separation between the equipment and receiver Connect the equipment into an outlet on a circuit different from that to which the receiver is connected Consult the dealer or an experienced radio TV tec...

Reviews: