

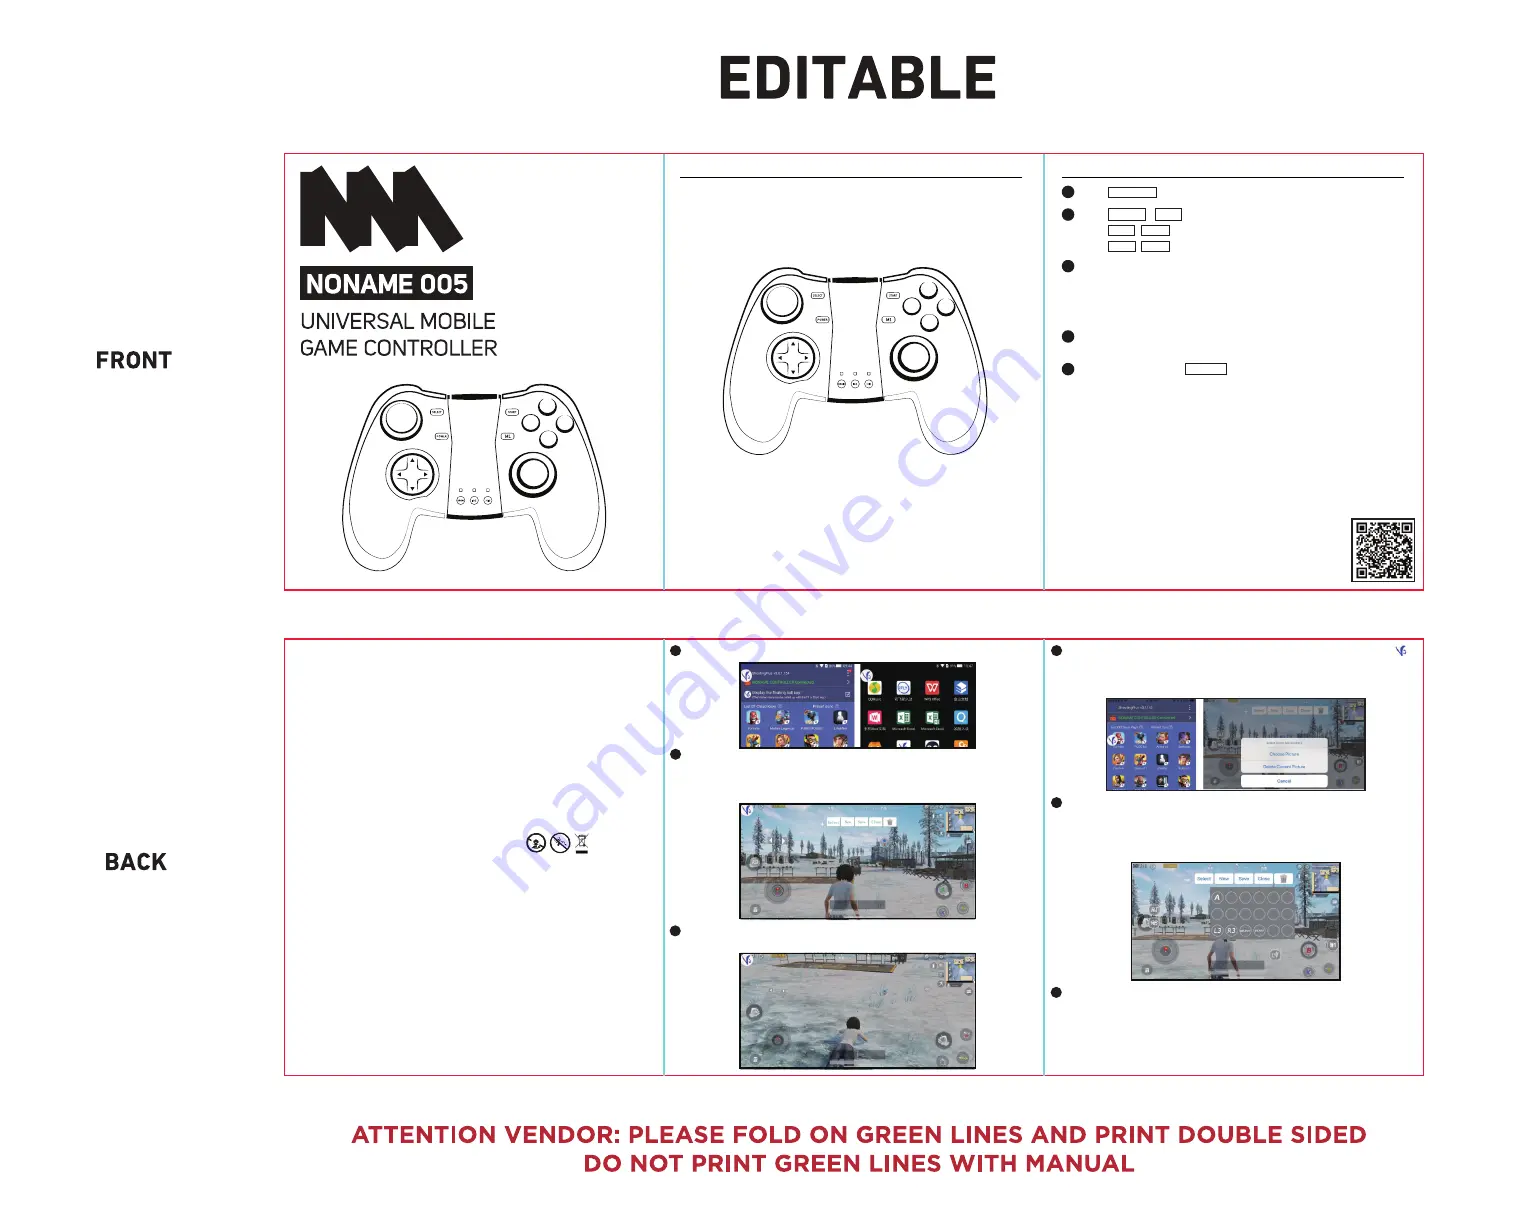
Thank you for purchasing and using the “NONAME 005” Game
Controller. This product can provide high quality gaming for mobile
phone. Before using this product, carefully read this manual to correctly
manipulate and play its best performance. Please ask your local dealer
or call us if you have any questions
YOUR NONAME PRODUCT
INSTRUCTIONS
Our product is warranted for a limited lifetime warranty from the date
of purchase. The warranty is provided on all material defects and
workmanship. Guarantee of 24 months does not apply to decrease
in the accumulators effective capacity caused by its use or age.
Effective capacity gradually decreases depending on the method of
use of the accumulator. WE RESERVE THE RIGHT TO CHANGE
TECHNICAL SPECIFICATIONS. For more information please visit,
www.goijoy.com
LIMITED LIFETIME WARRANTY
To avoid danger of suffocation, keep plastic bag away from babies and
children. Do not use this bag in cribs, beds, carriages or playpens. This
bag is not a toy. Disposal of old electrical & electronic equipment
(Applicable in the European Union and other European Countries with
separate collection systems.) The trash can symbol (seen on boom
right) on the product or on its packaging indicates that this product
shall not be treated as household waste. Instead it shall be handed
over at an applicable collection point for recycling of electronic
equipment. By ensuring this product is disposed of correctly, you will
help prevent potential negative consequences for the environment
and human health, which could otherwise be caused by inappropriate
waste handling. For more detailed information about this product,
please contact your local household waste disposal service or the shop
where you purchased this item.
OTHER IMPORTANT SAFETY INFORMATION
© Quest USA Corp.
NONAME is a registered trademark of Quest USA Corp.
All other trademarks and trade names are property of their
respective owners.
Designed by NONAME in New York. Made in China. All rights
reserved QUEST USA CORP. Brooklyn, NY. Limited lifetime warranty.
To activate your product warranty go to our website www.goijoy.com
& register this product.
The Controller has a built-in memory chip, and the user can freely define
the controller key inside the game by his own operating habits, and save
setting. It will be stored in the controller chip, can be called directly at the
next startup;The built-in chip can save up to 4 solutions.
Android users scan the QR code on the right to download
ShootingPlus V3 to map the button inside the game.
Apple users download ShootingPlus V3 in the "App Store"
to map the button inside the game.
Oper
a
tion S
teps f
or
ANDROID Users:
Oper
a
tion S
teps f
or
iO
S Users:
Button Mapping Steps:
LED2
LED3
Press
until the LED , Controller is ON;
POWER
1
Press
,
,
LED flashes,controller is under Android mode;
DROID
LED1
Press
LED flashes,controller is under IOS mode;
IOS
,
Press
LED flashes,controller is under standard mode;
HID
2
Switch the controller to right corresponding to your mobile phone (Android
or IOS),turn on Bluetooth on your mobile phone, search Bluetooth device,
find NONAME CONTROLLER and connect with it.
Note: Wrong mode phone (Android or IOS) will lead to wrong button
configuration which will influence the user experience.
3
LED is always on after successful connection between controller and
mobile phone.
4
Power On
:
Long press three seconds until the indicator light is off.
Sleep Mode: The controller automatically goes to sleep mode
without any operation without any operation within 10 minutes.
Wake up sleep: Press HOME key, the handle will release the sleep
state and automatically connect back to the last connected
Bluetooth device.
POWER
5
Open ShootingPlus V3 and enable the floating window permission
for this App.
1
2
3
If the user is not familiar with the key mapping data by themselves,
press
SELECT
to display the location of the key mapping.
X
LED1 LED2 LED3
B
A
Y
FUNCTIONS
X
LED1 LED2 LED3
B
A
Y
LEFT / RIGHT / L3 / R3
UP / DOWN / lEFT / RIGHT
A / B / X / Y
L1 / L2 / R1 / R2
M1
POWER
SELECT / START / POWER
DROID / IOS/HID
LED1 / LED2 / LED3
JOYSTICK:
D-PAD:
FUNCTION KEY:
TRIGGER:
EXPANDING KEY:
TURN ON/OFF:
CONTROL KEY:
MODEL KEY:
INDICATOR LIGHT:
Find the game, press
START
on the controller to call out the mapping
data in the game. Drag or modify the key data according to the
players operating habits. After the modification is completed, click
SAVE
to operate. Take “PUGB” as an example to change the interface
L
1
Take a screenshot and save in the game. Open ShootingPlus V3, click
to pop up the mapping interface. Long press the screen to chage the base
map, choose the button mapping screenshots, and import to the game.
Mapping modification is available.
2
Click + to bring up all the map buttons and drag the button to the place
you want to control. NOTE: if the key is not enough, you can call the
combination key; the combination key R1 can be combined with any key,
for example, R1+x, R1+L1. There will be a small red dot on the key-value
icon of the key combination.
3
After the modification is complete, click SAVE to open the game and play.
ATTENTION:
• iOS can’t call the menu and show the mapping position via START and
SELECT. Need to switch to ShootingPlus V3 to modify the mapping
data, save it and go back to the game.
• The function of the software is to change the controller key data, only
for mapping data.


