

SDMX PS/2 VGA- KVM-EXTENDER
SDMX PS/2 VGA- KVM-EXTENDER
SDMX PS/2 VGA- KVM-EXTENDER
Handbuch: http://www.ihse.de/pdf/b460-xx_e.pdf
Handbuch: http://www.ihse.de/pdf/b460-xx_e.pdf
Handbuch: http://www.ihse.de/pdf/b460-xx_e.pdf
1 Quick Setup
This section briefly describes how to install your KVM extender system. Unless you are an
experienced user, we recommend that you follow the full procedures described in the rest of this
manual. You can download the manual on:
http://www.ihse.de/pdf/b460-xx_e.pdf
.
2 Installation
For first-time users, we recommend that you carry out a test placement, confined to a single room,
before commencing full installation. This will allow you to identify and solve any cabling problems,
and experiment with the SDMX KVM- extender system more conveniently.
2.1 Package Contents
You should receive the following items in your SDMX KVM- extender package:
•
SDMX KVM-Extender- pair (Local Unit + Remote Unit)
•
1x 5V DC universal power supply for SDMX KVM- Extender (Remote Unit)
•
1x German type power cord
•
1x KVM CPU combination cable with PS/2 (6-pin MiniDIN male)
keyboard and mouse connectors, VGA video (HD15 male) connector, and
25-way (DB25 male) extender connector.
•
1x VGA video cable
•
1x audio cable (only devices with audio/serial option)
•
1x serial cable (only devices with audio/serial option)
•
Quick Start Guide (Quick Setup).
If anything is missing, please contact Technical Support.
2.2 System Setup
To install your SDMX- Extender system:
1.
Switch off all devices.
2.
Connect your keyboard, monitor(s) and mouse to the Remote Unit (depending on device type).
Please ensure, to not swap Mouse- and Keyboard connector. The Keyboard connector is purple
and the Mouse connector is green.
3.
Using the supplied CPU KVM cable(s), connect the keyboard, monitor(s) and mouse
connectors on the computer (or KVM switch). Please ensure, to not swap Mouse- and
Keyboard connector. The Keyboard connector is purple and the Mouse connector is green.
4.
Connect the 5V power supply to power the Remote Unit. The Local Unit normally takes power
through the PCs keyboard port. In video only applications, this connection is not used and so an
external PSU is required. Please contact Technical Support to obtain a suitable power supply.
Only use the power supply originally supplied with this
equipment or a manufacturer-approved replacement.
5.
If you have a dual access system, connect the keyboard, mouse and monitor for the Local
console to the appropriate ports on the Local unit. The ports may also be used to feed into a
KVM switch.
6.
Connect the interconnect cable to the INTERCONNECT socket(s)
7.
Power up the system.
2.3 Interconnection Cable Requirements
To connect SDMX KVM-Extender Local and Remote units you will need:
•
VGA, PS2-Keyboard, PS2-Mouse:
Connect the supplied VGA combination cable 1,8m
(VGA-Male, 2x PS2 Male on DB25 VGA/PS2-combination connector) with the CPU (KVM-
Switch, etc.). Please ensure that the connection is tension-free!
•
VGA:
Connect the supplied VGA- cable 1,8m (VGA-Male to VGA-Male) with the CPU
(KVM.- Switch, etc.). Please ensure that the connection is tension-free!
•
CATx cable:
Recommended cable: S/UTP (Cat5) according EIA/TIA 56A, TSB 36 or Digital
STP 17-03170. Four pairs AWG 24. Wiring according EIA/TIA 568A (10BaseT). Use of
cables from a higher category (Cat5e, Cat6, Cat7) is possible.
The use of unshielded CATx- cable is possible; because of the higher electromagnetic
noise/sensitivity, the device class may not be reached. You may use flexible cables (patch
cable) type AWG26/8 but because of the higher loss of the stranded cables, the maximum
extension distance is reduced to approximately half the value of solid cables.
A point-to-point connection is required. You may use one or more patch panels in the
line. Do not connect the CATx- link interface (RJ45) to any other products, especially
telecommunications or network equipment like Hub, Switch, Router etc.
•
Power Supply:
Connect the supplied 5V/DC power supply to the Plug terminal on the Remote
Unit of your SDMX –KVM-Extender system.
Power Supply for ’VGA only’ application:
•
Connect the optional power supply (434-2N) to the keyboard connector of the Local
Unit or
•
Connect the optional USB to PS2 Adapter (434-UP) to the keyboard connector of
the Local Unit
•
Serial cable:
Connect the supplied serial cable to your CPU/signal source.
•
Audio cable:
Connect the supplied audio cable to your CPU.
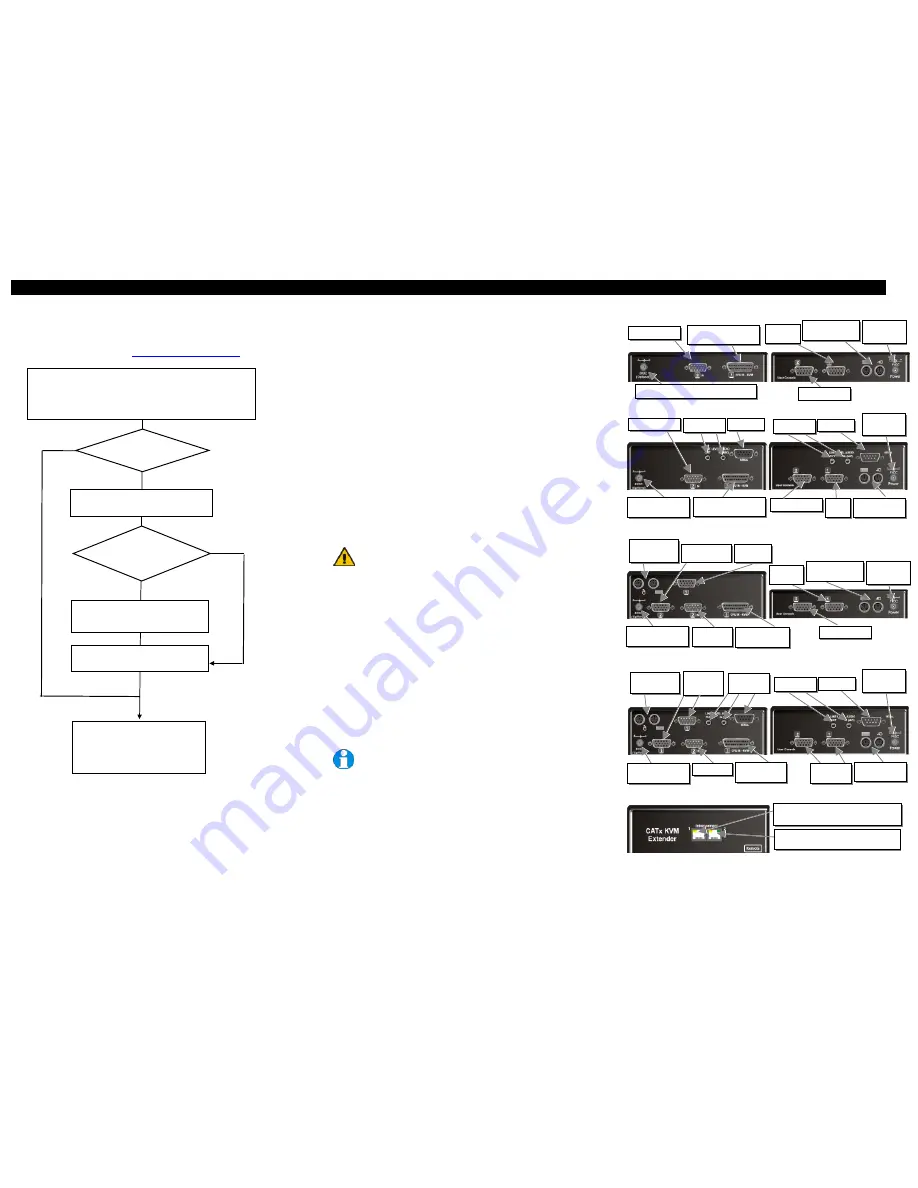
3 Device view (depending on device type)
SDMX KVM-Extender Type K460-SX Local and Remote Unit
SDMX KVM-Extender Type K460-SA Local and Remote Unit
SDMX KVM-Extender Type K460-DX Local and Remote Unit
SDMX KVM-Extender Type K460-DA Local and Remote Unit
SDMX KVM-Extender all types - Rear view of the Local and Remote Unit
Install system
1.
Connect Remote unit to KVM and audio/serial devices (if present).
2.
Connect Local unit to CPU or switch.
3.
Connect Local and Remote units with matching interconnection cable
(CATx).
4.
Power up the system.
Done
TFT Users:
Set monitor to auto-adjust,
or if you are an advanced user,
manually adjust the monitor’s clock
and phase for optimum video quality.
Single
NO
Configure
single channel or
both?
YES
Interconnect cable
>25m?
Enter Command Mode on Remote unit
<Left Control> + <Left Shift> + <F10>
INTERCONNECT 2 – carries
secondary video signals.
INTERCONNECT 1 – carries
primary video and data signals.
Choose video channel: <1> or <2>
Adjustments apply to selected channel.
2
nd
VGA In
Serial Out
Audio In/Out
2
nd
VGA In
1
st
VGA, Mouse/
Keyboard In
Serial Out
Audio In/Out
2
nd
VGA Out
1
st
VGA
Out
Mouse/ Keyboard
Out
VGA, Mouse/
Keyboard In
2
nd
VGA Out
2
nd
VGA
In
Mouse/Keyboard
Out Local
1
st
VGA
Out
2
nd
VGA Out
Local
Mouse/Keyboard
Out Local
Serial Out
Audio In/Out
VGA Out
Local (VGA
1
st
+
2
nd
)
Audio In/Out
Serial In
BOTH
Set Video Equalization
<Left Control> + <E>
More channels?
YES
NO
Connect to 1
st
VGA,
Mouse/ Keyboard
2
nd
VGA Out
Connect to 5V power supply (at ’VGA only’)
VGA, Mouse/
Keyboard In
2
nd
VGA In
VGA Out
(VGA 1+2
nd
)
Mouse/ Keyboard
Out
Connect to 5V
power supply
Connect to 5V
power supply
Connect to 5V power
supply (at ’VGA only’)
Mouse/ Keyboard
Out
Connect to 5V
power supply
1
st
VGA
Out
Connect to 5V power
supply (at ’VGA only’)
Connect to 5V power
supply (at ’VGA only’)
Mouse/ Keyboard
Out
Connect to 5V
power supply
1
st
VGA
Out


