background image

1

1

1

1

2

3

4

4

5

6

7

8

9

10

11

12

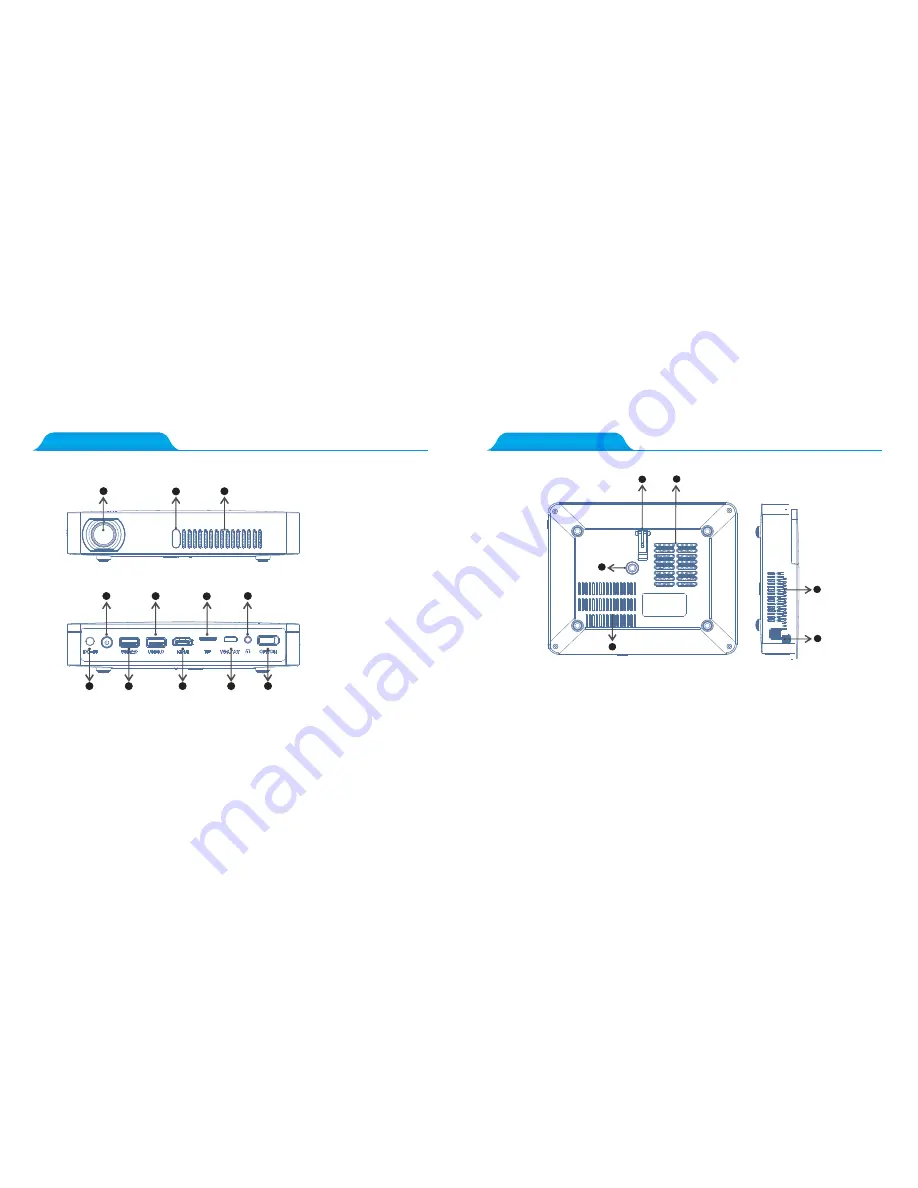
1.Projector Overview~1

1.Projector Overview~2

1. Height bracket    2. Air intake holes    3. Screw Mount (M5)
4. Battery ventilation holes   5. Ventilation holes    6. Focusing knob

Kind reminder:

 Please ensure that you are using the correct cable for the VGA/AV port!


            (For more details please inquire with your distributor) .

Kind reminder:


It’s strictly prohibited to block the air intake window,

                              which may cause over heating and damage the projector.

1

1

2

3

4

5

6

1. Projection lens 
2. Front IR remote
   controlling sensor 
3. Ventilation holes
4. Power on/off
5. USB 3.0 ports
6. TF card reader
7. 3.5mm earphone ring
8. Adapter connection port 
9. U disk/mouse port
10. HDMI input port 
11. Computer/video port 
12. Switch botton

Summary of Contents for CB400

Page 1: ...e for the VGA AV port For more details please inquire with your distributor Kind reminder It s strictly prohibited to block the air intake window which may cause over heating and damage the projector 1 1 2 3 4 5 6 1 Projection lens 2 Front IR remote controlling sensor 3 Ventilation holes 4 Power on off 5 USB 3 0 ports 6 TF card reader 7 3 5mm earphone ring 8 Adapter connection port 9 U disk mouse ...

Page 2: ...RAM 1GB DDR3 Operation system based on Android 4 4 Bluetooth support bluetooth 4 0 TF 32GB Max DC power jack x 1 USB 3 0 x 1 TF card reader x1 3 5mm earphone jack x 1 Brightness 3000 lumens international standard 500Ansi Lumens Battery capacity 10 000 mAh Speaker 2W 2 N W 600g GPU Mali 450MP2 ROM 8GB eMMC USB 2 0 x 1 HDMI x 1 VGA AV x 1 IR IR remote control Smart phone pusher Airplay Miracast etc ...

Page 3: ...key 2 OFF Press the power key while the projector is working normally if the indicator light turns from green to red the projector is off 5 How to Focus 4 Power ON OFF 5 How to Focus Switch on Switch off Adjust the focus button up or down lightly until the image is clear Adjust the focus button up or down lightly until the image is clear 150 inch 120 inch 100 inch 80 inch 60 inch ...

Page 4: ...G JPEG GIF BMP PNG etc MP4 AVI MOV FLV VOB 3GP MPG RMVB WMV etc Connect mouse keyboard USB stick WiFi connection steps Please press the main interface on the remote controller until the main screen appears Please press System Setting to find the Wi Fi Setting and select wireless network you wish to connect to from the list please refer to the picture below The virtual key board will be shown at th...

Page 5: ...rface on the remote controller until the main screen appears click on Settings find the Bluetooth device you wish to connect to and select said device 3 Select the Bluetooth device which you want to link in the list click the device and then connect it is ok Please press the main interface on the remote controller until the main screen appears press Home and then Browser The default website is Goo...

Page 6: ...isk device select the sda1 and then the file you wish to play Note Please try using the included office software when a file cannot be opened directly Please press the main interface on the remote control until the main screen appears select Multi Media and then ES explorer finally select the sda1 in Local Select the file that you wish to modify and in mouse mode right click the file in order to c...

Page 7: ...pp on your mobile 4 Connect Happy Cast on your mobile with the projector Cast KX in the connection list 5 Press the Play button on Happy Cast app on your mobile to start casting Note Android mobile devices please follow the instructions to project with HappyCast Instructions can be found within the Happy Cast application Please press the main interface on the remote control whent he main screen ap...

Page 8: ...Connect the iOS device to the same wireless network as your projector 4 Open Airplay on your iOS device and connect with Cast KX in the connection list Note Due to future possible iOS updates the Happy Cast app may not work particularly well when trying to cast to the projector via the wireless display function Step Open Airplay on your IOS device and click the CastKX button in the connection list...

Page 9: ...ion holes 4 Please avoid stabbing crushing or any damage to the device and battery 5 Do NOT get the battery wet avoid use in high humidity environments 1 3D video play When playing video compatible DLP 3D formats of videos will be automatically recogni zed the projector will automatically switch to 3D mode if this is unsuccessful please press the 3D button on theremote control when the main screen...

Page 10: ...Clean the shell regularly with a damp cloth neutral detergent can be used Please use a glasses cloth or lens paper not to scratch the lens Please clean projector s vents and speakers regularly by banister brush or the vents will be blocked When you ve finished using the projector the exhaust port may be very hot be careful not to burn yourself While projecting please do not look the lens directly ...

Reviews: