2 Heat/2 Cool
7-Day Programmable
Hardwired
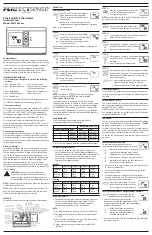
SC 3801
Programmable Electronic Thermostat
• Programmable and Configurable
• Single/Dual Stage Heat Pump Systems
• Single/Dual Stage Heat/Cool Systems
• Backlit Display
• Auto Changeover
• Simpleset
®
7 Day Programming
• Compatible with Gas, Oil, or Electric
• Title 24 Compliant/No Batteries Required
• Relay Outputs
(minimum voltage drop in thermostat)
• Ideally Suited for:
–
Residential (New Construction/Replacement), Light Commercial
Installation, Operation & Application Guide
For more information on our complete range of American-made
products – plus wiring diagrams, troubleshooting tips and more,
visit us at
www.icmcontrols.com