manualshive.com logo in svg
background image


One Blue Hill Plaza, 16

th

 Floor, PO Box 1546 

Pearl River, NY 10965 

1-800-722-6374 

(Voice) 845-920-0800 (Fax) 845-920-0880


1 | 

P a g e


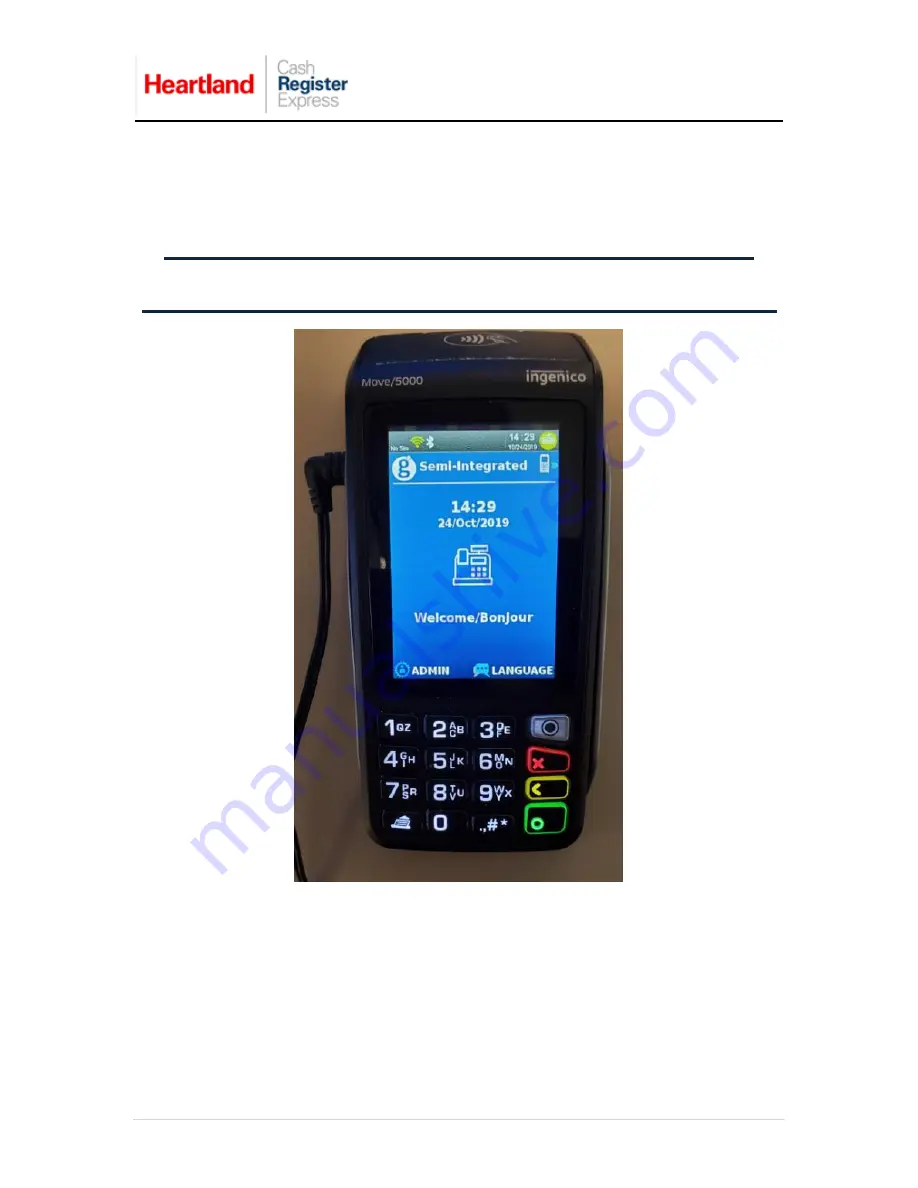
Ingenico Move/5000 EMV Certified 

PINpad with Global Payments Canada 


Cash Register Express now supports payment processing with EMV chip enabled cards through 

the 

Ingenico Move/5000 

EMV PINpad device. This document provides step-by-step instructions 

on installation and usage of the 

Move/5000 

with Cash Register Express. 


Note:

 To use Global Payments EMV as a payment processor, you must be using 

version 12.8001


or above. 


Содержание Ingenico Move

Страница 1: ... Global Payments Canada Cash Register Express now supports payment processing with EMV chip enabled cards through the Ingenico Move 5000 EMV PINpad device This document provides step by step instructions on installation and usage of the Move 5000 with Cash Register Express Note To use Global Payments EMV as a payment processor you must be using version 12 8001 or above ...

Страница 2: ...ING ON SCREEN SIGNATURE OPTIONAL 18 CONFIGURE PINPAD FOR DEBIT CASH BACK FEATURE OPTIONAL 20 PERFORMING A CREDIT CARD SALE 24 PERFORMING A CREDIT CARD SALE USING AN EMV ENABLED CARD 26 PERFORMING A CREDIT CARD SALE USING A CONTACTLESS ENABLED CARD 28 PERFORMING A MANUAL CARD ENTRY 30 PERFORMING A DEBIT CARD SALE 33 PERFORMING A DEBIT CARD SALE WITH CASH BACK OPTIONAL 35 PERFORMING A RETURN 39 PERF...

Страница 3: ...here are enough additional internet connections for each PINpad device you will be installing Each register running card transactions must have its own Move 5000 device Move 5000 devices may not be shared among registers Credit card settlements must be done in CRE on every station where a Move 5000 device is connected and you must enter a password on the PINpad to begin the settlement The Move 500...

Страница 4: ... Also settlements must be run through CRE on each register that has a Move 5000 unit connected and processing card transactions 1 Here is what the device looks like 2 Locate the included DC power cord model number PSM08A 0501 3 Connect power cord into your AC outlet or surge protector 4 Connect adaptor to the left side of the device ...

Страница 5: ... e 5 The PINpad will turn on and make a beeping sound when the connection is properly established Note The device must stay connected to a power source or be fully charged before proceeding to the next section ...

Страница 6: ...0 connected to a power source or fully charged If the screen turns off select the green button on keypad to turn screen back on This only happens when the device isn t connected to power source 1 With the PINpad powered on touch the screen to stop the screen saver then press the ADMIN button on screen 2 Select Setup Menu 3 ...

Страница 7: ...7 P a g e 3 Enter the Admin Name Password then press the green button on the keypad 4 Select Communications 2 5 Select Wi Fi 3 6 Select WiFi Easy Conn 1 ...

Страница 8: ...a g e 7 Select Wireless Network 8 Enter WIFI Password using on screen keyboard 9 Select Advanced Setup 2 10 Select IP Settings 2 Note Make sure WiFi is toggled On 11 Select WiFi Static IP 2 and select Enter ...

Страница 9: ...een button on the keypad to accept and commit values NOTE If you wish to use a specific IP that differs from what was obtained enter it in the TerminalIP before accepting and committing values 13 The menu should display as in this image when configured for static IP 14 From the Ethernet Menu select Current Setup then Display Params ...

Страница 10: ...10 P a g e 15 Select PRINT so you have a hard copy of the WIFI PARAMS Keep this handy as you will need it later ...

Страница 11: ...llow the instructions below to set up communication between CRE and the Ingenico Move 5000 device 1 With the PINpad powered on touch the screen to stop the screen saver then select ADMIN 2 Scroll down and select Misc Options or press 8 on the keypad ...

Страница 12: ...12 P a g e 3 Enter Manager ID Password and select Enter or press the green button on the keypad 4 Select Semi integrated 1 5 Select Communication Type 2 6 Select Enter ...

Страница 13: ...13 P a g e 7 Enter a port number In this example we re using 100 You can use 443 Select Enter Note Record this port number for later configuration in CRE ...

Страница 14: ...rinting This is to configure the PINpad to print through CRE s receipt printer 1 With the PINpad powered on touch the screen to stop the screen saver then select ADMIN 2 Scroll down then select Misc Options or press 8 on the keypad ...

Страница 15: ...15 P a g e 3 Enter Manager ID Password and select Enter or press the green button on the keypad 4 Select Semi integrated 1 5 Select Receipt Options 3 ...

Страница 16: ...16 P a g e 6 Select ECR 1 then select Enter 7 Press the red button on the keypad until you re back at the startup screen ...

Страница 17: ...p screen select the Payment Processing tab 4 Select the Processing tab 5 Select Credit Debit 6 Select Global Payments Canada from the Payment Processor dropdown list 7 Select TCP IP under the Communication Type section 8 Enter the IP Address configured in step 12 of the Connecting to Existing Network section Refer to the printout created during that process 9 Verify that the Port No value matches ...

Страница 18: ...e will print on the receipt If it s not enabled the receipt will print a signature line for the customer to sign 1 Select the Manager or Options button and enter the credentials if prompted 2 Select Setup then Setup Screen 3 Select Account Control 4 Under the Accept Digital Signature On select the Credit Cards checkbox 5 Select Update ...

Страница 19: ...19 P a g e 6 After the PINpad completes a credit card transaction CRE will prompt for customer signature 7 Sign using the touch screen and then select Done Note Signature will print on both receipts ...

Страница 20: ...iguring this feature will prompt the customer for cash back when doing a debit sale Batch must be closed before performing this change Follow Instructions below 1 With the PINpad powered on touch the screen to stop the screen saver then select ADMIN 2 Select Setup Menu 3 ...

Страница 21: ...21 P a g e 3 Enter Admin Name Password then select Enter or press the green button on the keypad 4 Select Trans Options or press 4 on the keypad ...

Страница 22: ...22 P a g e 5 Select Debit or press 2 on the keypad 6 Select CashBack or press 1 on the keypad 7 Select Debit and press Enter ...

Страница 23: ...K SETUP screen enter desired value for the CashBackLmt then do the same for the three CashBackAmt boxes Select the green button on the screen to confirm Select the red button on the keypad until you are returned to the Splash Screen Note Screenshot of this setup is on step 4 ...

Страница 24: ...essing credit card sales To process a sale with the swipe card follow these instructions 1 After you ve added items to an invoice and selected Credit in CRE the PINpad will prompt you to Tap Insert Swipe a card as depicted in this image 2 Swipe the credit card through magnetic stripe reader on the side of the PINpad ...

Страница 25: ...25 P a g e 3 When prompted Enter Last 4 digits of Card using the keypad 4 When the sale is complete the PINpad will display a message similar to the one depicted on the left ...

Страница 26: ...credit card sale with an EMV card follow the steps below 1 After you ve added items to an invoice and selected Credit in CRE the PINpad will prompt you to Tap Insert Swipe a card as depicted in this image 2 Insert the credit card into the chip reader slot on the bottom of the PINpad ...

Страница 27: ...27 P a g e 3 Wait for the PINpad to approve the sale Do not remove the card from the PINpad 4 When the sale is complete the PINpad will display Approved REMOVE CARD ...

Страница 28: ... To complete a credit card sale with a contactless card follow the steps below 1 After you ve added items to an invoice and selected Credit in CRE the PINpad will prompt you to Tap Insert Swipe a card as depicted in this image 2 Tap the credit card on the top of the terminal ...

Страница 29: ...29 P a g e 3 Wait for the PINpad to process the sale 4 When the sale is complete the PINpad will display an approval message as shown on the left ...

Страница 30: ... information by following the steps below 1 After you ve added items to an invoice and selected Credit in CRE the PINpad will prompt you to Tap Insert Swipe a card as depicted in this image 2 Using the keypad on the device enter the card number and press the green button 3 When prompted Enter Expiration Date MMYY and press the green button ...

Страница 31: ...31 P a g e 4 Enter Manager ID and Password then select Enter 5 Answer the Card Present Prompt by selecting Yes or No Note If you select Yes skip to step 7 ...

Страница 32: ...m the back of the credit card using the keypad on the device Note This prompt should display only for card not present scenarios 7 When the sale is complete the PINpad will display an approval message similar to the one pictured on the left ...

Страница 33: ...ds only 1 After you ve added items to an invoice and selected Credit in CRE the PINpad will prompt you to Tap Insert Swipe a card as depicted in this image 2 Insert the card on the PINpad Verify the amount displayed on the PINpad is correct and Press Yes or press the green button on the keypad to approve 3 When prompted Select Account type ...

Страница 34: ...34 P a g e 4 Using the keypad Enter PIN when prompted 5 Wait for process to complete 6 When the sale is complete the PINpad will display an approval message similar to the one pictured on the left ...

Страница 35: ...e that this pertains to EMV debit cards only 1 After you ve added items to an invoice and selected Credit in CRE the PINpad will prompt you to Tap Insert Swipe a card as depicted in this image 2 Insert the card on the PINpad Verify the amount displayed on the PINpad is correct and select Yes or press the green button on the keypad to approve ...

Страница 36: ...s for cash back 4 Select one of the pre defined CASH BACK AMOUNTS or select Other to enter another amount In this example we have selected 10 00 Note Amount must not exceed the CashBackLmt amount set in the cash back options in the PINpad ...

Страница 37: ...37 P a g e 5 Verify that the totals are correct and select Accept to proceed 6 When prompted Select Account type ...

Страница 38: ...P a g e 7 Enter Pin number then select green button on keypad 8 When the sale is complete the PINpad will display an approval message similar to the one pictured on the left including the cash back amount ...

Страница 39: ...more details 1 After you ve selected Credit to process the return in CRE the PINpad will prompt you to Enter Manager ID Password Once you ve entered credentials select Enter 2 Insert or swipe the card you want the refund to be processed on 3 If swiped it will prompt you for the last 4 digits of the card Use the number pad to enter these and then press the green button to submit An approval message...

Страница 40: ...ter you ve selected Void in CRE the PINpad will prompt you to Enter Manager ID Password Once you ve entered credentials select Enter 2 The PINpad will display a list of results You can scroll through the list by using the left and right arrows 3 Using the receipt verify the Credit Sale amount last four digits of the Account card number Auth code and Reference number 4 Select the green button on sc...

Страница 41: ...41 P a g e 5 Select Yes to confirm the void 6 When the void is complete the PINpad will display an approval message ...

Страница 42: ...h at the end of the day you must initiate the settlement in CRE and then enter credentials on PINpad to complete the action 1 Select the Manager or Options button and enter the credentials if prompted 2 Select Administrative then Credit Card Settlement 3 Select Settle ...

Страница 43: ...43 P a g e 4 The PINpad will prompt you to Enter Manager ID Password Once you ve entered credentials select Enter 5 Press Yes to start the settlement 6 Verify the settlement preview then Select Accept ...

Страница 44: ...44 P a g e 7 Wait for device to connect to processor 8 Once the batch has been confirmed and approved the PINpad will display a message to that effect and will print a settlement report ...

Страница 45: ...ts Answer Yes to print a detailed report or No to proceed with the settlement without the report 10 Wait for the settlement to finalize Note Once the settlement is complete CRE will display an settlement status message and the PINpad will return to the splash screen ...

Отзывы: