background image

HOME FITNESS

RECUMBENT BIKE / VÉLO COUCHÉ 

Содержание GZE-2032

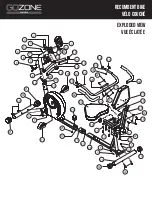
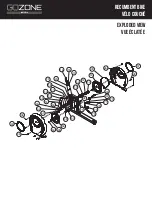
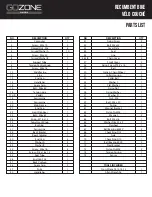
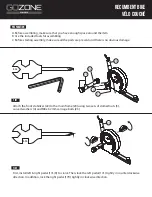
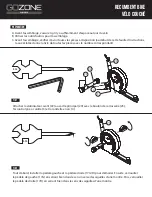
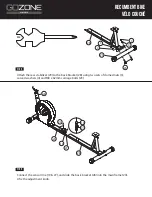
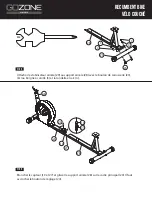
Страница 1: ...HOME FITNESS RECUMBENT BIKE V LO COUCH...

Страница 2: ...O COUCH 11 12 1 12 39 38 44 45 3 31 38 43 39 40 41 42 12 24 25 19 28 13 14 15 41 17R 14 10 2 3 4 4 5 6 7 8 8 16 21 21 3 4 22 23 18 19 20 9 17L 3 33 34 36 4 29 30 30 33 34 35 36 37 9 32 31 3 23 27 26 4...

Страница 3: ...HOME FITNESS 16 20 18 19 51 52 53 54 50 49 46R 47 48 48 64 65 66 67 59 58 51 52 57 56 55 60 75 72 73 74 48 69 67 70 71 61 62 63 68 48 47 RECUMBENT BIKE V LO COUCH EXPLODED VIEW VUE CLAT E...

Страница 4: ...L R Pedals 2 57 Washer D 1 18 Sensor Line 1 58 Nut M6 1 19 Sensor Line 1 59 Bolt M6 x 20 1 20 Main Frame 1 60 Spring 1 21 End Cap 2 61 Magnet Bracket 1 62 Nylon Nut M6 1 22 Front Stabilizer 1 63 Magn...

Страница 5: ...D Pedals 2 57 Rondelle D 1 18 C ble du Capteur 1 58 crou M6 1 19 C ble du Capteur 1 59 Boulon M6x20 1 20 Cadre Principal 1 60 Ressort 1 21 Capuchon 2 61 Porte Aimant 1 62 crou en Nylon M6 1 22 Stabil...

Страница 6: ...ine Always inspect your machine to make sure the bolts screw nuts and other parts are in safe and stability situation Before exercising always do warm up exercises first If the user experiences dizzin...

Страница 7: ...tres accessoires que ceux recommand s par le fabricant Ne pas placer d objets pointus autour du v lo Toujours inspecter le v lo pour v rifier que les boulons les vis les crous et toutes les autres pi...

Страница 8: ...s are present and there is no obvious damage FIG1 Attach the front stabilizer 22 to the main frame 20 using two sets of domed nuts 3 curved washers 4 and M8 x 62mm carriage bolts 23 FIG 2 First instal...

Страница 9: ...28 using two sets of domed nuts 3 curved washers 4 and M8 x 62mm carriage bolts 23 S13 FIG 4 Connect the sensor line 19 27 and slide the back bracket 28 into the main frame 20 A fix the adjustment kno...

Страница 10: ...es les pi ces avec le nombre correspondant Fig 1 Attacher le stabilisateur avant 22 au cadre principal 20 avec le boulon de carrosserie 23 l crou borgne calotte 3 et la rondelle en arc 4 FIG 2 Tout d...

Страница 11: ...le boulon de carrosserie 23 l crou borgne calotte 3 et la rondelle en arc 4 S13 FIG 4 Brancher le capteur 19 et 27 et glisser le support arri re 28 sur le cadre principal 20 Il faut accrocher le bouto...

Страница 12: ...5 to the back bracket 28 with 4 sets of flat washers 34 and bolts 33 FIG 6 Attach the back cushion 37 and the seat cushion 44 to the seat tube 35 with flat washers 34 and bolts 33 28 9 32 31 28 44 33...

Страница 13: ...seat tube 35 with carriage bolt 42 flat washer 31 and nut 3 STEP 8 Connect the sensor 10 19 and tension control wire 8 16 as shown and install the support tube 7 on the main frame 20 with curved wash...

Страница 14: ...S STEP 9 Attach handlebar 13 onto support tube 7 with bolt 15 flat washer 4 and nut 3 STEP 10 Attach computer 1 onto support tube 7 with nut 2 3 2 7 10 11 1 1a 1b 4 7 15 13 1a 1b 11 10 RECUMBENT BIKE...

Страница 15: ...se your duration and reduce speed The longer and harder you workout the more calories you will burn This is what is considered a standard workout As you become more fit you will be able to increase sp...

Страница 16: ...until the pointer advance to DISTANCE The distance of each workout will be displayed 4 CALORIE Press the MODE key until pointer lock on to CALORIE The calorie burned will be displayed when starting ex...

Страница 17: ...35 au support arri re 28 avec la rondelle plate 34 et le boulon 33 FIG 6 Attacher le coussin arri re 37 et le coussin 44 au tube du coussin 35 avec la rondelle plate 34 et le boulon 33 28 9 32 31 28...

Страница 18: ...ue de recouvrement 43 et le guidon 40 au tube du si ge 35 avec le boulon de carrosserie 42 la rondelle plate 31 et l crou 3 Fig 8 Brancher le capteur 10 et 19 et le c ble de la commande de la tension...

Страница 19: ...er le guidon 13 au tube de support 7 avec le boulon 15 la rondelle plate 4 et l crou 3 STEP 10 Attacher l ordinateur 1 sur le tube de support 7 avec l crou 2 3 2 7 10 11 1 1a 1b 4 7 15 13 1a 1b 11 10...

Страница 20: ...possible de devoir r duire la vitesse pour garder la fr quence cardiaque dans la zone cible Perte de Poids Le facteur le plus important ici est la somme des efforts faits lors des s ances d exercices...

Страница 21: ...vitesse actuelle s affiche 3 DISTANCE Appuyer sur la touche MODE jusqu ce que le curseur passe sur DISTANCE La distance parcourue lors de chaque s ance s affiche 4 CALORIE Appuyer sur la touche MODE j...

Отзывы: