background image

183D6379P086 REV.56

Write the model and serial  

numbers here:

Model #  ________________
Serial #   ________________

You can find them on a label 

behind the drawer or behind the 

lower oven door on the front of 

the range frame.

Owner’s Manual

Ra

ng

es

Safety Instructions

 . . . . . . . . .

2–6

Operating Instructions


Care and Cleaning

Troubleshooting Tips 

. . . 28-31


Printed on 

Recycled Paper

El

ec

tri

c F

ree-

St

an

di

ng

Models
EML27
JBS27

Surface Units . . . . . . . . . . . . . . . . . . 7,8

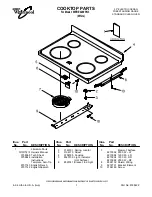
Glass Cooktop . . . . . . . . . . . . . . . 9, 10

Oven . . . . . . . . . . . . . . . . . . . . . . 11-20

Clock and Timer . . . . . . . . . . . . . 17

Control Lock Out . . . . . . . . . . . . . . 18

Energy Saver Mode . . . . . . . . . . . 18

Controls . . . . . . . . . . . . . . . . . 11

Power Outage . . . . . . . . . . . . . . 12

Aluminum Foil . . . . . . . . . . . . . . . 13

Broiling Guide . . . . . . . . . . . . . . 14

Clock and Timer . . . . . . . . . 15-16

Adjust the Oven Thermostat . . 17

Special Features . . . . . . . . . . . . . . 17

Sabbath Features . . . . . . . . . . . . 18

Self-Cleaning . . . . . . . . . . . . . . .19,20 

Control Knobs . . . . . . . . . . . . . . . . . . 21

Coil Surface Units . . . . . . . . . . . . . . . 22

Drip Pans . . . . . . . . . . . . . . . . . . . . . . . 22

Lift-Up Cooktop . . . . . . . . . . . . . . . . .  22

Standard-Clean Oven Interior . . . 23

Oven Vent . . . . . . . . . . . . . . . . . . . . . . 23

Porcelain Oven Interior . . . . . . . . . . 23

Lift-Off Oven Door . . . . . . . . . . . . . . 24

Oven Heating Elements . . . . . . . . . 24

Oven Racks . . . . . . . . . . . . . . . . . . . 24

Storage Drawer Removal . . . . . . . 24

Light . . . . . . . . . . . . . . . . . . . . . . . . . . . 25

Stainless Steel Handles . . . . . . . . . 25

Glass Cooktop . . . . . . . . . . . . . . . 26, 27

Summary of Contents for EML27

Page 1: ...s EML27 JBS27 Surface Units 7 8 Glass Cooktop 9 10 Oven 11 20 Clock and Timer 17 Control Lock Out 18 Energy Saver Mode 18 Controls 11 Power Outage 12 Aluminum Foil 13 Broiling Guide 14 Clock and Timer...

Page 2: ...is securely attached to the floor or wall and slide the range back so the rear leveling leg is under the anti tip bracket If the range is pulled from the wall for any reason always repeat this procedu...

Page 3: ...injured Use only dry pot holders moist or damp pot holders on hot surfaces may result in burns from steam Do not let pot holders touch hot surface units or heating elements Do not use a towel or othe...

Page 4: ...ooking frozen foods with excessive amounts of ice bottoms large enough to cover the surface heating element The use of undersized cookware will expose a portion of the surface unit to direct contact a...

Page 5: ...laced by a qualified service technician To avoid the possibility of a burn or electric shock always be certain that the controls for all surface units are at the OFF position and all coils are cool be...

Page 6: ...cks may be left in the oven Do not use self clean to clean other parts such as drip pans or bowls Before operating the self clean cycle wipe grease and food soils from the oven Excessive amount of gre...

Page 7: ...irection to the setting you want A surface ON indicator light will glow when any surface unit is on For glass cooktop surfaces A HOT COOKTOP indicator light will come on when the unit is hot to the to...

Page 8: ...d procedures from reputable sources These are available from manufacturers such as Ball and Kerr and the Department of Agriculture Extension Service Flat bottomed canners are recommended Use of water...

Page 9: ...cooktop retains enough heat to continue cooking To avoid overcooking remove pans from the surface units when the food is cooked Avoid placing anything on the surface unit until it has cooled complete...

Page 10: ...ass cooktops Poor conductivity and slow to absorb heat Will scratch the cooktop surface Check pans for flat bottoms by using a straight edge Pans with rounded curved ridged or warped bottoms are not r...

Page 11: ...e or See the Using the clock and timer section Automatic Oven Light n e e b s a h n e v o e h t e m i t y n a s t h g i l s i h T programmed using the Cooking Time or Start Time Delay Startfunctions L...

Page 12: ...s Flashing Display Power Outage If a flashing time is in the display you have experienced a power failure Reset the clock See the Using the clock and timer section If your oven was set for a timed ove...

Page 13: ...c a l p e R knob to the shaft and check performance Turn the OVEN TEMP knob to the setting you want Preheat the oven for 10 minutes for baking The oven on light comes on when the burner is on It will...

Page 14: ...hould be 2 5 cm to 7 5 cm from broil element Steaks less than 1 2 5 cm thick are difficult to cook rare They cook through before browning To prevent curling of meat slash fat at 2 5 cm intervals Mediu...

Page 15: ...e display reverts to the original setting If this happens repeat Step 1 and reenter the time of day Touch the Start On pad until the time of day shows in the display This enters the time and starts th...

Page 16: ...time will start counting down although the display does not change until one minute has passed When the timer reaches 00 the control will beep 3 times followed by one beep e pad is touched very 6 seco...

Page 17: ...ontrol set in this special features mode You may find that your new oven cooks differently than the one it replaced Use your new oven for a few weeks to become more familiar with it If you still think...

Page 18: ...some models Designed for use on the Jewish Sabbath and Holidays How to Set Sabbath Feature for Regular Baking NOTE To understand how the oven control works practice using regular baking non Sabbath b...

Page 19: ...e birds is extremely sensitive to the fumes given off during the self cleaning cycle of any range Move birds to another well ventilated room Wipe up heavy soil on the oven bottom How to Set the Oven f...

Page 20: ...or the door to be unlatched While the oven is self cleaning you can press the Clock pad to display the time of day To return to the clean countdown press the Self Clean pad Apply a small amount of veg...

Page 21: ...wders steel wool or harsh abrasives on any painted surface How to Remove Protective Shipping Film and Packaging Tape Carefully grasp a corner of the protective shipping film with your fingers and slow...

Page 22: ...with clean water and polish with a clean soft cloth The drip pans may also be cleaned in a dishwasher Clean the area under the drip pans often Built up soil especially grease may catch fire Do not co...

Page 23: ...is located at the top of the oven Carefully wipe the sensor clean after each oven cleaning being careful not to move the sensor as a change in its position could affect how the oven bakes Do not spray...

Page 24: ...door Removal position Oven Heating Elements Do not clean the bake element or the broil element Any soil will burn off when the elements are heated To clean the oven floor gently lift the bake element...

Page 25: ...t use scouring pads powdered cleaners bleach or cleaners containing bleach because these products can scratch and weaken the finish Wirecoverholder Be sure to let the light cover and bulb cool complet...

Page 26: ...lish the entire surface with CERAMA BRYTE Ceramic Cooktop Cleaner and a paper towel The CERAMA BRYTE Ceramic Cooktop Scraper and all recommended supplies are available through our Parts Center See ins...

Page 27: ...have to be replaced In this case service will be necessary Damage from Sugary Spills and Melted Plastic Our testing shows that if you are cooking high sugar mixtures such as jelly or fudge and have a...

Page 28: ...loration Food spillovers not cleaned See the Cleaning the glass cooktop section on the radiant glass before next use cooktop Hot surface on a model This is normal The surface may appear discolored wit...

Page 29: ...he Using the oven section broil properly position as recommended Oven controls improperly set Make sure you touch theBroil Hi Lo pad Improper rack position See the Broiling Guide being used Cookware n...

Page 30: ...erly set See the Using the self cleaning oven section Oven door is not in the locked Make sure you move the door latch handle all the position way to the right Crackling or This is the sound of the Th...

Page 31: ...turned off from See the Using the clock and timer and or the Energy showing in the display Saver Mode section Unable to get the Oven control pads were The Bake and Broil Hi Lo pads must be touched di...

Page 32: ...32 Notes...

Page 33: ...33 Notes...

Page 34: ...This book is printed on recycled paper Printed in Mexico...

Page 35: ...31 F 30 linE bAd SF 3 3...

Page 36: ...30...

Page 37: ...29 10...

Page 38: ...28...

Page 39: ...27 CERAMA BRYTE CERAMA BRYTE CERAMA BRYTE CERAMA BRYTE CERAMA BRYTE WX10X300 CERAMA BRYTE WX10X0302 WB64X5027 CERAMA BRYTE WX10X350...

Page 40: ...26 CERAMA BRYTE CERAMA BRYTE CERAMABRYTE CERAMA BRYTE CERAMA BRYTE CERAMA BRYTE CERAMA BRYTE CERAMABRYTE CERAMABRYTE CERAMA BRYTE CERAMA BRYTE CERAMA BRYTE 45 CERAMA BRYTE CERAMA BRYTE...

Page 41: ...25 40 Bar Keepers Friend Soft Cleanser 1...

Page 42: ...24 3 2...

Page 43: ...23...

Page 44: ...22 1 1 1...

Page 45: ...21 50 50...

Page 46: ...20 Pam...

Page 47: ...19 Soft Scrub OVEN TEMP 2 0 0 2 5 0 3 0 0 3 5 0 4 0 0 4 5 0 5 0 0 B R O I L C L E A N OFF OVEN TEMP 2 0 0 2 5 0 3 0 0 3 5 0 4 0 0 4 5 0 5 0 0 B R O I L C L E A N OFF...

Page 48: ...18 SF SAb 350 25 550 175 30 4 25 SF SAb 59 9 350 25 550 175 30 7 25 Sabbath or or 30 SF 12 12...

Page 49: ...17 12 12 3 SF 12 SF 35 35 20 40 or...

Page 50: ...16 59 9 59 59 3 00 6...

Page 51: ...15 23 3 1 1 12 6 3...

Page 52: ...14 www IsItDoneYet gov 2 5 F E 7 5 2 5 1 2 5 2 5 2 7 5 E 10 2 5 2 7 5 E D 13 20 C 23 18 C 20 1 3 2 5 7 5 E D 15 208...

Page 53: ...13 PrE 1 1 2 10 10 60 80 80 70 OVEN TEMP 2 0 0 2 5 0 3 0 0 3 5 0 4 0 0 4 5 0 5 0 0 B R O I L C L E A N OFF LOOSENSC R E W S T O R O T A T E M A K E C O O L E R M A K E H O T T E R...

Page 54: ...12 PrE 11 2...

Page 55: ...11 Pre F 3...

Page 56: ...10...

Page 57: ...9...

Page 58: ...8 Kerr Ball...

Page 59: ...7 150...

Page 60: ...6...

Page 61: ...5 CERAMABRYTE CERAMA BRYTE...

Page 62: ...4...

Page 63: ...3 160 180...

Page 64: ...2...

Page 65: ...2 6 21 22 22 22 23 23 23 24 24 24 24 25 25 26 27 28 31 EML27 JBS27 ____________________ ________________ 183D6379P086 7 8 9 10 14 15 16 17 17 18 19 20 11 20 11 12 13 17 18 18...

Reviews: