Fluke Calibration P5515, User Manual
The Fluke Calibration P5515 User Manual is a valuable resource for users of this product. Easily accessible for download, this manual provides comprehensive instructions and guidance on operating and maintaining the P5515. Available as a free download on our manualshive.com, it ensures optimal usage and accurate results.
Share
Download


Reviews:
No comments
Related manuals for P5515

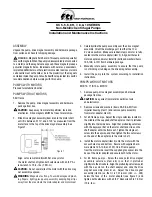
Clima Canal JDPC.002
Brand: Jaga Pages: 8

NEVERCOLD 70600
Brand: EASTMAN Pages: 11

26301
Brand: Crivit Pages: 23

20091210
Brand: Masterbuilt Pages: 4

Auromatic Salt
Brand: Bayrol Pages: 56

ERGO Tools E-KTP 3070
Brand: Pattfield Pages: 56

PHG4 Series
Brand: York Pages: 24

Biotec 12
Brand: Oase Pages: 42

DS 42
Brand: Varian Pages: 24

IPH15
Brand: Fairland Pages: 28

SDU 50 90
Brand: Frymaster Pages: 2
KC 10 Series
Brand: FTI Pages: 9

SOLARCYL
Brand: OSO Pages: 16

HAMAX 2
Brand: BEKA Pages: 80

74143
Brand: fluidra Pages: 276

Econoboil 301642
Brand: Zenith Pages: 12

SANDPIPER EH2-M
Brand: Warren rupp Pages: 11

REXSON 4B2200
Brand: SAMES KREMLIN Pages: 50


