background image

Epson Perfection V200 Photo

7/07

Epson Perfection V200 Photo - 1
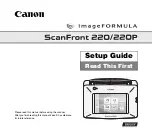
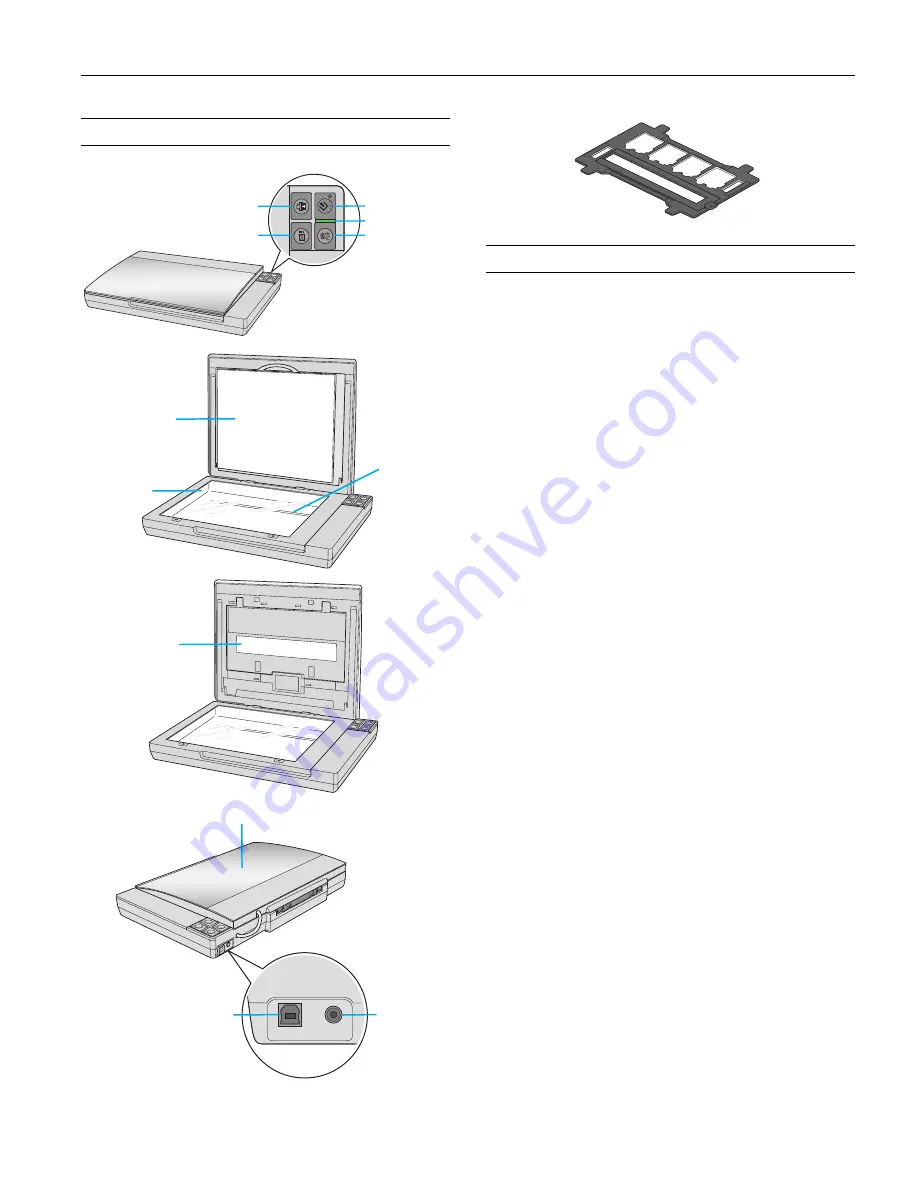
Scanner Parts

Scanner Specifications

General

Mechanical

a

c

b

b

a

c

e
d

c

a

b

P

Power/

]

Start button

a

Scan to PDF 

button

Status light

{

Copy button

|

Scan to E-mail button

Removable 
Document mat

Document 
table

Carriage

DC inlet

USB interface 
connector

USB interface 
connector

Scanner cover

a

Transparency 
unit window

Scanner type

Flatbed color

Photoelectric device

Epson MatrixCCD

®

 (12-line sensor)

Effective pixels

40,800 

×

 56,160 pixels at 4800 dpi

Document size

Documents or photos:
8.5 

×

 11.7 inches (216 

×

 297 mm) 

US letter or A4 size

Film or slides:
35mm film strips (6 frames at a time); 
35mm slides (4 slides at a time)

Scanning resolution

4800 dpi (main scan)
9600 dpi with Micro Step Drive 


(sub scan)

Output resolution

50 to 6400, 9600, and 12800 dpi 
(50 to 6400 dpi in 1 dpi increments)

Image data

16 bits per pixel per color internal
16 bits per pixel per color external

Interface

One USB 2.0 Hi-Speed port
(USB 1.1 compatible)

Light source

White cold cathode fluorescent lamp

Dimensions

Width: 16.9 inches (430 mm)
Depth: 11 inches (280 mm)
Height: 2.2 inches (57 mm)

Weight

Approx. 5.7 lb (2.6 kg)

Film holder

Summary of Contents for Perfection V200 Photo

Page 1: ... 40 800 56 160 pixels at 4800 dpi Document size Documents or photos 8 5 11 7 inches 216 297 mm US letter or A4 size Film or slides 35mm film strips 6 frames at a time 35mm slides 4 slides at a time Scanning resolution 4800 dpi main scan 9600 dpi with Micro Step Drive sub scan Output resolution 50 to 6400 9600 and 12800 dpi 50 to 6400 dpi in 1 dpi increments Image data 16 bits per pixel per color i...

Page 2: ...rent 1 5 A Temperature Operating 50 to 95 F 10 to 35 C Storage 13 to 140 F 25 to 60 C Humidity Operating 10 to 80 without condensation Storage 10 to 85 without condensation Operating conditions Ordinary office or home conditions Avoid operating the scanner in direct sunlight near a strong light source or in extremely dusty conditions Interface type Universal Serial Bus Specification Revision 2 0 I...

Page 3: ... 20 mm apart from the others 4 Close the scanner cover gently so that your original does not move Note Always keep the document table clean Do not leave photos on the document table for an extended period of time as they may stick to the glass Placing Large or Thick Documents When you scan a large or thick document you can open the scanner cover all the way so that it lies flat behind the scanner ...

Page 4: ...Holder 1 Open the cover of the 35mm film strip holder 2 Slide your film strip all the way into the film holder with the shiny base side facing down Your images and any wording on the film strip should appear backwards on the side that faces up You can scan up to 6 standard 35mm images per film strip Note Hold the edge of the film gently when touching the film otherwise you may damage the film Make...

Page 5: ...und them are not scratched dusty or covered in any way If the areas are obscured the scanner may have trouble recognizing your slides Do not cover the small holes or slots in the film holder 1 Place the film holder on the document table so that it is aligned as shown Make sure the tab with the slide icon on the film holder fits into the area with the same icon on the scanner 2 Place up to four sli...

Page 6: ...cing the Document Mat Replace the document mat by sliding it into the notches in the scanner cover Make sure the white surface faces outwards Scanning and Restoring Photos Using the Color Restoration feature in Epson Scan you can transform old faded or badly exposed photos into ones with true to life color You can restore printed photos negative film or slides automatically as you scan them You ca...

Page 7: ...screen User s Guide Note Backlight Correction is not available in Full Auto Mode Reading the Status Light If an error occurs the scanner stops operating and the status light flashes red This indicates the scanner is not connected to your computer properly or your software is not fully installed See the Start Here sheet that came with your scanner for instructions on installing the scanner software...

Page 8: ...Copy buttons simultaneously until the carriage moves to the center of the scanner 2 Press the P Power button for 3 seconds to turn off the scanner then unplug the AC adapter 3 Disconnect the USB cable from the scanner 4 Attach the packing materials that came with the scanner then repack the scanner in its original box or a similar box that fits the scanner snugly Related Documentation Note The ava...

Page 9: ...Epson Perfection V200 Photo 7 07 Epson Perfection V200 Photo 9 ...

Reviews: