

TS715 Si
User Instructions
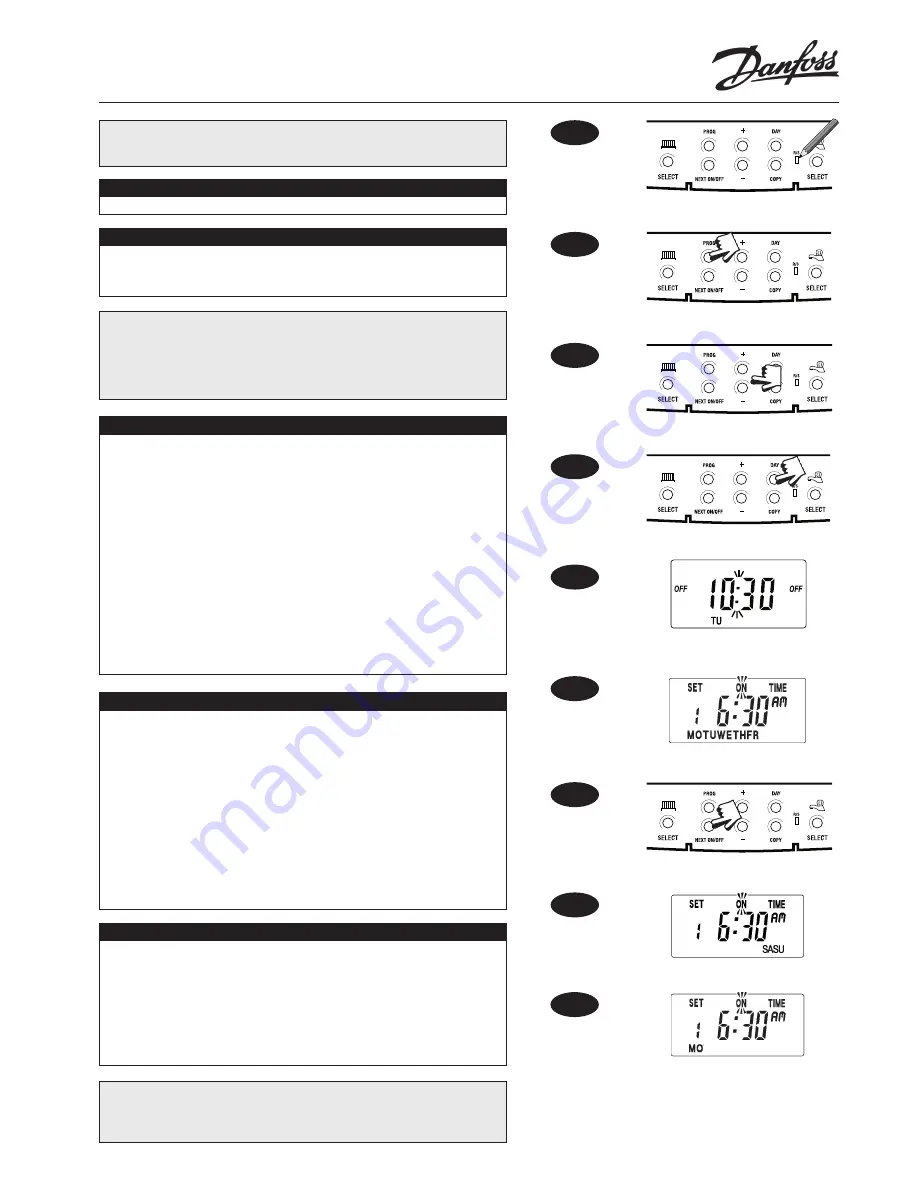
To move to
next event
To alter clock
& ON/OFF times
To move to next
day or to weekend
Fig. 1
Before beginning programming, you should reset the unit. Open the flap on the
front of the clock. Press the
RESET
button using a non-metallic object (e.g. end
of a bic biro pen top). This will clear all previous pre-set programmes.
(Fig. 1)
A. Setting the correct Time and Day
The time and date are set in the factory and do not need to be set.
B. Accepting the Factory Settings
The TS715 Si comes ready programmed with a set of times to suit the average
household.
If you wish to alter these settings follow instructions below.
Your installer will have set your unit to operate in one of the following modes:
5/2 day
-
a set of programmes for weekdays and another for weekends
(Section C)
7 day
-
different settings for each day of the week
(Section D)
24 hour
- one set of programmes for the whole week
(Section E)
Please follow relevant instructions below.
C. Programming the System - 5/2 day mode
1. Press
PROG
(Fig. 2)
until
SET ON TIME
appears at the top of the display and
MOTUWETHFR
appears at the bottom of the display
(Fig. 6)
. Use the
+ and -
buttons
(Fig. 3)
to set the time you would like your system to first come on in the morning
(Event 1)
.
2. Press
NEXT ON/OFF
once only
(Fig. 7)
. Use the
+ and -
buttons
(Fig. 3)
to set the
time you want your system to go off
(Event 2)
. To move to the next setting, i.e. when
you would like your system to come on again
(Event 3)
press the
NEXT ON/OFF
button once only.
3. Continue programming the system ON and OFF times for weekday Events 4,5 & 6
as in Step 2.
4. Press the
DAY
button once
(Fig. 4)
and
SASU
will appear at the bottom of the display
(Fig. 8)
. Programme new ON/OFF times by pressing the
NEXT ON/OFF
button
(Fig.
7)
once to move to the next setting and using the
+
and
-
buttons
(Fig. 3)
to set the
time you want.
5. Press the
PROG
button
(Fig. 2)
to return display to
RUN
mode
(Fig. 5)
.
6.
Proceed to Section F.
D. Programming the System - 7 day mode
1. Press
PROG (Fig. 2)
until
SET ON TIME
appears at the top of the display and day of
week (e.g.
MO
) appears at the bottom of the display
(Fig. 9)
. Use the
+
and
-
buttons
(Fig. 3)
to set the time you want your system to first come on in the morning
(Event
1)
.
2. Press
NEXT ON/OFF
(Fig. 7)
to move to
Event 2
.
Continue programming the system
ON and OFF times in this way by using the
+ and -
buttons to set the time you want
and pressing the
NEXT ON/OFF
button to move to the next setting
(Figs. 3 & 7)
.
3. Press
DAY
button once only
(Fig. 4)
, the next day (e.g.
TU
) will appear at the bottom
of the display. Continue programming for the rest of the week by pressing the
NEXT
ON/OFF
button
(Fig. 7)
to move to the next setting, using the
+ and -
buttons to
amend the time, and by pressing
DAY
to advance to the next day
(Figs. 7, 3 & 4).
4. Press the
PROG
button
(Fig. 2)
to return display to
RUN
mode
(Fig. 5)
.
5.
Proceed to Section F.
E. Programming the System - 24 hour mode
1. Press
PROG (Fig. 2)
until
SET ON TIME
appears at the top of the display. Use the
+
and -
buttons
(Fig. 3)
to set the time you want your system to first come on in the
morning
(Event 1)
.
2. Press
NEXT ON/OFF
(Fig. 7)
to move to
Event 2
. Continue programming the
system ON and OFF times in this way by using the
+ and -
buttons to set the time
and pressing the
NEXT ON/OFF
button to move to the next setting
(Figs. 3 & 7)
.
3. Press the
PROG
button
(Fig. 2)
to return display to
RUN
mode
(Fig. 5)
.
4.
Proceed to Section F.
N.B. Depending how your installer has set the clock you will be able to programme either 2
or 3 ON/OFFs per day. If your clock has been installed to allow 3 ON/OFFs and you do not
wish to use one of the ON/OFF settings, simply programme the ON time to be the same as
the OFF time and the setting will not operate.
Fig. 2
Fig. 3
Fig. 4
Fig. 5
Fig. 6
Fig. 7
Fig. 8
Fig. 9


