background image

Introducing the CoolMax CD-320


Product Overview 


The CoolMax CD-320 is available from leading storage partners in pre-configured set-ups 
with eSATA host connections; some also include USB host connections.  Simply open the 
box and connect the appliance with an appropriate host cable; it’s that simple.  

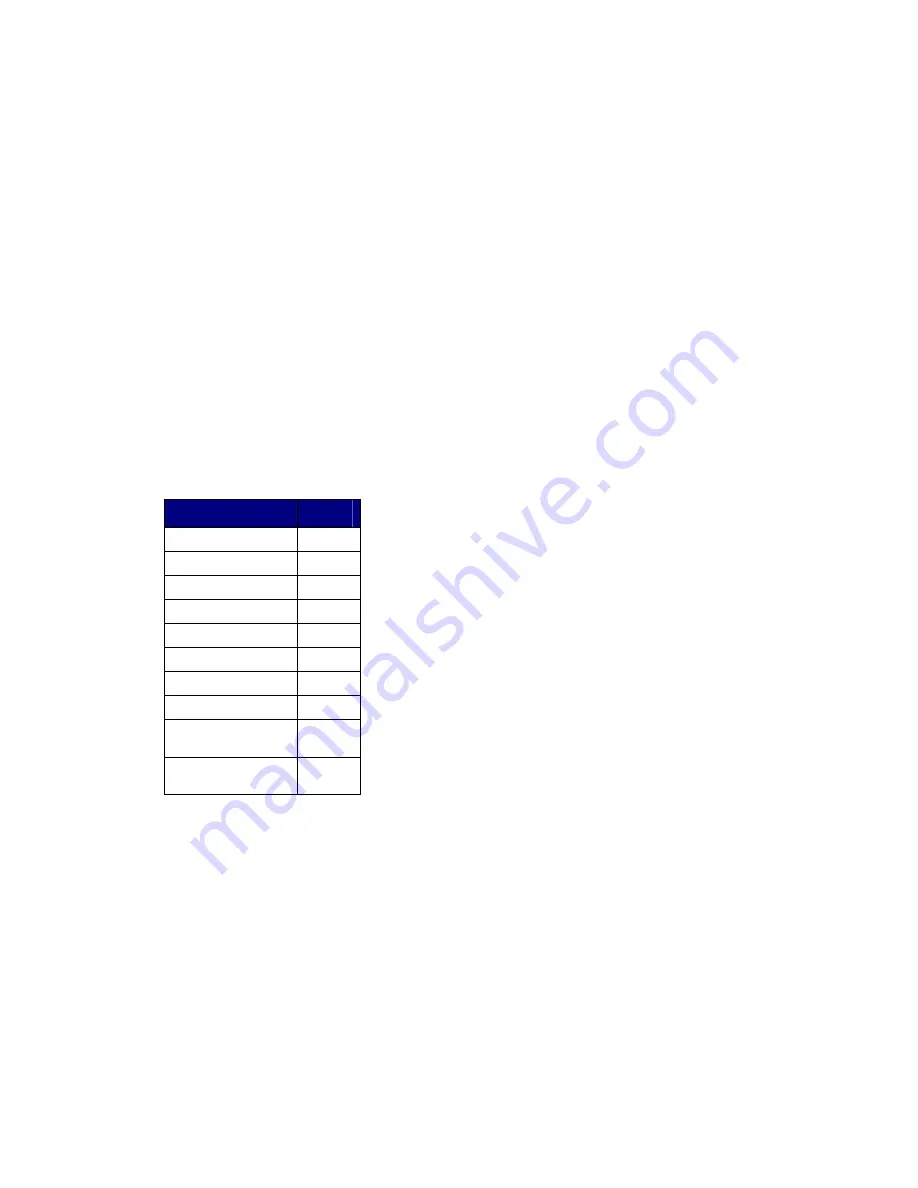
The CoolMax CD-320are available in four different configurations, each offering a different 
subset of features and capabilities, as shown in the following table:  

Table 1 

Available Product Features by Chip Type 


Feature 


SiI5744 


SATA  

Yes  

USB  

Yes  

JBOD  

Yes  

BIG  

Yes  

FAST  

Yes  

SAFE  

Yes  

SAFE33  

Yes  

SAFE50  

Yes  

Drive Locking  

No  

All Others Features  

Yes  


Throughout the remainder of this manual, all descriptions and screen images reflect the 
SiI5744, which supports all product features.  All references to “rotary switch” refer to the 
settings of the CONFIG[2:0] pins, which can be hard-strapped to a specific configuration, or 
dynamically selected using a rotary switch selection.  

CoolMax CD-320 is powered by Silicon Image’s industry-leading SteelVine™ architecture 
(see Figure 1) which provides:   


SATA or USB host connectivity  


eSATA capable on all SATA ports  


Enhanced data protection  


High-performance storage  

Summary of Contents for CD-320

Page 1: ...res by Chip Type Feature SiI5744 SATA Yes USB Yes JBOD Yes BIG Yes FAST Yes SAFE Yes SAFE33 Yes SAFE50 Yes Drive Locking No All Others Features Yes Throughout the remainder of this manual all descriptions and screen images reflect the SiI5744 which supports all product features All references to rotary switch refer to the settings of the CONFIG 2 0 pins which can be hard strapped to a specific con...

Page 2: ...perating systems that allows you to configure manage and monitor the CoolMax CD 320 hard disk drives and virtual volumes The CoolMax CD 320s can also be configured managed and monitored without using the SteelVine Manager software Figure 1 CoolMax CD 320 Architecture Populated with two external Serial ATA eSATA hard disk drives HDDs each CoolMax CD 320 can manage as much as 2 000 gigabytes i e 2 t...

Page 3: ... to the following specifications online Serial ATA High Speed Serialized AT Attachment Revision 1 0a Serial ATA II Extensions to Serial ATA 1 0a Revision 1 1 Serial ATA II Port Multiplier Revision 1 1 The Serial ATA web site is http www serialata org USB Features The CoolMax CD 320 provides the following Universal Serial Bus USB features USB 1 0 and USB 2 0 specification compliance For detailed in...

Page 4: ...he CoolMax CD 320 to the desired Storage Policy not the GUI selection and turn on the power To change the storage policy thereafter set the rotary switch to the desired position and press the recessed Mode Change push button to create the new virtual volume s Note that creating new virtual volumes will destroy any existing data that existed on the previous volume GUI Mode This mode allows you to u...

Page 5: ...ng only a single hard disk drive connected to Port 0 and then increase the storage capacity of the volume later by adding another hard disk drive or another CoolMax CD 320 with at least one hard disk drive to Port 1 and pressing the Mode Change push button The new disk blocks of Port 1 will be concatenated to the end of the disk blocks of Port 0 and any data that is stored on the existing BIG volu...

Page 6: ... FAST presents the best data speed but no data redundancy FAST storage policy accelerates hard disk operating speed by using many disks in parallel Hard drive data segments are written to different disks simultaneously which increases performance while sacrificing data redundancy To implement the FAST storage policy the CoolMax CD 320 creates a single virtual volume that is striped across both har...

Page 7: ...t a rebuild is in progress Although the volume remains available during the rebuild process the volume is susceptible to data loss through damage to the remaining drive until redundancy is restored at the end of the rebuild and verification process Host access takes precedence over the rebuild process If you continue to use the SAFE volume during the rebuild the rebuild process will take a longer ...

Page 8: ... whereas the temporary data stored on the BIG volume would be lost The size of the SAFE volume of a SAFE33 policy will be one third of the size of one hard drive if they are equal or one third of the size of the smaller if they are not equal The size of the BIG volume will be the combination of all remaining capacities Example In Figure 6 below assume that Drives A and B are 300 GB each When the S...

Page 9: ...or the temporary data Therefore the combination of SAFE and BIG would be the most efficient utilization of your available storage capacity If either hard drive fails the primary data stored on the SAFE volume would still be available whereas the temporary data stored on the BIG volume would be lost The size of the SAFE volume of a SAFE50 policy will be one half of the size of one hard drive if the...

Page 10: ...igure 8 shows an example of a single drive SAFE33 or SAFE50 Storage Policy configuration consisting of a 100GB hard drive Drive A connected to Port 0 Assuming that a SAFE50 Storage Policy is used a 50GB SAFE volume and a 50GB BIG volume will be created although the SAFE volume will be in a degraded non mirrored state When Drive B is connected to Port 1 to increase the storage capacity the SAFE vol...

Page 11: ...The SATA link between cascaded nodes in a cascaded configuration is not Port Multiplier aware Therefore although it is possible to configure lower level nodes subordinate to the top level mode to use JBOD SAFE33 or SAFE50 Storage Policies only the first volume for that node will be visible to any upper level node When creating virtual volumes with a cascaded configuration ensure that all hard disk...

Page 12: ...be available When the failed hard disk drive is replaced the subordinate node will automatically rebuild the mirrored volume Figure 10 Using Cascading to create a RAID 10 configuration Backup Button This feature allows you to launch a pre configured backup software application by simply pressing a push button on the CoolMax CD 320 The backup button supports the Vback backup application that you ca...

Page 13: ... support USB connection USB 1 0 or 2 0 direct host connection or USB hub Configuration Prerequisites SATA Host Connections If you use a host controller that does not provide Port Multiplier support The JBOD storage policy is unavailable when configuring the CoolMax CD 320 Only one disk is available on the host computer Virtual volumes that you create in the Advanced Configuration Wizard must use a...

Page 14: ...ailable On Windows systems the SteelVine Manager GUI and daemon software must be stopped before any devices can be disconnected Windows Systems 1 Close the SteelVine Manager GUI and exit the icon in the Notification Tray 2 Stop the SteelVine daemon by selecting Start Program Files Silicon Image 57XX SteelVine Control Stop SteelVineService Note Before using this procedure in Windows Vista you must ...

Page 15: ...nection the hard disk drives should not be hot plugged or hot unplugged while the system is running Instead you should eject the drives or shut down your host system before connecting or disconnecting any hard disk drives ATAPI Device Limitations The following limitations apply when connecting an ATAPI device to a SATA port of the CoolMax CD 320 ATAPI devices are only supported in the JBOD mode th...

Page 16: ...ion tray icon to open the SteelVine Manager GUI status window The SteelVine Manager icon remains active in the notification tray even if you close the SteelVine Manager window It can be closed by right clicking on the icon and selecting Exit The SteelVine Manager starts with the Status Window visible so you can monitor the CoolMax CD 320s connected to the host computer Up to four CoolMax CD 320s c...

Page 17: ...tions Utilities SteelVine folder Before the SteelVine Manager starts the launch sequence searches for an active daemon and launches it if the daemon is not active 1 Launch the Finder and navigate to the Applications Utilities SteelVine folder Double click the SteelVine icon to start the SteelVine Manager 2 If the launch sequence does not find the daemon a warning message appears Click OK 3 Enter t...

Page 18: ...window 6 Select menu options and follow the instructions in the remainder of this guide to configure CoolMax CD 320s When prompted enter the administrative password default password is admin Linux Use the following procedure to launch the SteelVine Manager on a Linux system 1 Change to the directory in which the SteelVine Manager GUI and daemon software was installed such as usr local SiliconImage...

Page 19: ...Storage Policy and the relative position within a cascaded configuration Refer to the tables below for a description of which items appear Table 2 Sections of the Status Window Status Cells Description Topology Section Tree View Displays the hierarchical structure of multiple CoolMax CD 320when using Cascading You can collapse or expand the Tree View to hide or display any subordinate nodes in a c...

Page 20: ...in this item Total Shows the combined capacity of the volume Capacity Shows the amount of storage space in GB available on each hard drive Volume Shows the total volume capacity and the drive capacities assigned to each volume Table 3 File Menu on the Status Window File Menu Item Description Change Password Opens a dialog to establish a new password Scan Devices Refreshes the status details presen...

Page 21: ...uration Wizard This selection only appears when the Config 2 0 pins are set to the GUI Configuration mode Schedule Disk Verify Schedule a disk Verify activity This selection only appears when one SAFE volume exists Configure Pop Ups Configure the Pop Up messages This selection is only available for the top level node of a cascaded configuration View Policy Settings Shows the Rebuild Policy setting...

Page 22: ...to one of the default settings the configuration screen and options are not accessible and the volumes are defined based upon a selected storage policy You cannot modify the volume counts or the capacities To access the Basic Configuration Wizard click on the Configure Box icon along the top of the SteelVine Manager Status Window To protect against unintended changes the SteelVine Manager prompts ...

Page 23: ...n Wizard Table 7 Sections of the Basic Configuration Wizard Wizard Section Description Storage Policy Identifies available SteelVine Storage Policies to assign to the CoolMax CD 320 configuration Volume List Shows Volume Mode storage policy and Size details for logical volumes The Total GB s Left field below the volume list shows the remaining capacity in gigabytes for all hard drives ...

Page 24: ...o last commit Cancels proposed changes Table 9 Command Buttons on the Basic Configuration Wizard Button Label Description To Advanced Mode Opens the Advanced Configuration Wizard This option is only available if the Advanced Configuration mode is enabled for you system If you are using a SATA host connection this option is only available if your SATA controller is PM aware For more information ref...

Page 25: ...2 When prompted enter the administrator password The default password is admin 3 Select a storage policy in the Storage Policy frame ...

Page 26: ...E volume that has one third of the available storage capacity of the smaller hard drive and one BIG volume that has the remaining capacity SAFE50 Creates one SAFE volume that has one half of the available storage capacity of the smaller hard drive and one BIG volume that has the remaining capacity FAST RAID 0 Creates one volume that is striped across two hard drives to expose double the capacity o...

Page 27: ...change may result in data loss click Yes to accept the configuration 5 Select Save to Config File from the File menu or click the Write configuration for system to a file toolbar button to save the configuration 6 Click Apply to create the selected configuration close the Wizard and display the volumes in the Status Window may take up to one minute to display ...

Page 28: ...is entered by selecting the GUI only position on the rotary switch if the Advanced Configuration feature is enabled for your system refer to Customizing the SteelVine Manager on page 82 In addition if you are using a SATA host connection your SATA controller must be Port Multiplier aware Why Advanced Configuration The Basic Configuration Wizard provides predefined storage policies to quickly confi...

Page 29: ...city split between the volume and its mirror twin The reverse configuration one SAFE volume and one FAST volume is also possible One BIG volume that is spread across the two hard drives part of each drive is concatenated or added to a portion of the second drive and one SAFE volume that is allocated the remaining capacity split between the volume and its mirror twin Note You cannot combine the JBO...

Page 30: ...block indicates an existing volume Volume List Shows Volume Mode storage policy and Size details for currently configured volumes Select a volume to edit or delete The Total GB s Left field below the volume list shows the remaining capacity in gigabytes for all the hard drives Advanced Controls Permit volume creation and modification on each hard drive Use check box indicates drive membership with...

Page 31: ... the volume that is currently selected in the volume list Delete all volumes Deletes all configured volumes Table 13 Command Buttons on the Advanced Configuration Wizard Button Description To Basic Mode Opens the Basic Configuration Wizard When configuring a volume create a new volume or edit a selected volume Update Volume Applies the selected storage policy to the selected portion of a hard driv...

Page 32: ...our data and use the Disk Management utility for your operating system to delete all partitions on CD 320 drives After you configure and partition the new volumes restore the backed up data to the new configuration 1 Select Configure Box from the Edit menu or click the Configure Box toolbar button to open the Basic Configuration Wizard 2 From the Basic Configuration Wizard click To Advanced Mode t...

Page 33: ...toolbar button 4 Move the slider below Drive 0 to the left to change the BIG volume s capacity allocation from the entire hard drive to a portion of the drive This frees capacity for the second volume ...

Page 34: ...Tip Click to the right or left of the slider within the slider s channel to make half GB changes 5 Click Update Volume ...

Page 35: ...6 Click the Create a New Volume toolbar button Bright solid colors identify saved volumes ...

Page 36: ...low both Drive 0 and Drive 1 because FAST volumes are striped across two hard drives 9 Verify the sliders below both drives automatically moved all the way to the right to allocate the remaining capacity on the two drives to the FAST volume Note You can allocate less than the total remaining capacity to the second volume If you do that however the capacity is unavailable and unused 10 Click Update...

Page 37: ...11 Click the Write Configuration for System to a File toolbar button to Save a Configuration File ...

Page 38: ...12 Click Apply to create the multi volume configuration close the Wizard and display the volumes in the Status Window within approximately one minute ...

Page 39: ... details 5 Partitioning Volumes This section explains how to partition volumes after configuring them in the SteelVine Manager GUI You must partition volumes for the host computer s operating system before you can store data on the volumes Refer to the operating system s documentation for further guidance ...

Page 40: ...essor device the Not Initialized disk with no capacity allocated to it will appear Do not initialize or modify that device 1 Right click the My Computer icon on your desktop and select Manage from the pop up window 2 Select Disk Management under Storage to open the Windows Disk Manager This example illustrates the BIG storage policy which concatenates the capacity of all hard drives connected to t...

Page 41: ...c disk If a disk is marked Not Initialized right click the disk icon and select Initialize Disk An additional dialog box appears allowing you to select which disks to initialize Uncheck the Disk item and click OK Within a few seconds the selected disk s should be marked as a Basic disk Note The disk numbers in the Windows Disk Manager may be different from the Volume numbers shown in the SteelVine...

Page 42: ...4 Click Next to start the Partition Wizard 5 Select the Primary or Extended option and click Next ...

Page 43: ...6 Specify the partition size By default the partition occupies the entire volume Click Next 7 Assign a drive letter or mount path and click Next ...

Page 44: ...8 Name and format the partition and click Next 9 Review the file system settings and click Finish to create the logical partition ...

Page 45: ...10 Repeat steps 1 through 9 to partition any remaining disks you configured in the SteelVine Manager GUI ...

Page 46: ...isk 8 0 GB Config Disk Media will appear Do not remove or modify that partition After you configure and partition the new volumes restore the backed up data to the new configuration 1 Launch Disk Utility from the Application Utilities folder 2 Select a configured disk and click the Partition tab This procedure illustrates the BIG Storage Policy configuration which concatenates the capacity of all ...

Page 47: ...4 Enter a name for the volume in the Name field such as My BIG disk 5 Select Mac OS Extended journaled from the Format drop down list 6 Specify the size of the partition in the Size field 7 Click the Partition button 8 Click Partition to acknowledge the warning ...

Page 48: ...aining disks you configured in the SteelVine Manager GUI Remember do not partition the disk that represents the CD 320 processor Linux Note For a more detailed instruction to install the SteelVine Manager please refer to the Quick Installation Guide for Linux 6 View Policy Settings Overview The Policy Settings dialog allows you to view the current settings for Rebuild and Verify ...

Page 49: ...t had previously been identified as non usable Verify Rebuild Defines whether to automatically perform a verification of the data after a rebuild operation is completed When this policy is set to Enabled a verification of the copied data is automatically performed When this policy is Disabled an automatic verification of the copied data is not performed and any verification would need to be launch...

Page 50: ... how manually rebuild and verify a SAFE volume refer to Chapter 7 Rebuild Schedule Disk Verify 7 Rebuild Schedule Drive Verify This chapter describes the procedures for the following procedures Manually start or abort a Rebuild operation Manually start or abort a Verify operation ...

Page 51: ...ebuild process has been started it can also be aborted Once the rebuild has taken place the Verify process will begin automatically if your system is configured to do so If the rebuild process is ever interrupted the rebuild process will resume from the last 10 GB segment that was completed before the interruption occurred Verify Rebuild To confirm that the two hard disks that comprise a single SA...

Page 52: ... restarted and allowed to complete Abort Verify To abort a verify process select Action Abort Verify The verify process will be terminated This selection is only available when a verify process is active Schedule Drive Verify Create a New Schedule The SteelVine Manager software is set up to automatically verify the rebuild of a hard disk drive However you can also create a verification schedule at...

Page 53: ...un during the off hours so as to not interfere with your normal back up routine A schedule can be run for each individual hard drive Modify Delete Verification Schedule You can modify or delete an existing schedule by selecting the desired radio button then changing the parameters and clicking the OK button ...

Page 54: ... conditions or situations occur Partition Rebuild Start Partition Rebuild Complete Partition Verify Start Partition Verify Complete Partition Rebuild Resume Temperature Too High System Fan Too Slow Power supply Fan Too Slow No Boxes Found Box Removed Drive Unplugged Drive Inserted Each of the above conditions can be customized for sending options as well as the ...

Page 55: ...the hard drives 1 Click on the Configure Email Notification icon along the top of the SteelVine Manager Status Window or select the Setup Email Notification item from the Edit menu pull down list 2 Enter the Administrative password for your system the default password is admin 3 The Email Notification setup screen show below will appear ...

Page 56: ...l perform a DNS lookup and will attempt to find the address of the SMTP server automatically 2 Enter the SMTP Server Port number or use the default value of Port 25 3 Enter your full email address into the From box and enter the full email address es of the intended recipient s of the condition notifications into the To and CC boxes ...

Page 57: ... messages especially when the same error condition or event occurs multiple times 6 The Email Notification feature also you to customize a message for each of the error condition or event items of which each has its own default message already built in For example use the following procedure to edit the message for Drive Unplugged Click on the Message button The following dialog will appear The me...

Page 58: ... Number type in the descriptive text followed by the message code as demonstrated below Click on the Accept button to complete the change Receiving an Email Notification When one of the conditions situations occurs a pop up dialog appears on the host computer stating that an email message has been sent Note You must click OK to remove the pop up from the screen The email message received from the ...

Page 59: ...fication The default setting is that this feature is enabled and set to display for 30 seconds Popup messages can appear for up to 60 seconds To set the option for manual closure of the pop up window set the seconds to 0 This will keep the pop up window from closing until you click OK to dismiss the pop up message Accessing the Pop Up Error Notification Dialog Use the following procedure to enable...

Page 60: ...the Administrative password for your system the default password is admin 3 The Pop Up Error Notification setup screen show below will appear You can Enable or Disable the popup message by selecting the appropriate radio button You can also specify the duration of the display time for the popup messages 4 Click OK to save your settings Drive Locking Overview not implemented yet ...

Page 61: ... Corporation version 6 5 or later although you configure this feature to launch any other application program by specifying its command line syntax Accessing the Backup Button Dialog The Backup Button dialog allows you to select the application that should be associated with the Backup Button on the CoolMax CD 320 Use the following procedure to access the Backup Button dialog 1 Click on the Backup...

Page 62: ...ckage The first time you launch that application extension you will be prompted to configure the backup job parameters such as source and destination directories Thereafter whenever you press the Backup Button push button on the CoolMax CD 320 the specified backup job will automatically begin While the backup job is running the Backup LED on the CoolMax CD 320 will blink and additional button pres...

Page 63: ...that application program will be added to the drop down list in the previous dialog Click on the Apply button to save that association It is possible to add any number of application programs to the drop down list although only one application program can be the active selection Once the application program has been is selected you can then press the Backup Button push button on the CoolMax CD 320...

Page 64: ...3 Select the SteelVine Manager program and click Remove 4 Confirm that you want to remove the SteelVine Manager software by clicking Yes 5 Optionally move or delete the xml configuration files that the InstallShield Wizard left in the installation directory by default C Program Files Silicon Image 57xx SteelVine Note When updating the software you must manually delete the database files named SV_S...

Page 65: ... scripts Install New Software For Windows Mac or Linux follow the instructions in the SteelVine Quick Installation Guide for your operating system to install a new version of the SteelVine Manager software Monitor and Troubleshooting This section describes options you can use to monitor and troubleshoot the CoolMax CD 320 Monitor the CoolMax CD 320 Monitor Drive Status The color of the drives and ...

Page 66: ...ed with a smaller drive The appliance is configured with the SAFE50 SAFE33 SAFE FAST or BIG storage policy and these policies cannot accommodate the smaller drive Insert a drive that is the same size as or bigger than the original hard disk drive Mismatch A drive with an unexpected Serial Number was inserted for a SAFE FAST or BIG volume Insert the correct hard disk drive Not Readable A bad sector...

Page 67: ...liance Table 16 Color Codes for Temperature Status Color Definition Resolution Green Temperature is normal Yellow Temperature is greater than 40º Celsius 104º Fahrenheit Remove objects that interfere with airflow around the CoolMax CD 320 Red Temperature is greater than 45º Celsius 113º Fahrenheit Ensure constant airflow around the CoolMax CD 320 If there is no airflow replace the fan Identify the...

Page 68: ...r than expected Note If no fan speed sensor is installed a value of n a will appear Review Event Logs Event logs are helpful for troubleshooting and locating a system malfunction 1 Select Event Log from the Edit menu in the Status Window The Event Log screen displays a list of events in a table format of columns and rows Date displays the date and time of the event ...

Page 69: ...te The easiest way to tell the difference between a blinking LED and a flashing LED is that flashing stops when the read write activity is finished and blinking does not stop The blink rate is slower but the difference in speed is more difficult to detect visually Troubleshooting Table 19 Troubleshooting Suggestions Problem Resolution LEDs Confirm power at the outlet verify power connection and tr...

Page 70: ...rference Move the HBA to an alternate PCI X slot Try the HBA in a PCI slot Verify the System LED status to confirm power Verify HBA BIOS recognizes empty CoolMax CD 320 Turn off PCI bus power save mode in the host BIOS Verify the USB connection and try a different USB cable Connect to a different USB port CoolMax CD 320 USB connection is not recognized Refer to Microsoft s Knowledge Base article 3...

Page 71: ... Mac OS X the Disk Utility should show a SCSI Connection ID for the virtual disks on the physical hard drives Error messages during the driver installation would have indicated issues Resolve resource conflicts IRQ DMA or I O Identify maximum SATA disk drive capacity supported by the operating system and ensure the volume size meets the limits Verify Port Multiplier PM support in the HBA Review St...

Reviews: