CHIEF Universal Slat Wall Multi Arm Mount KSY220, Installation Instructions Manual
The CHIEF Universal Slat Wall Multi Arm Mount KSY220 offers a versatile solution for mounting your displays. This user-friendly product comes with an Installation Instructions Manual, which you can easily download for free from our website. Experience hassle-free installation with the step-by-step guidance provided in the manual.
Share
Download


Reviews:
No comments
Related manuals for Universal Slat Wall Multi Arm Mount KSY220

Montana 600 Series
Brand: Garmin Pages: 44

V210
Brand: SharkRack Pages: 4

FPS5.V2
Brand: Sealey Pages: 2

AMCR04K
Brand: Amada Pages: 2

HA Gasliftarm Single
Brand: HAGOR Pages: 12

MLR Series
Brand: Aigis Mechtronics Pages: 4

Floor Stand I 40
Brand: Loewe Pages: 28

DSP-ST10
Brand: Daewoo Pages: 6

Entryway Rack
Brand: OPEN SPACES Pages: 6

HA Tablestand
Brand: HAGOR Pages: 12

DA-FM1500
Brand: Idis Pages: 2

H-3575
Brand: U-Line Pages: 3

950-AP303
Brand: OBERON Pages: 2
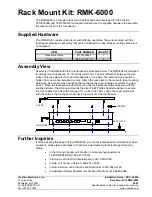
RMK-6000
Brand: Crestron Pages: 2

VisionMount VLF210
Brand: Sanus Pages: 36

SK 2
Brand: tecalor Pages: 24

D24001
Brand: DeWalt Pages: 2

DW7451
Brand: DeWalt Pages: 2


