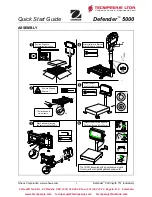
background image

ProDoc BFA Series 

Digital Physician Scale 

with Body Fat Analysis 

PD150
PD350

PD350DHR

(Digital Height Rod) 

and

PD350MHR

(Mechanical Height Rod) 

Owner’s Manual 

CARDINAL SCALE MFG. CO. 

0044-M380-O1 Rev A 

PO Box 151 

y

 Webb City, MO 64870 

02/12

Ph: 417-673-4631 

y

 Fax: 417-673-5001 

www.detectoscale.com 

0044-M380-O1 Rev A 

y

 ProDoc BFA Series 

1

Technical Support: Ph: 866-254-8261 

y

 [email protected] 

Technical Support: Ph: 866-254-8261 

y

 [email protected] 

Summary of Contents for Detecto ProDoc BFA PD150

Page 1: ...nical Height Rod Owner s Manual CARDINAL SCALE MFG CO 0044 M380 O1 Rev A PO Box 151 y Webb City MO 64870 02 12 Ph 417 673 4631 y Fax 417 673 5001 www detectoscale com 0044 M380 O1 Rev A y ProDoc BFA Series 1 Technical Support Ph 866 254 8261 y techsupport cardet com Technical Support Ph 866 254 8261 y techsupport cardet com ...

Page 2: ...0044 M380 O1 Rev A y ProDoc BFA Series 2 ...

Page 3: ...Battery 22 Automatic Shutoff 22 Sleep Mode 22 OPTIONAL AC POWER ADAPTOR 22 OPERATION 23 Keypad Functions 23 Annunciators 25 Weighing Only 27 Hold Function 28 Tare Function 28 Height Measuring Only with Digital Height Rod 29 Printing Function 29 BMI Measure with Digital Height Rod 30 BMI Measure with Mechanical Height Rod or No Height Rod 31 Body Fat and Total Body Water Estimation with Digital Hei...

Page 4: ...n which case the user will be responsible to take whatever measures necessary to correct the interference You may find the booklet How to Identify and Resolve Radio TV Interference Problems prepared by the Federal Communications Commission helpful It is available from the U S Government Printing Office Washington D C 20402 Request stock No 001 000 00315 4 All rights reserved Reproduction or use wi...

Page 5: ... SPECIFICATIONS Model Number PD150 Floor Scale with Remote Display PD350 Eye Level Scale PD350DHR Eye Level Scale with Digital Height Rod PD350MHR Eye Level Scale with Mechanical Height Rod Capacity 0 220 lb x 0 1 lb 0 100 kg x 50g 220 550 lb x 0 2 lb 100 250 kg x 100g Weight Units Pounds or Kilograms selectable Power Requirements Six 6 AA size Alkaline batteries not included OR an optional Medica...

Page 6: ...ion y Zero function y Tare function y Hold function y Sleep function y Low battery indicator y Available with or without height rod y Level indicator and adjustable feet y Body fat and total body water graduation 0 1 y Muscle mass and bone mass graduation 0 1 y Age range from 10 to 99 years y Height range 110 to 200cm for height rod measurement 60 to 240cm for manual input y Height graduation 0 1c...

Page 7: ...ate percentage of body fat and body water bone mass and muscle mass using BIA Bioelectrical Impedance Analysis It is intended for use by healthy children 10 17 years old and healthy adults with active moderately active and inactive lifestyles for body composition assessment PRECAUTION NOTICE Do not use the scale on subjects who have body implants such as pacemaker artificial limbs contraceptive de...

Page 8: ...0044 M380 O1 Rev A y ProDoc BFA Series 4 ...

Page 9: ...2 23 Optimal 20 28 21 29 22 30 23 31 24 32 Moderate 29 31 30 32 31 33 32 33 33 35 High 31 32 33 34 35 2 How is percentage body fat BF estimated The percentage of BF is measured by a method called Bioelectrical Impedance Analysis BIA The use of BIA to estimate body fat has been pioneered since the seventies It was only in the past decade that the estimation of body fat using BIA technology was succ...

Page 10: ...mal TBW of an individual varies according to age and gender The table below may be used as a guide Source University of Illinois Medical Center Chicago USA BF Range Optimal TBW Range 4 to 14 70 to 63 15 to 21 63 to 57 22 to 24 57 to 55 Men 25 and over 55 to 37 4 to 20 70 to 58 21 to 29 58 to 52 30 to 32 52 to 49 Women 33 and over 49 to 37 Please be reminded that the TBW estimated with the scale re...

Page 11: ...o maintain your posture making one tiny adjustment after another to keep your body upright Skeletal muscle is also important for holding your bones in the correct position and prevents your joints from dislocating Some skeletal muscles in your face are directly attached to your skin The slightest contraction of one of these muscles changes your facial expression Skeletal muscle generates heat as a...

Page 12: ...r unhealthy European version BMI for adult 19 99 of age BMI Classification 30 and over Obese 25 29 9 Overweight 18 5 24 9 Normal Under 18 5 Underweight Asian Version BMI for adult 19 99 of age BMI Classification 25 and over Obese 23 24 9 Overweight 18 5 22 9 Normal Under 18 5 Underweight 0044 M380 O1 Rev A y ProDoc BFA Series 8 ...

Page 13: ...Feet Platform with Electrodes Level Indicator LCD display Keys Display Column Back View Body Fat and Total Body Water Indication Bar DC Jack RJ11 port USB B port R232 port Bottom View Battery compartment 0044 M380 O1 Rev A y ProDoc BFA Series 9 ...

Page 14: ...d that you read this manual before attempting to operate the scale this section is included to provide a condensed set of instructions on installing and using the scale At a minimum please make certain you read all of the caution and warning statements Step 1 Place the scale on the floor and then place the display at a convenient distance from the scale base Step 2 Turn the scale over on the floor...

Page 15: ...y viewing Wall Mounting 1 Choose the location to mount the display on the wall The location should be free of temperature extremes and water It should be where the display can be easily viewed not subject to direct sunlight and where the keypad is within easy reach of the operator 2 Make certain the structure and mounting hardware are of sufficient strength to support the display The mounting brac...

Page 16: ...4 slots on the back of the display and align them with the four 4 tabs on the Wall Bracket A Refer to Figure No 3 9 Insert the tabs into the slots and press together until the bracket locks to the back of the display 10 Referring to Figure No 4 align the cutout in Wall Bracket A with Wall Bracket B and gently pull down to secure the display to the wall Figure No 4 Wall Bracket B Wall Bracket A Dis...

Page 17: ...feet from inside Wall Bracket A and install them in each corner of the bracket as shown in Figure No 6 Remove Feet from Wall Bracket A Install Feet in Wall Bracket A Figure No 5 Figure No 6 3 Next locate the four 4 slots in the back of the display Refer to Figure No 7 Figure No 7 Figure No 8 Display Wall Bracket A with Feet Installed Slot Tab 4 Referring to Figure No 8 align and insert the tabs on...

Page 18: ...s incurred during transit Remove all plastic wrapping foam fillers and cardboard material from the scale base display and other components You should have the following components c Scale Base d Column with attached Display e Hardware Pack containing M5x45 Machine Screw 4 M5x45 Machine Screws 1 Philips Screwdriver f Optional Digital or Mechanical Height Rod e f d c Figure No 9 1 See Note Below NOT...

Page 19: ...ith the scale base and then place the column over the tabs on the scale base NOTE Center the cable in the column as shown in Figure No 11 when placing the column over the tabs on the scale base Figure No 11 Threaded Hole in Column M5x45 Machine Screw Recessed Hole in Base Tabs on Scale Base Column 4 While holding the column in place on the scale carefully lay the scale down with the column horizon...

Page 20: ...ick Start Step 1 Once the scale is assembled place it on the floor Step 2 Carefully lay the scale over on its side with the edge of the display resting on the floor and then locate the battery access cover on the bottom of the scale Step 3 Remove the cover install six 6 AA size batteries1 and then replace the cover Step 4 Return the scale to the upright normal operating position and make sure it i...

Page 21: ...to height rod 8 M4x10 PM Screws bracket to column 8 Lock Washers bracket to column M4x4 5 Machine Screw M4x10 Machine Screw Lock Washer 1 Referring to Figure No 13 align the upper bracket with the holes in the height rod near the headpiece and install four 4 M4x4 5 PM screws to secure the bracket to the height rod 2 Next align the lower bracket with the lower holes in the height rod and install fo...

Page 22: ...h lock washers to secure it to the column See Figure No 15 4 Remove the plastic cover on the back of the display exposing the modular connector socket Insert the modular connector of the DHR cable into the socket on the display until it locks in place It will click when locked in place Route the DHR cable through the two 2 plastic cable clips on the upper bracket See Figure No 16 Figure No 15 8 M4...

Page 23: ... Head Screw 8 32 Hex Nut M4x10 Machine Screw Wrench Lock Washer 1 Referring to Figure No 17 align a bracket with the holes near the top of the mounting bar and install two 2 8 32x1 2 Pan Head screws and 8 32 Hex nuts to secure the bracket to the mounting bar 2 Next align the other bracket with the lower holes in the mounting bar and install two 2 8 32x1 2 Pan Head screws and 8 32 Hex nuts to secur...

Page 24: ... s head 2 Patient may now step on scale 3 Carefully lower height rod while keeping headpiece horizontal until it rests on top of patient s head If patient is shorter than 3 4 101 5 cm push latch to right while simultaneously pushing down on headpiece until headpi 4 Read height of patient as follows If back of headpiece points to outer height rod then it points to correct height If back of headpiec...

Page 25: ... first remove the battery cover by pushing in on the tab and lifting it up Refer to Figure No 21 Figure No 20 Battery Cover Figure No 21 Push in and lift here Figure No 22 3 If installing new batteries proceed to step 4 If replacing the batteries remove all six 6 batteries from the battery holder and hen proceed to step 4 4 Install the six 6 new AA size batteries in the battery holder noting the p...

Page 26: ...to indicate the sleep mode has activated The sleep mode feature requires that no key is pressed on the keypad and the scale to remain at the center of zero for a period of time to activate The period of time for the sleep mode is also selected during the setup process of the scale and can be set for up to nine 9 minutes When a key is pressed or weight is placed on the scale it will wake up and ret...

Page 27: ...print operation to occur Second it is used to change the weighing units between pounds and kilograms For example with pounds displayed pressing and holding this key will change the weighting units to kilograms NOTE This feature must be enabled during setup and calibration of the scale to be operational This key is used to lock and unlock the display If the HOLD feature was enabled during setup and...

Page 28: ...ation Pressing it a third time will return the display to the patient s weight The TSTORE and SRECALL keys are multi purpose keys They are used to Toggle between on or off in setting mode speedily go forward change the value of height and age toggle between Male and Female toggle between Normal and Athlete mode In the Memory Function operation pressing the TSTORE key will select the MEM position 1...

Page 29: ...nunciator is turned on to indicate the scale is in the Body Mass Index mode BFA Body Fat Analysis This annunciator is turned on to indicate the scale is in the Body Fat Analysis mode ZERO This annunciator is turned on to indicate that the weight displayed is within 1 4 division of the center of zero NET This annunciator is turned on to show that the weight displayed is the net weight Net weight is...

Page 30: ...is annunciator is turned on to indicate the value display is the calculated Body Fat Percentage This annunciator is turned on to indicate the value display is the calculated Total Body Water Percentage N or A These annunciators are turned on to indicate whether Normal N or Athlete A Mode has been selected when performing a BFA operation These annunciators are turned on to indicate which male or fe...

Page 31: ... and pounds The kg or lb annunciator will turn on to show which weighing unit is active 6 Patient may now step on scale and stand still while the weight is being measured The STA annunciator will be turned on when the weight is stable 7 Read and record weight displayed 8 Patient may now step off scale 9 To turn scale off press ON OFF key Display will show oFF and turn off x If the Automatic Shutdo...

Page 32: ...ress LOCK RELEASE key again to release the weight Released Locked Tare Function When weighing a patient with a blanket or other item it is necessary to tare out the weight of the item in order to get an accurate weight reading 1 Press ON OFF key 2 The display will turn on show all digits and then the software version will be displayed for a few seconds 3 Next a small o is shown and moves across th...

Page 33: ...ad and then lift headpiece to horizontal position Figure No 26 11 Carefully lower height rod until headpiece rests on top of patient s head 12 Record patient s height 13 While holding headpiece horizontal raise height rod well above patient s head 14 Patient may now step off scale 15 Return height rod to starting position 16 To turn scale off press ON OFF key Display will show oFF and turn off y I...

Page 34: ...7 9 Carefully lower height rod until headpiece rests on top of patient s head 10 Press MODE ENTER HEIGHT key 11 The display will change to the BFA mode BFA annunciator will be flashing 12 Press the SRECALL or TSTORE keys to select the BMI mode BMI annunciator will be flashing 13 Press MODE ENTER HEIGHT key 14 While the patient is still standing on the scale the result will be shown in sequence BMI...

Page 35: ...Press the SRECALL or TSTORE keys to select the BMI mode BMI annunciator will be flashing B If Kilograms Only Kilograms Pounds or Stones and Pounds or Kilograms was selected for Unit in setup display will change to show 168 0cm a Use numeric keys to enter up to 4 digits for height in centimeters and then press MODE ENTER HEIGHT key b The display will change to the BFA mode BFA annunciator will be f...

Page 36: ...ey 8 Grasp height rod at hinge pin see Figure No 28 and raise it well above patient s head and then lift headpiece to horizontal position Figure No 28 9 Carefully lower height rod until headpiece rests on top of patient s head 10 Press MODE ENTER HEIGHT key 11 The display will change to the BFA mode BFA annunciator will be flashing 12 Press MODE ENTER HEIGHT key 13 The display will change to show ...

Page 37: ...r Percentage Body Fat Percentage Muscle Mass Percentage Bone Mass Percentage 22 The scale will then automatically return to the weighing mode 23 Patient may now step off scale 21 Return height rod to starting position 22 To turn scale off press ON OFF key Display will show oFF and turn off x If the Automatic Shutdown feature has been enable the scale will turn off after a pre defined time of inact...

Page 38: ...ess MODE ENTER HEIGHT key b Display will change to flashing the digit for the decimal inches c Use numeric keys to enter up to 2 digits 9 9 max for height in inches and then press MODE ENTER HEIGHT key d The display will change to the BFA mode BFA annunciator will be flashing B If Kilograms Only Kilograms Pounds or Stones and Pounds or Kilograms was selected for Unit in setup display will change t...

Page 39: ...ent s body fat percentage total body water percentage muscle mass percentage and bone mass percentage Total Body Water Percentage Body Fat Percentage Muscle Mass Percentage Bone Mass Percentage 18 The scale will then automatically return to the weighing mode 19 Patient may now step off scale 20 To turn scale off press ON OFF key Display will show oFF and turn off x If the Automatic Shutdown featur...

Page 40: ... show which position is currently selected Note that repeatedly pressing the TSTORE key will advance to the next MEM position and return to the MEM 1 position Position 2 Selected 4 When the desired MEM position has been selected press the MODE ENTER HEIGHT key 5 The new results for the BMI or Body Fat and Total Water Estimation Mode operation will be stored in memory and replace the previously sto...

Page 41: ... To view the MEM 3 position press the SRECALL key again 6 The MEM 3 position annunciator will flash and the stored data will be displayed 7 To view the MEM 4 position press the SRECALL key again 8 The MEM 4 position annunciator will flash and the stored data will be displayed 9 To exit Recall Memory and return to the weighing mode press the SRECALL key again 10 Note that if no key has been pressed...

Page 42: ...E ENTER HEIGHT key to save it and proceed to the next prompt Otherwise use the numeric keys to enter a new value from 00 to 23 and then press the MODE ENTER HEIGHT key to save it and proceed to the next prompt IMPORTANT Time is entered in a 24 hour format When entering times after noon 12 00 PM you must add 12 to time For example 3 00 PM would be entered as 15 yy YEARS With display showing YY pres...

Page 43: ...t prompt 00 EOP is Disabled 01 to 99 The number of lines sent after End Of Print USB USB PORT FUNCTION With display showing USB press MODE ENTER HEIGHT key to show current setting If value displayed is acceptable press MODE ENTER HEIGHT key to save it and proceed to the next prompt Otherwise use the numeric keys to select a new value 00 01 or 02 and then press the MODE ENTER HEIGHT key to save it ...

Page 44: ...SH AUTOMATIC SHUTOFF With display showing ash press MODE ENTER HEIGHT key to show current setting If value displayed is acceptable press MODE ENTER HEIGHT key to save it and proceed to the next prompt Otherwise use the numeric keys to select a new value from 0 to 9 minutes and then press the MODE ENTER HEIGHT key to save it and proceed to the next prompt Note that selecting 0 disables the automati...

Page 45: ...R HEIGHT key to save the new setting and advance to the next prompt USA SET ZERO LIMIT This prompt selects whether the scale is used in the USA and has a zero limit or outside the USA with no zero limit With display showing USA press MODE ENTER HEIGHT key to show current setting If value displayed is acceptable press MODE ENTER HEIGHT key to save it and proceed to the next prompt Otherwise use the...

Page 46: ... 900 CALn CALIBRATE SCALE Recommended to use 150kg for Calibration Step 1 The display will change to show CALn Step 2 To skip calibration and save the previous settings press the MODE ENTER HEIGHT key The display will show off and then shut the scale off Proceed to Step 12 Step 3 Otherwise press the SRECALL or TSTORE keys to select Y Y Yes start calibration and then press the MODE ENTER HEIGHT key...

Page 47: ...cale off 3 Press and hold the LOCK RELEASE key and then press the ON OFF key 4 The display will turn on all digits show the software version for a few seconds and then change to show CALCH 5 Release all keys 6 The display will show CALCH for two seconds and then change to show the 3 digit calibration counter 7 Next the display will show SetCH for two seconds and then change to show the 3 digit set...

Page 48: ... 175 0cm BMI 21 5 Time mm dd yy FORMAT 2 Journal Format If FORMAT 2 Journal Format was selected for the USB or RS232 PORT FUNCTION USB 2 or RS232 2 the data will be printed RS232 or output USB in the format below Note that the output of this format includes commas between each field and a carriage return to terminate the record Time Date BMI Height Weight Age Gender Activity Body Fat Body Water Bo...

Page 49: ...sage displays Err4 when estimating body fat and total body water values Estimated body fat percentage is beyond the technical limit Moistening your feet may help to improve the electrical contact 7 The message displays Err4 when estimating body fat and total body water values Percentage total body water is out of range Moistening your feet may help to improve the electrical contact 8 The message d...

Page 50: ...0044 M380 O1 Rev A y ProDoc BFA Series 46 ...

Reviews: