Your new Quartz Chronograph features the following:
1. Hours, minutes and seconds display.
2. Complete Chronograph (Stopwatch) function.
3. Date function (on some models).
4. Tachymeter (on some models).
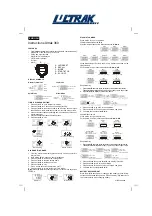
This diagram will simplify following the step - by - step
setting sequence.
NOTE:
The watch crown has three specific setting positions.
See diagram. Once the watch is properly set, except for
date variations or time zone changes, adjustment is
rarely, if ever, required. The push buttons designated as “A”
(at the 2 o’clock position) and “B”(at the 4 o’clock position)
control
PRELIMINARY SETTING PROCEDURE
Before the chronograph can be used, the chrono second
hand must be in the “0”(zero) or 60th second position. If not,
proceed as follows:
Step 1. Pull the crown to the “OUT” position.
Step 2. Slowly push and release button “A” until the chrono
Second in the 60th second position. If the button is kept
depressed, the hand will continue to move rapidly.
Step 3. When the hand is accurately positioned, push the
crown to the “In” position and proceed to “Setting the Time.”
SETTING THE TIME
NOTE:
Your watch is in normal time indication mode when
the crown is in the “IN” position.
Step 1. When the small second hand reaches the 60th
second mark, pull the crown all the way to the “OUT”
position. All hands will stop.
Step 2. With the crown still in the “OUT” position, turn it to
move hands FORWARD (clockwise) until you see the date
change. This establishes midnight.
Step 3. For AM time, continue to move hands FORWARD
until the minute hand is approximately 5 minutes ahead of
the desired minute marker; then, gently turn back to
the same minute marker.
For PM time, follow the same procedure, but first advance
the hands past 12 o’clock.
Step 4. When the time standard by which you are setting
your watch (telephone beep, etc.) reaches the 60th second,
push the crown all the way to the “IN” position without
turning.
All normal hands will start instantly.
SETTING THE DATE (on some models)
Step 1. Pull the crown out to the “ INTERMEDIATE ”position
(one “click“). Turn the crown counterclockwise until the
desired date appears.
Step 2. Push the crown back to the “IN” position. The watch
will now be operating normally.
NOTE:
The date will advance automatically at midnight,
provided that AM and PM have been established (see
“Setting the Time”). The watch calendar is programmed for a
31-day cycle. Therefore, on the first day of any month
following a month with less than 31 days, the date must be
advanced manually. The date should never be changed
manually between 9:00pm and 3:00am, as this might
result in an inaccurate date display. However, the
mechanism will not be damaged if the crown is turned
accidentally during this time period.
HOW TO USE THE CHRONOGRAPH
Step 1. To start chronograph measurement, push and
release button “A”.
Step 2. To stop chronograph measurement, push and
release button “A”. Measurement ceases; time is indicated.
Step 3. To reset chronograph hands to “0”, push and release
button “B”.
HOW TO USE THE TACHYMETER (on some models)
Step 1. With the watch in normal time indication mode, push
and release button “A” precisely at the start of a measured
mile*
Step 2. Push and release button “A” precisely at the end of
the measured mile
Step 3. Read the outer edge of the dial to obtain your speed
in miles per hour.
Step 4. Reset your watch by pushing and releasing button “B“.
*NOTE:
Some US highways have measured mile markers.
BOOK NO. 592 • CHRONOGRAPH •SERIES 0S20
Watch Setting Guide
4/2006