Aven Mighty Scope 1.3M, Instruction Manual
The Aven Mighty Scope 1.3M is a powerful digital microscope that offers high-resolution imaging. To get the most out of this cutting-edge technology, be sure to download the Instruction Manual for free from our website. This manual will guide you through the features and functions of the device, ensuring you can maximize its potential.
Share
Download


Reviews:
No comments
Related manuals for Mighty Scope 1.3M

Primary kit C101
Brand: X-Loupe Pages: 2

Mic-Fi Eye
Brand: Gima Pages: 4
1013153
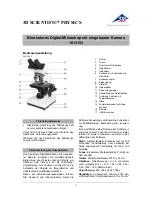
Brand: 3B SCIENTIFIC PHYSICS Pages: 24

DC-128
Brand: National Pages: 8

205-RLED
Brand: National Pages: 8

571 218
Brand: Jeulin Pages: 10

3012-LED
Brand: Accu-Scope Pages: 15

3019
Brand: Accu-Scope Pages: 19

3002-CB Forensic Comparison Series
Brand: Accu-Scope Pages: 19

Elcipse TE2000
Brand: Nikon Pages: 12

Live Cell 2
Brand: Nikon Pages: 14

LABOPHC-POL
Brand: Nikon Pages: 25

Eclipse Ni-U
Brand: Nikon Pages: 52

eclipse fn1
Brand: Nikon Pages: 59

PM200 Series
Brand: AmScope Pages: 16

TKx400i DUAL-LED
Brand: Thames & Kosmos Pages: 16

AY12938
Brand: Barska Pages: 7

BH2 Series
Brand: Olympus Pages: 46


