background image


Microscope


ECLIPSE FN1 

Instructions


M368E 

05.10.NF.1


Summary of Contents for eclipse fn1

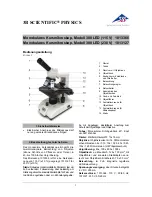
Page 1: ...Microscope ECLIPSE FN1 Instructions M368E 05 10 NF 1 ...

Page 2: ......

Page 3: ...s system the super high pressure mercury lamp power supply high intensity light source and such WARNING and CAUTION Symbols Used in This Manual Although Nikon products are designed to provide the utmost safety during use incorrect usage or failure to follow the safety instructions provided may cause personal injury or property damage Damage or injury that may occur due to mishandling is unwarrante...

Page 4: ...to which the symbol has been affixed Caution for heat This symbol on the lamphouse of the Eclipse FN1 calls your attention on the following The lamp and its surroundings including the lamp house become very hot during and immediately after lighting Do not touch the lamp and its surroundings during and immediately after lighting to prevent the risk of burns Make sure that the lamp and its surroundi...

Page 5: ...ither the super high pressure mercury lamp power supply or the high intensity light source 4 Cautions about the power cord Make sure to use the specified power cord Using a wrong power cord may result in malfunctions or fire The power supply for this system is classified as subject to Class I protection against electrical shock Make sure the power supply unit is connected to an appropriate ground ...

Page 6: ...specified in this manual Using other than the specified type of lamp could result in an accident such as a burst Because safety is a top priority in the design of Nikon products the hazards described above should not pose any danger as long as you heed all of the warnings and cautions in the manuals and use the system only for its intended purpose However the hazards described above could lead to ...

Page 7: ...with the optical fiber Specified light source Sumita Optical Glass Inc Halogen light source LS DWL N For the illumination with the lamp house Specified lamp house Nikon FN LH Specified lamp 12V 100W Long life halogen lamp PHILIPS 7724i or ODRAM HLX 64623 Specified power supply Nikon TE2 PS100W In addition when the lamp house is used for the illumination a lamp house adapter must be attached to con...

Page 8: ...substage or condenser when carrying the microscope system This may cause the part to come off resulting in damage to the microscope system Do not install the product in a locker or a cabinet 7 Do not turn on the power supply and the power supply for the optical fiber light source when a cover is placed over the product Do not turn on the power supply and the power supply for the optical fiber ligh...

Page 9: ...e environment may result in malfunctions or poor performance Consider the following factors when selecting an installation location Fix the microscope FN1 body securely on a baseplate or a vibration isolator with bolts When the microscope is mounted on a microscope slider such as an XY mover fix the microscope body on the microscope slider securely with bolts or so on to prevent the microscope fro...

Page 10: ...temperature and avoid subjecting the filters to rapid temperature changes When a filter is not in use store it in a desiccator or hermetically sealed container with a drying agent The filters attached in the nine types of filter cubes listed below have sharper wavelength characteristics than standard filters However due to their sophisticated coatings they must be handled with special care In part...

Page 11: ...l x1 Polarizer for visible lights x1 Polarizer for infrared rays x1 Variable magnification double port tube x1 Single objective holder x1 LWD 16x water immersion type objective x1 LWD 16x DIC slider x1 Variable magnification turret x1 Rectangular stage Stage main part x1 Two auxiliary support columns x2 Two auxiliary plates x2 Knurled ring x1 Acrylic chamber x1 Chamber holder x1 Eight flat head sc...

Page 12: ...ider 21 3 Single Objective Holder 21 4 Eyepiece Tube 21 4 1 Selecting the Optical Path in the Eyepiece Tube T Eyepiece Tube F Eyepiece Tube 21 4 2 Diopter Adjustment 22 4 3 Interpupillary Distance Adjustment 23 5 LWD Condenser 23 5 1 Focusing and Centering the LWD Condenser 23 5 2 Adjusting the Condenser Aperture Diaphragm 24 5 3 Attaching an Optical Element into the LWD Condenser Turret 25 5 4 Op...

Page 13: ...ters 33 11 2 For the DIC microscopy 33 11 3 Contrast Adjustment 35 Chapter 4 Assembly 36 Chapter 5 Troubleshooting 49 1 Viewing Problems and Control Problems 49 2 Electrical System Problems 52 Chapter 6 Care and Maintenance 53 Chapter 7 Specifications 54 ...

Page 14: ...be The product name for the variable magnification double port attachment is Mag Variable Double Port The ultraviolet light shield is removed from the microscope in the photo above The following figure shows the ultraviolet light shield Eyepiece Eyepiece tube Diopter adjustment ring Slide click release button Sliding nosepiece Objective vertical movement lever Condenser Base auxiliary leg Sliding ...

Page 15: ...que adjustment ring Objective Field diaphragm control WARNING Focus adjustment ring for the rear port Lamp house Parfocal correction knob Brightness control knob Power indicator This lamp is lit when power is on Power switch Push it to the I side to turn on Push it to the O side to turn off AC inlet Connect the specified power cord that meets the voltage provided Refer to Chapter 7 Specification f...

Page 16: ... path CAUTION Make sure to move the objective vertical movement lever to the center position when you change objectives between the near side one and the far side one You cannot change objectives when the objective vertical movement lever is placed at the right or the left If you attempt to change objectives forcibly the microscopy may be damaged Refer to Section 2 2 in Chapter 3 Selecting an Obje...

Page 17: ...r to Section 5 1 in Chapter 3 Focusing and Centering the Condenser 13 Move the objective vertical movement lever to the center to retract the low magnification objective into the upper position 14 Pull the sliding nosepiece to the front to locate the water immersion type objective into the optical path CAUTION Make sure to move the objective vertical movement lever to the center position when you ...

Page 18: ...attained 17 Adjust the brightness with the brightness control knob on the power supply or on the optical fiber light source 18 Stop down the field diaphragm with the field diaphragm control so that it circumscribes the viewfield Refer to Section 6 in Chapter 3 Field Diaphragm 19 Stop down the condenser aperture diaphragm with the condenser aperture diaphragm lever to about 70 to 80 of the numerica...

Page 19: ...e objective vertical movement Never attempt either of the following actions as they will damage the microscope Rotating the left and right focus knobs in opposite directions at the same time Rotating the coarse focus knob past the stopper 1 2 Adjustment for the Rotation Torque rotation Resistance of the Coarse Focus Knob The torque of the coarse focus knob can be adjusted To increase the torque ro...

Page 20: ... objectives and for dipping the objective into the water to perform the water immersion You can operate the lever only when the objective is placed in the optical path The vertical movable range of the objective is up to 15 mm above the focal point With this movable range you can observe a specimen in a high petri dish The table below shows the relationship between the objective vertical movement ...

Page 21: ...ween the near side one and the far side one 1 Move the objective vertical movement lever from the left to the center The near side objective is retracted 2 With the near side objective retracted push the slide click release button and pull the sliding nosepiece lever fully to the near side 3 Release the slide click release button Move the sliding nosepiece slightly to and from to find a click stop...

Page 22: ...sh the objective vertical movement lever on the nosepiece farther than the normal position at the left or the right The objective moves down 1 mm When the lever is released the lever and the objective come back to their original positions CAUTION To prevent damage to the specimen and the objective be careful not to perform the dipping function accidentally Push the lever as far as it will go 2 5 C...

Page 23: ...der for the DIC microscopy is inserted into the DIC slider slot on the upper side of the objective clamp screw 4 Eyepiece Tube 4 1 Selecting the Optical Path in the Eyepiece Tube T Eyepiece Tube F Eyepiece Tube The optical path selector lever can be used to select the way to distribute light to the binocular part and the vertical tube Lever position BINO PHOTO BINO PHOTO 1 2 3 1 2 3 BINO PHOTO 1 2...

Page 24: ...er Adjustment Diopter adjustment compensates for differences in visual acuity between the right and left eyes improving binocular observation It s hard to adjust the diopters with the standard procedure because of the sliding nosepiece So adjust the diopters as described below 1 Turn the diopter adjustment rings on both eyepieces to align their engraved lines with the edges of the outer tubes of t...

Page 25: ... LWD condenser must be focused and centered so that the light passing through the LWD condenser forms an image at the correct location the center of the optical path on the specimen surface Before focusing and centering the LWD condenser focus on the specimen with a low magnification objective by following the steps of 1 to 11 in Section 2 of Chapter 1 Microscopy When you wish to use the 4x object...

Page 26: ...s are increased Conversely as the aperture diaphragm is opened resolution and brightness are increased while contrast and depth of focus are reduced It is not possible to adjust one pair of characteristics without affecting the other Generally a satisfactory image with appropriate contrast can be obtained with an aperture setting that is 70 to 80 of the numerical aperture of the objective The nume...

Page 27: ...ge of the centering telescope to focus on the aperture diaphragm image 4 Turn the diaphragm control lever to adjust the aperture diaphragm This is normally adjusted to 70 80 of the pupil of the objective 5 Remove the centering telescope with the adapter and attach the eyepiece to its original position 5 3 Attaching an Optical Element into the LWD Condenser Turret You can perform the bright field m...

Page 28: ... the additional lens 3 For the DIC microscopy Attach an objective for the DIC microscopy Attach a DIC prism into the condenser turret of the LWD condenser that meets the specification of the objective You can see the DIC prism type on the side of the objective 4 For the microscopy under the diagonal illumination You can observe a nearly transparent specimen by improving the contrast under the diag...

Page 29: ... that is the size of the picture composition frame for a digital camera the size of the CCD 7 Stage You can adjust the rotation torques rotation resistances of the stage movement knobs for the X axis and for the Y axis To adjust them move the stage to the edge of the movement It makes the adjustment easy Torque adjustment for the Y axis To increase the torque rotate the knob B in the arrow a direc...

Page 30: ... condenser lens If water in the chamber spills on the stage or on the condenser lens it should be wiped out soon After use wipe off water from the tip of the objective then follow up by wiping with absolute alcohol If you observe water stains apply a small amount of neutral detergent and wipe gently then follow up with absolute alcohol 9 Cleaning the Oil Immersion Type Objective After Use To wipe ...

Page 31: ...ious observations from a low magnification with wide view field to a high magnification with high resolution without changing objectives Take note of that vignettings may occur when the magnification for the rear port is x0 35 This is not a malfunction The front port can be used for the following observations Bright field microscopy Microscopy under the diagonal illumination DIC microscopy combine...

Page 32: ...unt unit can be removed When the C mount unit is removed the rear port can be used as an ISO mount of 38 mm in its inner diameter and of 29 mm distance from the hardware edge to the imaging position The product name for the variable magnification turret is Mag Variable Turret 10 3 Mounting a 2 3 Inch TV Camera When the M4 set screw on the knurled ring of the rear port is tighten and the two M4 set...

Page 33: ...e rear port come together Check that the M4 set screw on the knurled ring on the rear port is loosened and that the M4 set screws at the C mount unit screw part is tightened To raise the camera position on the rear port rotate the knurled ring in the A direction To lower the camera position rotate the knurled ring in the B direction During the adjustment watch the monitor image 10 6 Selecting the ...

Page 34: ... used 2 To perform the infrared DIC microscopy through the rear port You must use the simple analyzer FN IR ISA DIC IR analyzer or the epi fl attachment D FL U EPI FL to perform the DIC microscopy through the front port When you use the epi fl attachment insert the DIC analyzer 11 Polarizer Turret You can perform the DIC microscopy under visible lights the wavelength range is from 430 nm to 770 nm...

Page 35: ...l path of the rear port Remove the DIC prism of the single objective holder from the optical path And remove the DIC prism of the condenser lens from the optical path When the variable magnification double port attachment and the epi fl attachment D FL UEPI FL are used Locate the empty hole into the optical path for the epi fl attachment turret and check that the analyzer in the epi fl attachment ...

Page 36: ... of the polarizer turret to adjust the index a white point to the center line of the scale Insert the IR polarizer assembled in Step 2 into the upper turret of the polarizer turret The notch of the IR polarizer must be oriented in the way as shown in the figure 3 JAPAN FN PT 4 Attach the polarizer turret into the microscope body 5 Rotate the knurled ring on the right side of the polarizer turret a...

Page 37: ...s filter and the 1 4 lambda plate 11 3 Contrast Adjustment 1 Insert the DIC slider into the single objective holder or into the sliding nosepiece to locate the DIC prism of the condenser into the optical path 2 Rotate the knurled ring on the right side of the polarizer turret upper side to change the polarizer orientation and adjust the contrast ...

Page 38: ... loose accuracy when exposed to even a weak physical shock Required tools Hexagonal screwdriver provided For M4 set screws Two hexagonal wrenches provided For M4 hexagonal socket head bolts and M5 hexagonal socket head bolts Phillips screwdriver For M3 Phillips head screw When not using these tools store them together in a safe place for a future use Installation location This microscope system is...

Page 39: ...ptical Fiber Light Source Trinocular Tube TV tube Trinocular Tube Ergonomic Eyepiece Tube Mag Variable Double Port Simple Polarizing Attachment Microscope FN1 DIC Slider Objectives Slider Objective CFI75 LWD Sliding Nosepiece CFI75 Holder LWD Condenser High intensity Light Source Mercury Lamp Fiber Light Source C mount TV adapter C TEP DSC Port Power Supply 12V100W Halogen Lamp DIC Module Support ...

Page 40: ...wer supply Use a 12V 100W halogen lamp the PHILIPS 7724 lamp or the OSRAM HLX64623 lamp Be careful not to touch the glass surface of the lamp with bare hands Doing so will cause fingerprints grease etc to burn onto the lamp surface reducing the illumination If you do get any fingerprints or dirt on the lamp wipe them clean Make sure the lamp house cover is securely fitted to the lamp house after r...

Page 41: ...use connector part and fix it with the clamp screw on the upper side of the lamp house Replacing lamps For information about replacing lamps for the LS DWL N halogen light source for the optical fiber illumination refer to the instruction manual provided with the light source 1 Check that the power switches on the power supply and the optical fiber light source are turned off the switches are push...

Page 42: ...en the two nosepiece arm clamp screws on the right side of the microscope mainstay and remove the cover 2 Attach the nosepiece arm onto the dovetail on the microscope mainstay 3 Tighten the nosepiece arm clamp screw on the right side of the microscope mainstay 4 Reattach the cover on the right side of the microscope mainstay 3 Assembling the eyepiece tube mount part Attach the eyepiece tube mount ...

Page 43: ...ication double port attachment onto the eyepiece tube mount part of the epi fl attachment and fix the double port attachment with an M4 hexagonal socket head set screw Then fix the epi fl attachment with two M4 hexagonal socket head bolts onto the microscope main body The epi fl attachment is put between the microscope main body and the variable magnification double port attachment 3 Simple DIC an...

Page 44: ...ce with the protrusion on the sleeve and slide in the eyepiece Some types of eyepiece tube do not have such protrusions If necessary attach optional rubber eye guards into the grooves around the eyepieces 7 Assembling the stage unit and attaching the LWD condenser 1 Attaching the stage onto the substage 1 Remove the four M5 hexagonal socket head bolts on the upper part of the substage 2 Attach the...

Page 45: ...nsert a bolt into the threaded hole in the bottom of the auxiliary support column tighten the bolt and secure the auxiliary support column to the microscope body Do the same for the opposite side When the LWD condenser is attached the stage support columns cannot be attached You must attach the stage support columns before attaching the LWD condenser 4 Attaching the stage support plates Attach the...

Page 46: ...chamber with a silicone adhesive or so on to prevent water leaks Chamber holder Acrylic chamber 8 Attaching the sliding nosepiece or the single objective holder 1 Rotate the coarse focus knob to move the nosepiece arm to the center of the vertical stroke 2 Insert the provided hexagonal screwdriver into the hole on the right side of the eyepiece mount part And then tighten the M4 hexagonal socket h...

Page 47: ...d then screw in the nosepieces For the sindle objective holder Rotate the coarse focus knob to move the nosepiece arm to the upper limit And then screw in the LWD 16x water immersion type objective 11 Attaching the DIC slider For the sliding nosepiece Set the objective into the optical path Lower the objective You can see the DIC slider slot Insert the DIC slider into the slot Use the DIC slider t...

Page 48: ...the optical fiber light source 1 Insert the optical fiber into the optical fiber adapter on the back of the microscope 2 Push in the optical fiber as far as it goes then fix it with the M4 hexagonal socket head set screw 14 Fixing the microscope main body Insert four hexagonal socket head bolts into the screw holes on the vibration isolator through the holes of the base auxiliary legs at the base ...

Page 49: ...onnecting the power code Make sure to use the specified power cord When the supply voltage is 100 V to 120 V the power cord specification is as follows UL Listed detachable cord set 3 conductor grounding Type SVT No 18 AWG 3 m long maximum rated at 125 VAC minimum When the supply voltage is 220 V to 240 V the power cord specification is as follows Approved according to EU EN standards 3 conductor ...

Page 50: ... hole on the right side Sliding nosepiece two M3 hexagonal socket head bolts on the both sides LWD condenser two M4 screw holes on the bottom side Polarizer turret two M3 screw holes JAPAN FN PT Microscope body 18 Attaching option accessories To attach option accessories such as the photomicrographic equipment or so on refer to the instruction manuals for them M4 screw holes M3 screw holes M3 hexa...

Page 51: ...de the sliding nosepiece to the click stop position The condenser position is too low Adjust the condenser focus knob so that the field diaphragm image is focused on the specimen surface The condenser has not been centered Center the condenser The condenser is not attached correctly Install the condenser correctly A filter is in an intermediate position Move the filter slider to a click stop posit...

Page 52: ...an the components The nosepiece is not placed to a click stop position Push the slide click release button and slide the sliding nosepiece to the click stop position The specimen is not secured in place on the stage surface Attach the specimen securely The focus is uneven The stage is tilting Install the stage correctly The nosepiece is not placed to a click stop position Push the slide click rele...

Page 53: ...oes out of focus when the objectives are switched Parfocal adjustment for objectives has not been performed Perform parfocal adjustment The specimen movement is too sensitive The torque for the stage handle is adjusted too light Adjust the torque tighter The interpupillary distance has not been adjusted Adjust the interpupillary distance When viewing through the binocular eyepiece the image does n...

Page 54: ...nsion cable is not connected to the lamp house Connect the extension cable to the lamp house No lamp is attached Attach a lamp The lamp is blown Replace the lamp with a new one The lamp does not light even though the power switch is turned on A wrong lamp is used Use the specified lamp PHILIPS 7724 or OSRAM HLX 64623 The lamp is about to blow Replace the lamp with a new one The power cord is not c...

Page 55: ...using petroleum benzine or absolute alcohol always follow the instructions provided by the manufacturer 2 Painted component cleaning Do not use organic solvents such as alcohol ether or paint thinner on painted components plastic components or printed components Doing so could result in discoloration or in peeling of the printed characters For persistent dirt dampen a piece of gauze with neutral d...

Page 56: ...50 50 The DSC port cannot be used with the variable magnification double port tube Trinocular eyepiece tube FUW Bino Vertical port 100 0 0 100 Trinocular eyepiece tube TUW Bino Verticlal port 100 0 20 80 0 100 Long object distance condenser Universal turret condenser NA 0 78 Object distance OD 8 2mm Differential interference contrast microscopy and diagonal illumination microscopy can be performed...

Page 57: ...S100W power supply FN LH lamp house YM EPI 3 3PIN extension cable This is UL listed product UL61010A 1 This product meets FCC Part 15B Class A requirements This equipment has been tested and found to comply with the limits for a Class A digital device pursuant to Part 15 of the FCC Rules These limits are designed to provide reasonable protection against harmful interference when the equipment is o...

Page 58: ...ter dimensions A S C O SHUTTER 4 1 2 3 5 6 1 2 6 JAPAN FN MN H 0 35 OUT IN DM 2 F STOP A STOP EX ADJ FN1 and trinocular eyepiece tube Specimen surface 159 55 67 346 100 94 106 5 107 551 2 205 5 477 5 185 5 8 2 φ37 4 1 coverslip 156 ...

Page 59: ...FN S2N 2 F STOP A STOP EX ADJ C O SHUTTER 4 1 2 3 5 6 1 2 6 FN1 and ergonomic eyepiece tube Specimen surface 104 67 346 100 94 106 5 107 486 7 264 6 477 5 185 5 8 2 φ37 4 1 coverslip 156 226 8 21 8 151 4 170 φ9 φ9 φ9 φ9 Optical path center ...

Reviews: