background image

Version 2.0

About your J-Series CPE

The J-Series ODU (Outdoor Unit) is specially 
designed to be installed outside (like on a roof) over 
the pole or a wall. That helps ODU to receive better 

4G-LTE signals and feed them into the home or 

internal living space via an Ethernet cable using the 
POE feature.

Quick Start Guide

Model: AOL-J912

4G LTE Bands 2/4/5/12/13/14/25/26/66

J Series by ATEL

4G LTE Outdoor CPE

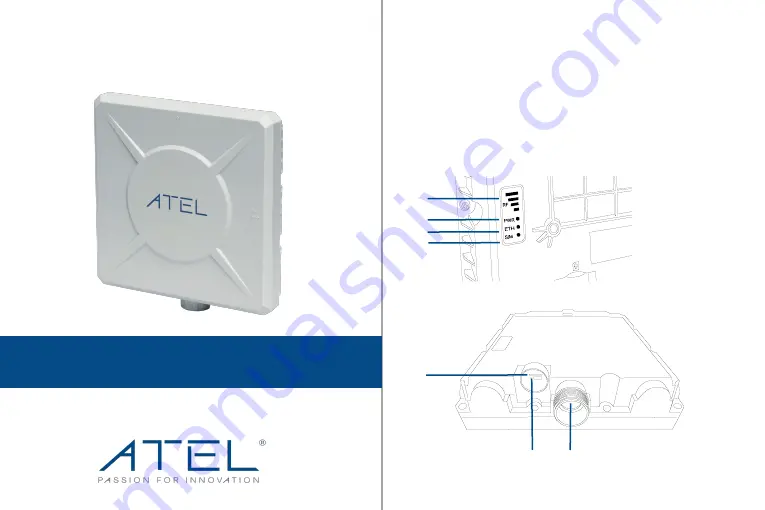
Figure 1.  LEDs & Ports Location

1

2

3

4

5

6

7

Summary of Contents for AOL-J912

Page 1: ... roof over the pole or a wall That helps ODU to receive better 4G LTE signals and feed them into the home or internal living space via an Ethernet cable using the POE feature Quick Start Guide Model AOL J912 4G LTE Bands 2 4 5 12 13 14 25 26 66 J Series by ATEL 4G LTE Outdoor CPE Figure 1 LEDs Ports Location 1 2 3 4 5 6 7 ...

Page 2: ... this button helps device configurations convert to factory defaults 6 ETH Ethernet Ethernet LED LED On indicates the Ethernet LAN connection is established LED Off indicates the Ethernet LAN connection is not established 3 SIM Slot Regular 2FF SIM card needs to be inserted as directed 4 RF Network Signal Bars These LEDs indicate the receiving signal quality More LED bars represents better signal ...

Page 3: ...elps to affix the ODU with the mounting bracket to a pole Installation Kit Towards ODU rear panel Towards Pole Wall Helps to attach mounting bracket to ODU rear panel NOTE Tools not included in the installation kit PoE Injector Power Cord Output 48 56V DC Input 100 240V AC ...

Page 4: ...ect J Series ODU with PC Power ON your J Series ODU To turn on your device you need to connect the Ethernet cable coming from the ODU to the PoE injector s P D OUT Port Now connect power cord to PoE injector s AC IN Port The Power LED on the ODU should now be on this indicates that the ODU is successfully powered ON To connect your ODU to your PC first turn the ODU on using the PoE injector Connec...

Page 5: ...strong electric or magnetic fields such as dish satellite antennas Note Tools required during installation M6 Wrench and 2 Phillips Screwdriver tools not included in installation kit Installation of your J Series ODU To Mount on a Pole 1 Attach the mounting bracket to the rear panel of the ODU using four M6 mounting nuts 2 Attach the U shaped side of the bracket to the pole using the provided U bo...

Page 6: ... and mark the location for holes 2 Use a 4mm drill bit to make four holes approximately 30mm deep then insert four wall anchors into the holes 3 Use four screws to attach the ODU with mounting bracket to the wall Affix Align Mounting Brackets 1 Unscrew the screws used to stack two mounting brackets together This also helps the ODU CPE s angle to be adjusted horizontally or vertically depending upo...

Page 7: ... Settings Once changed you must use the new password to login to the portal Online Device Management Portal You can access your ODU J Series Online Portal to view device status change your device settings and perform manual software upgrades for more details kindly refer to the device s User Manual Open any web browser and then enter http 192 168 0 1 in the URL address bar while connected to the J...

Page 8: ...one and boot up with factory default settings A To reset the device from the Online Portal click Settings Basic Management Click on Restore to factory default settings B To reset the ODU from the reset button refer figure 1 make sure your ODU is powered on Insert a pin into the Reset pin hole push down and hold for 3 seconds The device will restore the factory defaults and reboot The ODU must have...

Page 9: ...Limited Warranty The full ATEL USA Warranty Policy can be found at www atel usa com warranty On this page you can Start a Warranty Claim Check on an Existing Claim and read our Warranty Policy by clicking on ATEL s Warranty Policy Please follow all warranty instructions available and if you have any questions contact us at support atel usa com Our Website www atel usa com Contactusat support atel ...

Reviews: