ARKSCAN ES321, User Manual
The ARKSCAN ES321 user manual is available for free download on manualshive.com. This comprehensive manual provides detailed instructions and guidance on how to operate and maximize the functionalities of the ARKSCAN ES321 scanner. Easily access this convenient manual to enhance your scanning experience and unlock the full potential of your device.
Share
Download


Reviews:
No comments
Related manuals for ES321

RCR-1
Brand: Raymarine Pages: 46

IF30
Brand: Intermec Pages: 28

CL4NX Plus
Brand: SATO Pages: 6

HS 6508
Brand: Leuze Pages: 20
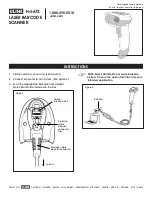
H-6672
Brand: U-Line Pages: 3

GP-1124D
Brand: GPRINTER Pages: 85

QD2430
Brand: DxLab Pages: 2

appLS15I
Brand: Approx Pages: 102

Star RF10
Brand: IDTECK Pages: 12

FS5108J
Brand: RIOTEC Pages: 2

iDC9277A
Brand: RIOTEC Pages: 5

X-200 PRO
Brand: OBD2 Pages: 13

PowerExpand A8328
Brand: Anker Pages: 9

PowerExpand A8326
Brand: Anker Pages: 12

Pro 603
Brand: Obreey Pages: 111

Z-3392
Brand: Zebex Pages: 12

UGT-CR960
Brand: Vantec Pages: 8

BVS HS-P Series
Brand: Balluff Pages: 314


