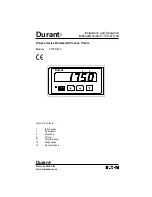
Art.no: 321222
1. LCD screen
2. Button "CLOCK"
3. Button "v- "
4. Button "SET"
5. Button "RESET"
6. Button "C.D."
7. Button "RND"
8. Button "ON/OFF"
9. Button "
˄+
"
Digital Timer Operation Instruction
1. Distribution of buttons and illustration of functions:
【
CLOCK
】
: Return clock; 12/24-hour switch (press for 3 seconds)
【
+
】
: Increase button; enter into program group setup
【
-
】
: Decrease button; enter into count-down setup
【
RND
】
: Random button
【
ON/OFF
】
: ON/AUTO/OFF switch; program group clear/reset
【
SET
】
: Clock setup; switch setup
【
RESET
】
: System reposition button
【
C.D.
】
: Count-down; summer-time system switch (along with
【
ON/OFF
】
button)
2. Clock setup
1. Recover power supply or press
【
RESET
】
button, or press
【
CLOCK
】
button under other modes, enter into
CLOCK mode;
2. Press
【
SET
】
button, “WEEK” flashes, press
【
+
】
or
【
-
】
button to select from Monday to Sunday;
3. Press
【
SET
】
button, “HOUR” flashes, press
【
+
】
or
【
-
】
button to select from 0-12 or 0-23 hours;
4. Press
【
SET
】
button, “MINUTE” flashes, press
【
+
】
or
【
-
】
button to select from 0-59 minutes;
5. Press
【
SET
】
button to return to CLOCK mode.
6. While setting, press
【
+
】
or
【
-
】
button for 3 seconds for accelerating accumulation function.
3. Program group setup
1. In CLOCK mode, press
【
+
】
or
【
-
】
button to enter into setup of program group or count-down. Display in turn:
1on-1off-2on-2off-
…
20on-20off-d on (or d off); press
【
+
】
or
【
-
】
button for 3 seconds for accelerating accumulation function.
2. First switch to program group “1on”. Display: --:--. Press
【
SET
】
button, “WEEK” flashes, press
【
+
】
or
【
-
】
button
to adjust. Display in turn:
MO TU WE TH FR SA SU, MO, TU, WE, TH, FR, SA, SU, MO TU WE TH FR,


