

Q u i c k S t a r t
G u i d e
I n t r a o r a l Vi d e o C a m e r a S y s t e m
1
C o m p o n e n t s
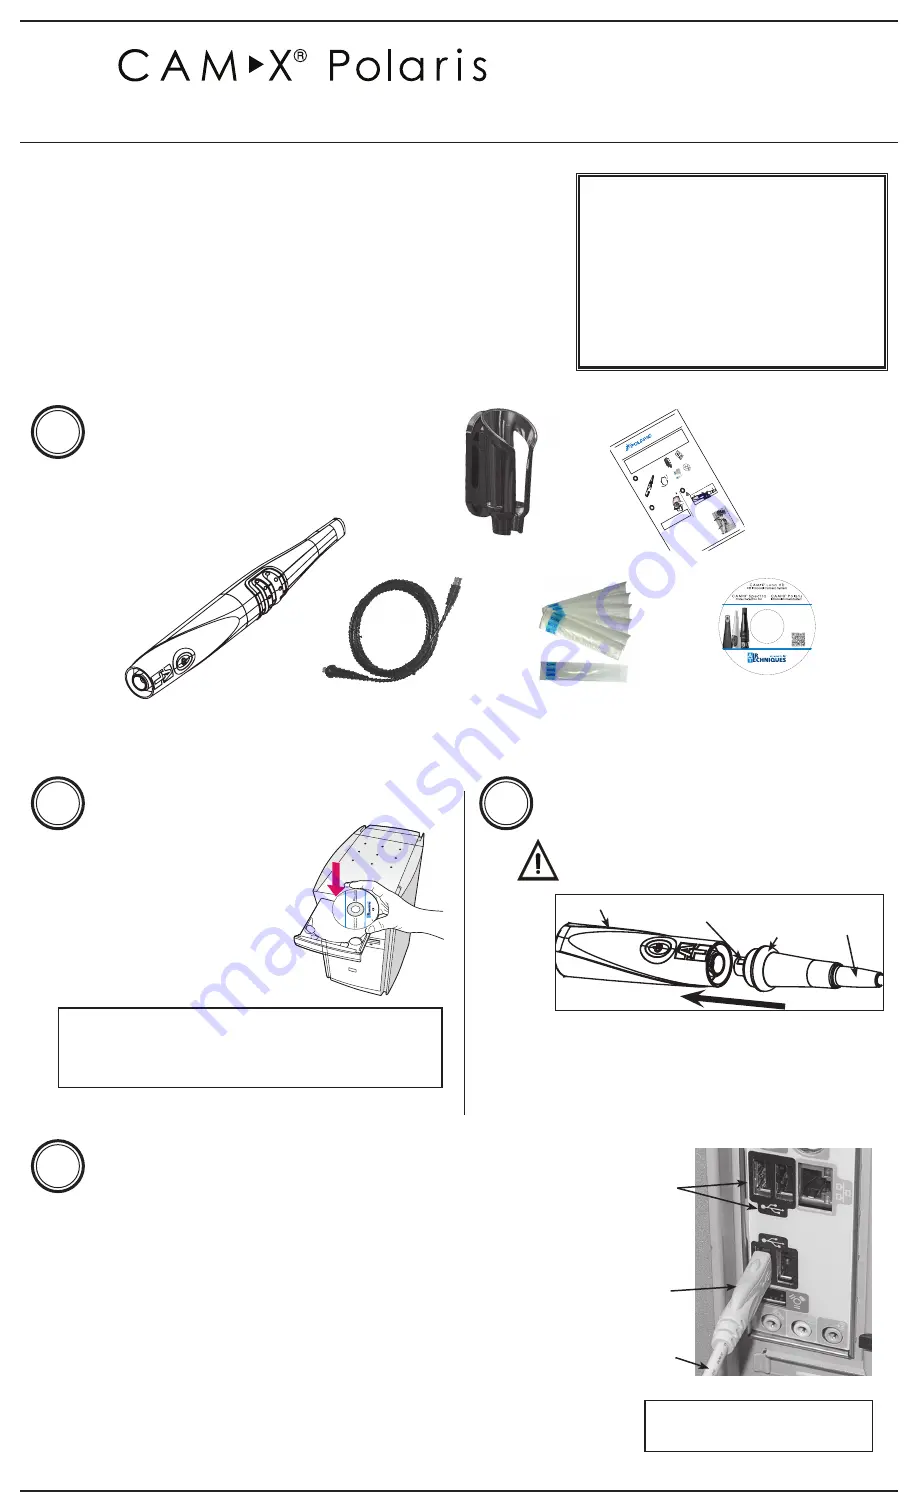
1. Using the black molded connector end of the Handpiece
Cable, align the connector key with the keyway of the
Handpiece connector.
2. Insert straight into Handpiece connector until it securely snaps
into place.
H a n d p i e c e C o n n e c t i o n
Do not twist or turn the Handpiece Cable
connector. The connector is keyed and mates
straight on with Handpiece connector.
S o f t w a r e I n s t a l l a t i o n
Before connecting
Polaris
to your
computer or attempting to use it for
the first time, run the Setup program
on the Drivers and Utilities Disk.
This CD contains the necessary
device drivers to communicate with
the imaging software installed on the
user’s computer.
Note: If the startup screen does not appear, double-click
My Computer, double-click the CD drive and
then double-click Autorun.exe.
Polaris Camera Handpiece
Handpiece Holder
with Wall Mount
Disposable Camera
Sheaths Sample Pack
Quick Start Guide
Qu
ick
St
art
Gu
ide
Int
rao
ral
Vi
deo
Ca
me
ra
Sys
tem
The
version
of
Ope
rato
r’s M
anu
al fo
r
Pola
ris
is in
clud
ed o
n th
e
CD.
Als
o in
clud
ed a
re
USB
Device
Drivers,
Demonstr
ation
Program
and
Utilities
and
Adobe
Acrobat
Reader
Aut
hor
ized
ima
ging
sof
twa
re, p
urch
ased
from
you
r de
aler
or o
ther
com
pan
y, m
ust
be i
nsta
lled
on t
he c
omp
uter
in o
rde
r to
ope
rate
Pol
aris
.
Make
sure
that
the
computer
meets
all
requirements
necessary
to
support
the
Pola
ris.
See
Minimum
Computer
Syste
m R
equirements
in
the
Inst
ruct
ion
Man
ual
.
1
Co
mp
on
en
ts
1. Using
the
black
molde
d connector
end
of
the
Handpie
ce
Cab
le,
align
the
con
nector
key
with
the
keyway
of
the
Handpiece
connecto
r.
2. I
nser
t str
aigh
t int
o H
and
piec
e co
nne
ctor
unt
il it
secu
rely
snap
s
into
pla
ce.
Ha
nd
pie
ce
Co
nn
ect
ion
Do
not
twi
st o
r turn
the
Handpiece
Cable
connecto
r. The
connector
is k
eyed
and
mates
straight
on
with
Handpiece
con
necto
r.
So
ftw
are
In
sta
lla
tio
n
Befo
re
connecting
Pola
ris
to
your
compute
r or
atte
mpt
ing
to use
it for
the
first
tim
e, run
the
Setup
program
on the
Drivers
and
Utilities
Disk
.
This
C
D
con
tain
s t
he
nec
essa
ry
device
drivers
to
communicate
with
the
imag
ing
software
inst
alled
on
the
user
’s c
omp
uter
.
Note:
If th
e sta
rtup
scre
en d
oes
not
app
ear,
dou
ble-
click
My
Com
put
er,
do
uble
-clic
k th
e
CD
dri
ve
and
then
dou
ble-
click
Aut
oru
n.e
xe
.
Sc
an
X
Sw
ift
In
st
al
la
tio
n
&
O
pe
ra
t
M
an
ua
l
Di
sk
P
/N
G
80
95
R
ev
. A
M
ar
ch
2
01
3
Di
sk
Polaris Camera Handpiece
Qu
ick
Star
t Gu
ide
Dispos
able
Camera
Covers
Sample
Pack
Qu
ick
Star
t
Gui
de
Q
u
ic
k
S
ta
rt
In
st
ru
ct
io
n
s
D
ig
ita
l
Im
ag
in
g
S
ys
te
m
©
Ai
r T
ec
hn
iqu
es
, I
nc
C
op
yri
gh
t 2
01
3 •
P/
N
G8
01
3,
Re
v.
A •
M
ay
2
01
3
Co
rp
or
ate
H
ea
dq
ua
rte
rs
12
95
W
al
t W
hi
tm
an
R
oa
d
|
M
elv
ille
, N
ew
Yo
rk
1
17
47
- 3
06
2
|
P
ho
ne
: +
1-
80
0-
24
7-
83
24
|
F
ax
: +
1-
88
8-
24
7-
84
81
W
es
ter
n F
ac
ilit
y
29
1
Bo
nn
ie
La
ne
, S
ui
te
1
01
|
C
or
on
a,
C
A
92
88
0
- 2
80
4
|
P
ho
ne
: +
1-
80
0-
24
7-
83
24
|
F
ax
: +
1-
95
1-
89
8-
76
46
w
w
w.
ai
rt
ec
hn
iq
ue
s.
co
m
Sca
n Q
R C
od
e fo
r m
ore
ab
out
Sc
anX
.
8
Si
ze
#
2
Im
ag
e
Pl
at
es
(2
P
ac
ks
o
f 4
p
lat
es
)
4
Si
ze
#
0
Im
ag
e
Pl
at
es
(2
P
ac
ks
o
f
2
pla
te
s)
4
Si
ze
#
1
Im
ag
e
Pl
at
es
(2
P
ac
ks
of
2
p
lat
es
)
Ba
rri
er
En
ve
lop
es
Si
ze
#
0
(B
ox
o
f 1
00
)
Si
ze
#
1
(B
ox
o
f 1
00
)
Si
ze
#
2
(B
ox
o
f 3
00
)
Qu
ick
S
ta
rt
In
str
uc
tio
ns
M
ain
S
ca
nX
S
wi
ft
As
se
m
bly
w
ith
S
ize
#
2
In
let
G
uid
e
In
sta
lle
d
2
PS
P
Cl
ea
nin
g
W
ipe
S
am
ple
P
ac
ks
ScanX
Swift Ins
tallation
&
Operatin
g Manu
al
D
isk P/N G80
95 Rev.
A
March 2
013Disk
Sa
m
ple
Cl
ea
nin
g
Sh
ee
t
US
B
Ca
ble
24
V
DC
P
ow
er
S
up
ply
Ad
ap
te
r
ScanX
Swift Ins
tallation
&
Operati
ng Manu
al
Disk P/
N G8095
Rev. A
March 2
013Disk
CD
D
isk
&
Tr
ain
ing
DV
D
C
h
e
ck
D
e
li
ve
re
d
C
o
m
p
o
n
e
n
ts
1
In
st
a
ll
D
e
vi
ce
D
ri
ve
rs
2
De
vic
e
Dr
ive
r I
ns
ta
lla
tio
n.
Be
fo
re
c
on
ne
ct
in
g
Sc
an
X
to
y
ou
r c
om
pu
te
r o
r a
tte
m
pt
in
g
to
us
e
it
fo
r t
he
fi
rst
ti
m
e,
ru
n
th
e
Se
tu
p
pr
og
ra
m
o
n
th
e
Dr
ive
rs
an
d
Ut
ili
tie
s
Di
sk
.
Th
is
CD
c
on
ta
in
s
th
e
ne
ce
ss
ar
y
de
vic
e
dr
ive
rs
to
c
om
m
un
ica
te
w
ith
th
e
im
ag
in
g
so
ftw
ar
e
in
sta
lle
d
on
th
e
co
m
pu
te
r.
N
ot
e:
If
th
e
sta
rtu
p
sc
re
en
d
oe
s
no
t
ap
pe
ar,
d
ou
bl
e-
cli
ck
M
y
Co
m
pu
te
r,
do
ub
le
-c
lic
k
th
e
CD
-R
O
M
ic
on
a
nd
th
en
d
ou
bl
e-
cli
ck
D
:\
Au
to
ru
n.
ex
e
.
No
te
:
A
ut
ho
riz
ed
im
ag
ing
s
of
tw
ar
e,
p
ur
ch
as
ed
f
ro
m
y
ou
r
de
al
er
o
r
ot
he
r c
om
pa
ny
, m
us
t b
e
in
st
al
le
d
on
th
e
co
m
pu
te
r
in
o
rd
er
t
o
op
er
at
e
th
e
Sc
an
X
Sw
ift
.
S c a n X Swift In
s t allation &
O p e r at Man
u a l
D i sk P/N G80
9 5 Rev. A
M a r ch 2013 Disk
Si
ze
#
0
In
let
Gu
ide
D
is
k
Software
CD
& Trai
ning
Video
USB
2.0
Cable,10
Feet
2
3
Conn
ector
Key
Handpiece
Quick
Disconnect
Collar
Handpiece
Cable
US
B I
nte
rfa
ce
Co
nn
ect
ion
s
IMP
OR
TAN
T:
Use
a H
igh
Pow
er (
500
mA
) US
B 2.
0 Po
rt O
nly
1. Connect
the
USB
Type
A c
onn
ector
side
of
the
Han
dpiece
Cable
to any
availa
ble
USB
2.0
high
speed,
high
power
port
on
the
user
supplied
Computer
System
.
2. Al
ways
mak
e sure
to use
the
same
USB
port
whenever
re-
connection
of the
USB
cable
is necessar
y.
3. A
self-powered
USB
hub
can
be
used
to
extend
the
handpiece
cable
length.
4. Do
not
use
a BUS
- powered
hub
or
extension
cable.
USB
Type
A
Conn
ecto
r
Han
dpiece
Cable
Typical
Comp
uter
USB
2.0
Ports
4
Melville, NY U.S.A.
Includes:
►Operator's Manuals
• Spectra
• Polaris
• Luna HD
►Software Installation and
Conguration Guide
►Acrobat Reader
►Installation Program
Disk P/N G1415 Rev L
Software Drivers
and Utilities Disk
USB 2.0 Cable,
10 Feet
2
3
Connector
Key
Handpiece
Quick
Disconnect
Collar
Handpiece
Cable
U S B I n t e r f a c e C o n n e c t i o n s
IMPORTANT:
Use a High Power (500 mA) USB 2.0 Port Only
1. Connect the USB Type A connector side of the Handpiece Cable to any
available USB 2.0 high speed, high power port on the user supplied
Computer System.
2. Always make sure to use the same USB port whenever re-connection of the
USB cable is necessary.
3. A self-powered USB hub can be used to extend the handpiece cable
length.
4. Do not use a BUS - powered hub or extension cable.
USB Type A
Connector
Handpiece
Cable
4
Typical
Computer USB
2.0 Ports
Note: Desktop computer shown.
Laptop can be used.
Thank You and Congratulations
on your purchase of
Polaris
, the
latest standard definition camera in the dental video imaging product line
from Air Techniques, a leading manufacturer of dental equipment since 1962.
Polaris
offers the flexible benefits of USB Plug-N-Play technology that is easily
integrated into any practice. The lightweight one-piece handpiece is extremely
maneuverable and produces crisp, clear images.
This document provides brief information to help you get started using your
Polaris
for the first time.
Please refer to the Operator’s Manual PDF file on the Drivers and Utilities
Disk for detailed information.
Online Warranty Registration.
Quickly register your new
Polaris
online.
Just have the product model and serial numbers
available. Go to the Air Techniques web site,
www.airtechniques.com
, click the
Warranty
Registration
link and complete the form.
Registration ensures a record for the warranty
period and helps to keep you informed of product
updates and other valuable information.


