background image

09

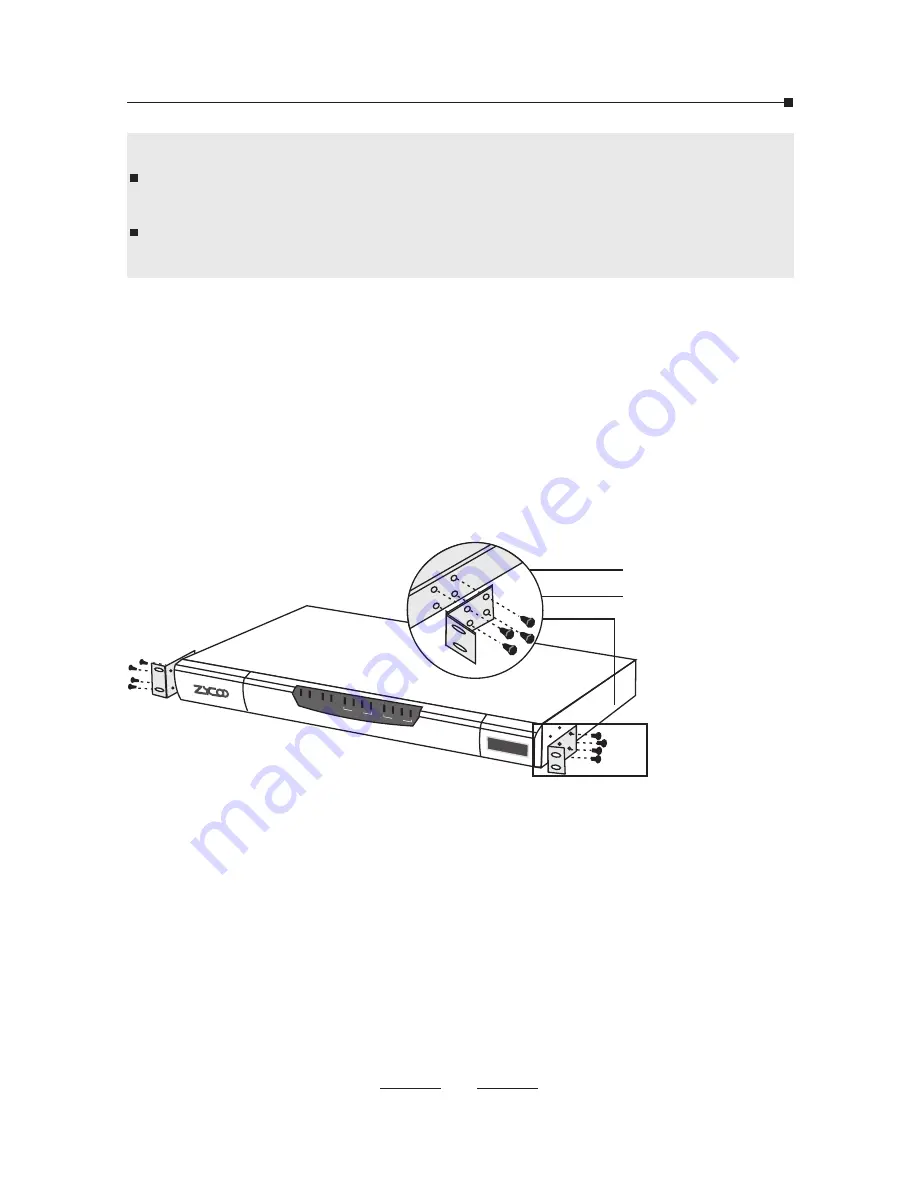
To  install  the  device  in  an  EIA  standard-sized,  19-inch  rack,  follow 
the instructions described below:

1.Check the grounding and stability of the rack. 
2.Secure  the  supplied  rack-mounting  brackets  to  each  side  of  the 
device with supplied screws as illustrated in the following figure.

PWR SYS

WAN LA

N

1         2        3          4

1         2        3          4

SLOT1

SLOT2

CooVox

IP Phone S

ystem

Rack-mounting Bracket

Screw

Do  not  touch  any  device  on  the  module,  just  to  prevent  the 
module from being damaged by static electricity.
This operation must be done with power cut off. The module does 
not support hot-plugging.

3.Install  IP  PBX  to  the  right  place  in  the  rack,  and  then  attach  the 
brackets to the device.

Rack Installation

Notes:

Summary of Contents for CooVox U80

Page 1: ...For Medium and Large Business IP PHONE SYSTEM CooVox Series U80 www zycoo com Quick Installation Guide Quick Installation Guide PWR SYS WAN LAN 4 3 2 1 4 3 2 1 SLOT2 SLOT1 CooVox IP Phone System ...

Page 2: ...ions 2 2 Installation Tools 2 3 Product Installation 2 4 Physical Connection 2 5 LED Definitions 3 Basic System Configuration 3 1 Web Login 3 2 Network Configuration 3 3 Module Settings 4 Further Configuration Table of Contents 03 04 04 07 07 12 12 13 13 14 15 17 ...

Page 3: ...na only for GSM WCDMA Module WarrantyCard Power Cord IP PBX Thank you for purchasing ZYCOO IP Phone System These are the items included with your IP Phone System purchase QuickInstallation Guide Two mounting brackets and fittings ...

Page 4: ...ood skin contact and is well grounded Use only the power cord provided with IP PBX Make sure that the supply voltage matches the specifications indicated on the rear panel of IP PBX Confirm not to bring about the overload of power circuit before turning on the power of IP PBX to avoid the unnecessary damage To avoid the electric accident do not open or remove the cover of IP PBX when it is working...

Page 5: ...e Environment Operating Storage Temperature 0 C 40 C 20 C 55 C Humidity 10 90 RH Non condensing 5 95 RH Non condensing Clearness The dust accumulated on IP PBX can be absorbed by static electricity and result in poor contact of metal contact points Some measures have been taken for the device to prevent static electricity but too strong static electricity can cause deadly damage to the electronic ...

Page 6: ... grid Keep the devices far from high frequency strong current devices such as radio transmitting station Use electromagnetic shielding when necessary Lightening Protection Extremely high voltage currents can be produced instantly when lightning occurs and the air in the electric discharge path can be instantly heated up to 20 000 As this instant current is strong enough to damage electronic device...

Page 7: ...ion operators computer room please obey the following requirements for installation and maintenance 2 2 Installation Tools Phillips screwdriver ESD preventive wrist wrap Cables 2 3 Product Installation Module Installation This IP PBX can support installing two extension modules at the same time Optional modules are as follows 4FXS Module 4FXO Module 2FXOS Module 2GSM Module 4GSM Module 2WCDMA Modu...

Page 8: ...ms 2 Check if the module is clean and intact 3 Please ensure power of IP PBX is cut off 4 Please ensure the direction of the module is correct ZYCOO logo side up 5 Push the module into the module slot through the guide rail 6 Tighten the locking screws on the both ends of the module Vacant FXO FXS Module GSM WCDMA E1 Module 4BRI Module Vacant E1 Module 4BRI Module FXO FXS Module GSM WCDMA Module E...

Page 9: ...s as illustrated in the following figure PWR SYS WAN LAN 1 2 3 4 1 2 3 4 SLOT1 SLOT2 CooVox IP Phone System Rack mounting Bracket Screw Do not touch any device on the module just to prevent the module from being damaged by static electricity This operation must be done with power cut off The module does not support hot plugging 3 Install IP PBX to the right place in the rack and then attach the br...

Page 10: ...rom the bottom to top of the rack to avoid overloading Please avoid any heavy thing placed on the device to avoid any unexpected accidents Please ensure heat dissipation and air circulation Connect to Ground Connecting the device to ground is to quickly release the lightning over voltage and over current of the device which is also a necessary measure to protect the body from electric shock In dif...

Page 11: ...installed in the normal environment the device can be grounded via the PE Protecting Earth cable of the AC power supply as shown in the following figure If you intend to connect the device to the ground via the PE Protecting Earth cable of AC power cord please make sure the PE Protecting Earth cable in the electrical outlet is well grounded in advance Notes L N 1 2 1 IP PBX Rear panel 2 AC Power C...

Page 12: ...nel Ringing Channel Loading Failure Channel Loading Succeed Channel Ringing Channel Loading Failure Channel Loading Succeed Channel Ringing Channel Loading Failure Module Loading Succeed Module Loading Failure CPE Signaling NET Signaling SS7 Signaling R2 Signaling Connected No Alarm Disconnected Alarm TE Mode NT Mode Module Loading Failure E1 T1 PRI R2 L1 Green Wink Off Red Wink Off Red Wink Off R...

Page 13: ...e to this website and you will be directed to the login page 3 Basic System Configuration 3 1 Web Login Step 1 Connect a PC directly to CooVox IPPBX WAN port Change your PC IP address to 192 168 1 xx Step 3 Enter the default URL https 192 168 1 100 9999 of the CooVox IPPBX into the browser address bar Step 2 Start a web browser To use the user interface you need a PC with Internet Explorer version...

Page 14: ...14 Default WAN IP address 192 168 1 100 Default LAN IP address 192 168 10 100 Default Username admin Default Password admin 3 2 Network Configuration Step 1 Go to Network Settings Network ...

Page 15: ...ault module settings for the CooVox U80 IPPBX system Step 2 Configure the network information There are three types of network connection They are Static DHCP PPPoE Point to Point Protocol over Ethernet You can find detail settings in the user manual If you have installed E1 or BRI module please do the following configurations Go to System Module Settings If E1 module ...

Page 16: ...16 If BRI module Save the configurations and confirm to reboot the IPPBX system ...

Page 17: ... you have other questions please contact the local dealer or distributor from which you purchased this product You can also browse our online FAQ resource at the ZYCOO Web site first to check if it could solve your issue If you need more support please contact ZYCOO support team ZYCOO online FAQ Http www zycoo com support Support team mail address support zycoo com Copyright Zycoo Co Ltd 2016 ...

Page 18: ......

Reviews:

Related manuals for CooVox U80