background image

ZTechnik

PO Box Maywood, IL 60153-0158 USA

708-343-0400 / Fax: 708-343-0625 / www.ZTechnik.com / e mail: [email protected]

©2011 National Cycle, Inc.

Page 3 of 5

10-118585-000 12/11

INSTALLATION

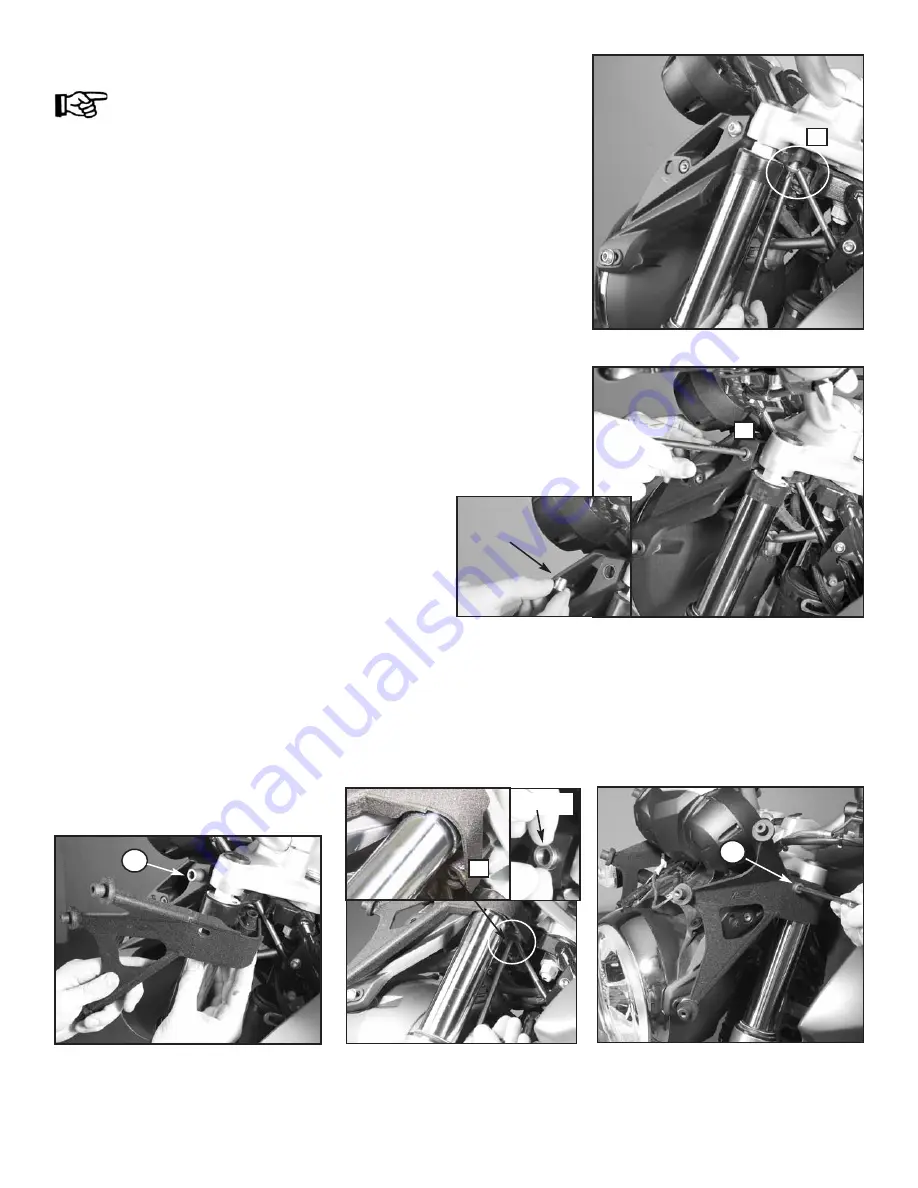
Remove and install the brackets to motorcycle

one side at a time.

1. MOUNT POINT-A

Remove the Left side screw only, from the head light

bracket located on the underside of the upper triple

tree clamp.

(T40 Torx Wrench) Figure 6.

Retain the OEM compression spacer. It will be

re-used.

Screw will not be re-used

2. MOUNT POINT- B

Remove the Left side screw and compression

spacer from the headlight bracket located on the

outside of the upper triple tree clamp.

Screw and

Compression Spacer will not be reused.

(T40 Torx Wrench) Figure 7.

3. INSTALL BRACKET

MOUNT POINT- A

Secure mount point A using original OEM

Compression spacer and a 45mm Screw (7).

(6mm Allen Wrench) Figure 8b

MOUNT POINT-B

Secure mount point B using supplied

Standoff (8) and a 45mm Screw (7)

(6mm Allen Wrench) Figure 8a and 8c

4.

Tighten all fasteners securely.

(6mm Allen Wrench)

5.

Follow the same procedure for the Right side of

motorcycle.

Figure 6

Figure 7

Figure 8b

Figure 8a

Figure 8c

B

A

Remove
Compression
Spacer

8

7

A

OEM

Summary of Contents for Z2442

Page 1: ...d Z2444 Parts List Index Part Number Description Qty Notes 1 Windshield Hardcoated Lexan polycarbonate 1 Not Pictured 2 37 370240 000 Bracket Left 1 3 37 370241 000 Bracket Right 1 Bag 1067 4 51 514212 000 Hex Screw M6 x 12 Stainless Steel 6 5 34 346037 000 Cap Black 6 6 44 447304 000 Grommet 6 7 51 515748 000 Hex Screw M8 x 1 25 x 45 Stainless Steel 4 8 49 495256 000 Standoff 2 Check contents of ...

Page 2: ...sing will fit through bracket GO TO PAGE 3 FIGURE 1 R12R MODELS WITH LARGE TURN SIGNALS FIGURE 2 1 Remove headlight shroud Figure 3 2 Disconnect Turnsignals Figure 4 3 Remove turnsignal T30 Torx Wrench Figure 5 ZTechnik PO Box Maywood IL 60153 0158 USA 708 343 0400 Fax 708 343 0625 www ZTechnik com e mail info ZTechnik com 2011 National Cycle Inc Page 2 of 5 10 118585 000 12 11 Figure 2 Large Turn...

Page 3: ...re used 2 MOUNT POINT B Remove the Left side screw and compression spacer from the headlight bracket located on the outside of the upper triple tree clamp Screw and Compression Spacer will not be reused T40 Torx Wrench Figure 7 3 INSTALL BRACKET MOUNT POINT A Secure mount point A using original OEM Compression spacer and a 45mm Screw 7 6mm Allen Wrench Figure 8b MOUNT POINT B Secure mount point B ...

Page 4: ...TH LARGE TURN SIGNALS Route turn signal through bracket and re install turnsignal Check operation of turn signals T30 Torx Wrench Figure 9 Install shroud Figure 10 6 INSTALL WINDSHIELD Insert grommets 6 into windshield Figure 11 Flex shield to align holes with the mount points Figure 12 Install aluminum caps 5 using the M6 Screws 4 6mm Allen Wrench Figure 13 Tighten securely 4mm Allen Wrench Figur...

Page 5: ...it losen Zubehörteilen Überprüfen Sie die Halterungen regelmäßig auf festen Sitz Die heutigen Motorräder sind mit einer ausreichenden Rahmensteifigkeit gebaut um den moderaten Belastungen standzuhalten die durch die absehbare Hinzufügung eines oder mehrerer Zubehörteile auf sie ausgeübt werden Wenn ein oder mehrere Zubehörteile die Stabilität Ihres Motorrads beeinträchtigen entfernen Sie sofort da...

Reviews: