background image

6

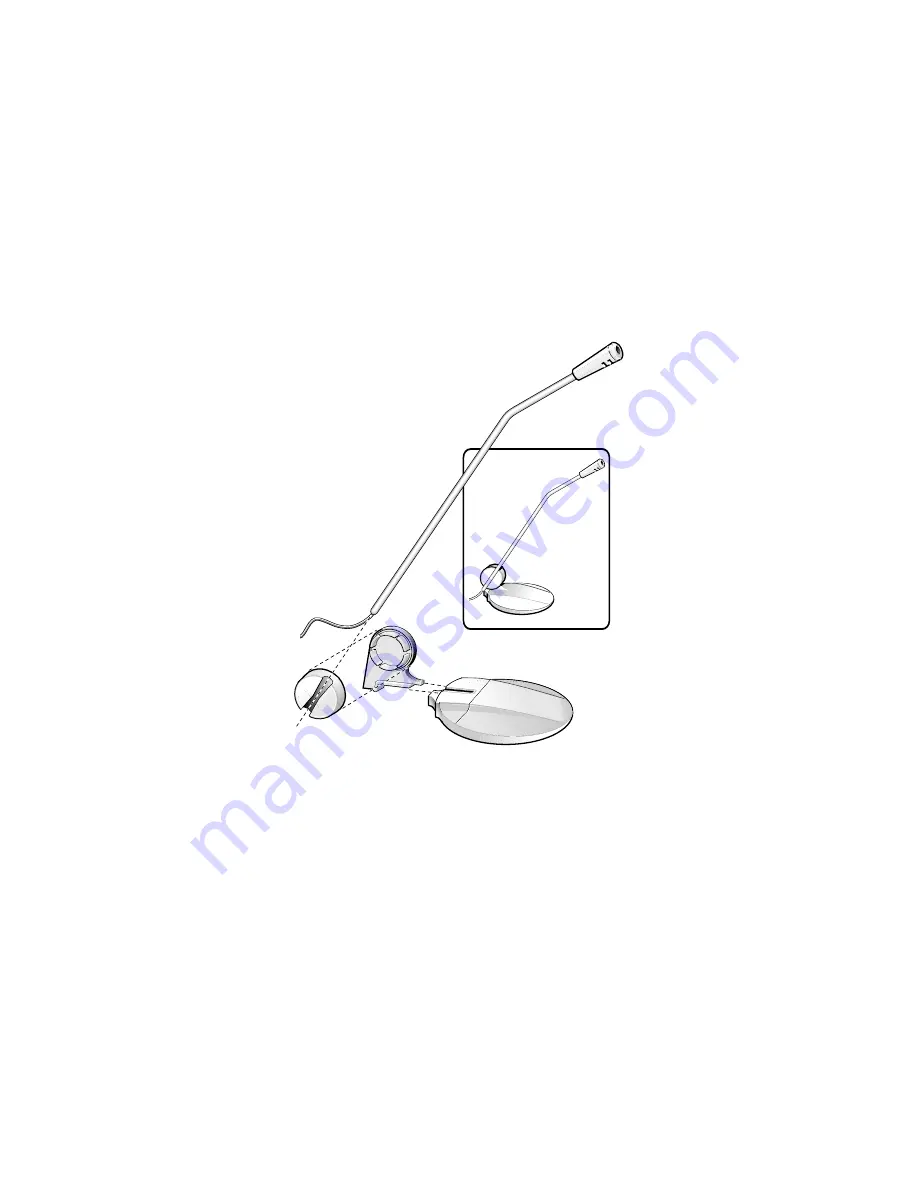
Assemble the microphone. Put the two halves of the microphone
holder together, and then slide the holder into the slot on the
microphone stand. Finally, slide the microphone stem into the
groove on the microphone stand. Refer to the assembly drawing
on the next page.

Insert the microphone plug into the jack marked MIC and then
insert the external speaker plug into the jack marked SPK. The
diagram on the next page shows the connections.

8

9

Summary of Contents for 2800

Page 1: ...QUICK START ...

Page 2: ...OR 3 11 9 INSTALLING SOFTWARE FROM THE CD ROM 11 INSTALLING BITWARE FROM FLOPPY DISKS 11 USING THE SPEAKERPHONE FEATURE WITH BITWARE 13 USING THE SVD FEATURE WITH BITWARE 15 USING THE SVD FEATURE WITH OTHER SOFTWARE 15 TESTING YOUR FAXMODEM 16 SENDING A FAX IN BITWARE 17 COMMON PROBLEMS AND SOLUTIONS 17 IMPORTANT INFORMATION 20 ...

Page 3: ...rophone with stand A CD ROM containing voice fax data software and other software documentation and customer support information Voice fax data software is on floppy disks in case you don t have a CD ROM drive These floppies also contain some helpful installation utilities for non Plug and Play systems Packet of free and reduced price online service offers ...

Page 4: ...ck Take the cover off your computer This is a little different for every computer If you are not familiar with the procedure consult your computer s manual for more detailed instructions Locate an available 16 bit slot see the illustration on the next page Note that the faxmodem has two sections of gold connecting fingers A 16 bit slot has double connectors to match the fingers Unscrew and remove ...

Page 5: ... phone jack where you would normally connect a phone You can also plug a regular telephone into the jack marked PHONE The telephone shares the phone line with the faxmodem and works as a normal telephone when the faxmodem is not in use 6 3 3 2 21 1 R RS SW WLLR RQ QD DOO 1 1 0 0 5 52 23 3 2 21 1 7 7 5 51 1 6 63 3 5 5 LINE PHONE MIC SPK 7 ...

Page 6: ... on the microphone stand Finally slide the microphone stem into the groove on the microphone stand Refer to the assembly drawing on the next page Insert the microphone plug into the jack marked MIC and then insert the external speaker plug into the jack marked SPK The diagram on the next page shows the connections 8 9 ...

Page 7: ...computer and turn itON If you are running Windows 3 1 or 3 11 proceed to Setting Up Your Faxmodem with Windows 3 1 or 3 11 on page 9 If you are running the Windows 95 operating system proceed to the next section 10 11 ...

Page 8: ...It lists A as the default drive If you are installing from the CD ROM type D unimodem and click OK this assumes that your CD ROM drive is the D drive If it isn t substitute the correct drive letter for D If you are installing from a floppy disk make sure that correct drive is designated in the Install From Disk dialog box A is probably correct Insert the BitWare Disk 1 in the drive and click OK Wi...

Page 9: ... table on page 20 or in some other easy to find place The COM port information is important because you will be asked to set the COM port when you configure your software applications Setting Up Your Faxmodem with Windows 3 1 or 3 11 If you are running Windows 3 1 or 3 11 you need to run the SETPORT utility from your DOS prompt If your computer has a CD ROM drive insert the disc that came with you...

Page 10: ...SETPORT is successful you may still run into a conflict with another peripheral such as a mouse a video card or a sound card This happens because SETPORT is unable to tell that a particular IRQ setting is already assigned to another device if that device is not being used at the time If you get erratic behavior such as inconsistent modem performance or a piece of hardware that stops working even t...

Page 11: ...ions on the screen Installing BitWare from Floppy Disks If you don t have a CD ROM drive the BitWare Voice Fax Data F D V installation program copies files from two 3 5 disks onto your system s hard disk and updates Windows system files Below are the basic instructions for installing BitWare The instructions below assume your 3 5 floppy drive is A Start Windows and place the BitWare Disk 1 in driv...

Page 12: ...e BitWare Setup dialog box appears and informs you that it can create independent Program icons that provide easy drag and drop use in Windows Click OK if you want this option A Group Name dialog box appears again this time asking you to name the second group window for the BitWare program icons Choose the default name BitWare Icons by clicking OK or typing another group name in the space and then...

Page 13: ...ormation box appears showing the modem class and the modem s fax send and receive speeds Click Close to proceed Using the Speakerphone Feature with BitWare BitWare F D V software has a speakerphone support feature called BitPhone With this feature you can conveniently dial out and receive calls hands free using the microphone and speaker Dialing Out Start BitWare F D V When the task bar appears on...

Page 14: ...n to terminate the call To hang up the phone click the red and black On Off button Receiving a Call Start BitWare F D V When the task bar appears on your screen click the BitPhone icon The BitPhone appears on your screen and the green PwrOn light comes on When someone calls you BitPhone displays a flashing bell icon Click the green Send button The green InUse light comes on when you answer the inc...

Page 15: ...and more software packages support AudioSpan in a direct and user friendly way These software packages include FarSite Lite and Wacky Wheels For software that doesn t directly support AudioSpan you can still use the feature by employing certain AT commands in your modem s initialization string These AT commands turn AudioSpan on and off and select the hardware settings you use to speak with and li...

Page 16: ... Your Faxmodem Logging on to an online service or Internet Service Provider ISP gives you an opportunity to test your faxmodem You also have a chance to enjoy the online services free offers If you have a CD ROM drive launch the easy point and click interface Go to the Online Services menu and select one of the services such as America Online or CompuServe If you don t have a CD ROM drive locate t...

Page 17: ...m connects and its progress When the box disappears the fax transmission is complete You can check the status of the fax by clicking the Transmit Log icon in the BitWare Icons box For further details about sending and receiving faxes refer to the BitWare User s Guide Common Problems and Solutions The following problems and solutions are commonwhenusing modems Problem The faxmodem disconnects while...

Page 18: ...volume of your speaker is too low Solution Install or move the jumpers on the faxmodem This procedure is described in Appendix B of the electronic Owner s Manual Problem You can t receive faxes Solution Make sure that Automatic Receptionis enabled inthe fax software and that the faxsoftware is running Make sure that no other communications software is running Problem Your faxmodem goes off hook an...

Page 19: ...and the volume setting is turned up in your software so that you can hear dialing sounds Also make sure that the phone line is plugged in If you are using tone dialing on a line that requires pulse dialing the line may not be able to accept tone dialed calls Select pulse dialing in your software For more troubleshooting tips refer to your Owner s Manual ...

Page 20: ...need the information below We recommend that you take a few moments to fill in the following information for your future reference Faxmodem Model located on the FCC label and on the end of the box Serial Number located on the bracket COM Port ______ IRQ if known Date of Purchase Store or Dealer ...

Page 21: ...oes not warrant that the hardware will work properly in all environments and applications and makes no warranty or representation either expressed or implied with respect to the quality performance merchantability or fitness for a particular purpose of the software or documentation The manufacturer reserves the right to make changes to the hardware software and documentation without obligation to ...

Reviews: