Zoom 272714 Operation Manual Download Page 38

Selecting files and playing them

Files that have been recorded by the 

P8

 or that are saved on the SD card can be selected and played.


File format overview

Select audio files with the following formats.

• 

Format: WAV

• 

Sample rate: 44.1 kHz

• 

Bit rate: 16/24-bit

• 

Mono/stereo

NOTE

• 

If a file is not compatible with the 

P8

, its name will be gray and it will not be selectable or an error pop-

up message will appear when it is selected.

• 

Files that are not compatible with the 

P8

 but can be converted will appear on the File List Screen. When 

they are selected, they can be converted to a compatible file format. Select the file after conversion.

• 

After the sample rate of a file has been converted to 44.1 kHz, “_441” will be added to the end of the file 
name.

• 

After a file has been converted from MP3 to WAV, it will have the same name.

• 

A new file will be created during conversion, so the original file will remain.
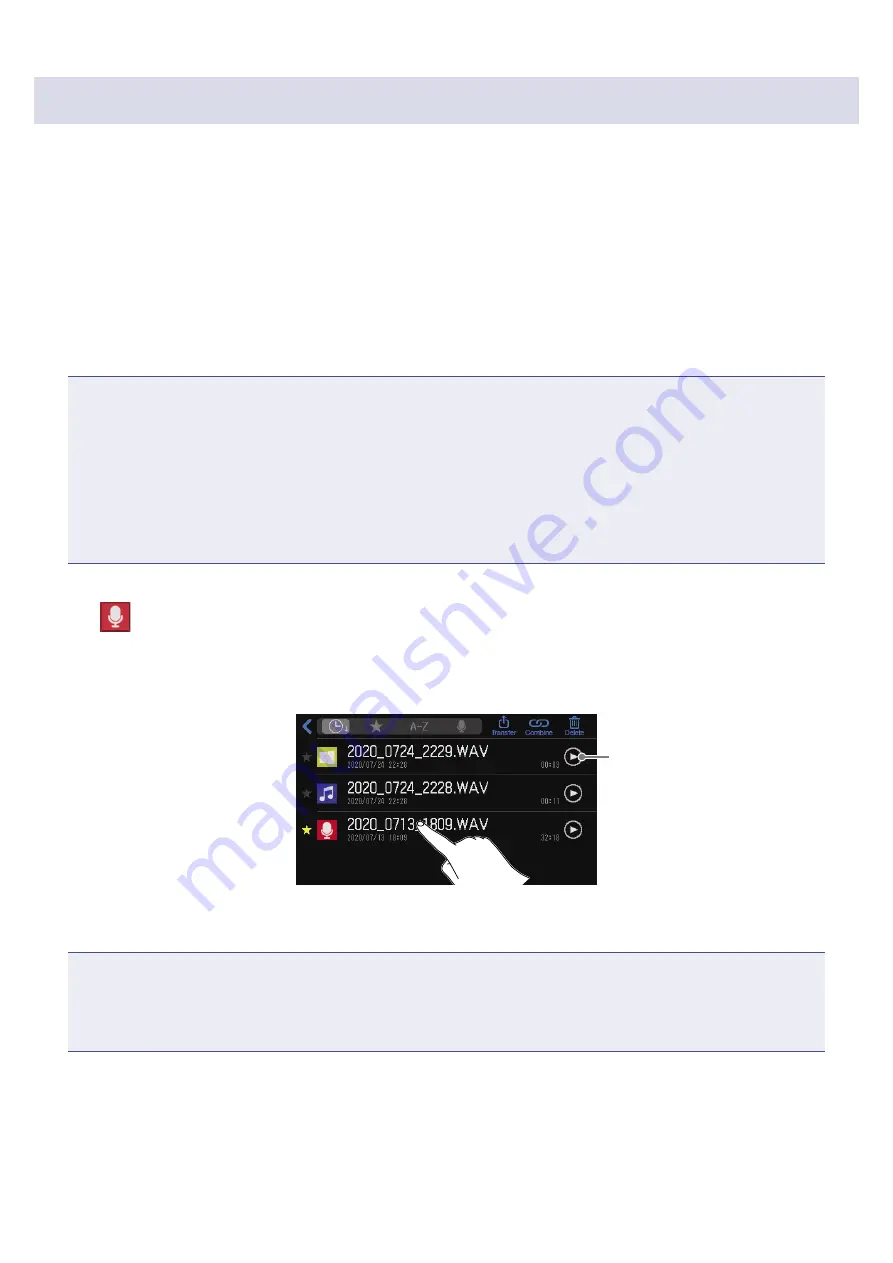
1. 

Tap 

 on the Home Screen.

This opens the File List Screen.

2. 

Tap the audio file you want to play.

Play button

Tap to start and stop 

playback.

The editing screen for the selected audio file will be shown.

NOTE

• 

When using play buttons on the File List Screen to play files, 48kHz, 88.2kHz and 96kHz WAV files can 
be played, but they will not be played with the correct pitch or speed.

• 

Play buttons only appear for WAV files.

38

Summary of Contents for 272714

Page 1: ...mission is prohibited Product names registered trademarks and company names in this document are the property of their respective companies All trademarks and regis tered trademarks in this document a...

Page 2: ...f Cisco Systems Inc in the USA and other countries and is used under license The SD SDHC and SDXC logos are trademarks Other product names registered trademarks and company names in this document are...

Page 3: ...mixing Every necessary editing function is built in The P8 has every necessary editing function to complete episodes for distribution These include deleting unnecessary parts of recorded data optimiz...

Page 4: ...D PAD 46 Setting playback modes for each SOUND PAD 47 Changing bank names 48 Managing files 49 Deleting files 50 Combining multiple files into one in specific order 52 Editing files 55 Opening the Fil...

Page 5: ...can be used for one touch playback of background music jingles and other sounds during recording Countermeasures for environmental noise in recording locations Attaching windscreens to mics can reduce...

Page 6: ...reo files for podcasting in the following ways Unnecessary parts can be cut and fade ins outs can be added Background music can be added The loudness normalization function can even out the volume ide...

Page 7: ...audio interface signals input by USB can be set to not be output back to USB This can prevent feedback to the person at the other end when recording while calling through a computer smartphone or tab...

Page 8: ...UT SELECT switches Set these according to the connected equipment Dynamic mic Condenser mic supplies 48V phantom power Computer smartphone or tablet Touchscreen This shows the status of the P8 and can...

Page 9: ...ith built in amplifiers for example PHONES jacks These output a stereo mix of the signals from all the channels Connect headphones to these PHONES knobs Use to adjust the volumes of the signals output...

Page 10: ...and off DC IN 5V AC adapter connector Connect the included AC adapter here USB port Type C This USB port is for connecting with a computer smartphone or tablet SD card slot Cards that conform to SDHC...

Page 11: ...ed with a computer for example and recordings on the SD card can be transferred for editing This might not be usable with some communication apps Smartphone Guests can participate by phone during podc...

Page 12: ...e By connecting a computer smartphone or tablet to the P8 a guest in a remote location can participate in a podcast by phone Internet Live streaming By connecting a P8 to a computer smartphone or tabl...

Page 13: ...ne connection jack USB port Channel 4 Channel 5 Channel 6 Channel 1 Channel 2 Channel 3 SPEAKER OUT jacks Smartphone channel Headphones Input sound Channels 1 5 can be used to input sound from mics Ch...

Page 14: ...of all channels or the playback of audio files on an SD card to speakers with built in amplification for example A mix of all channels is output to the computer smartphone or tablet connected by USB W...

Page 15: ...editing Counter This shows either the current elapsed recording time or the remaining available recording time Date and time Use to make settings related to the date time and display language SD card...

Page 16: ...mes of files and SOUND PAD banks Tap the keyboard and input characters Delete characters Input characters and spaces Move the cursor Switch between upper and lower case Character input area A cursor s...

Page 17: ...are supported Disable write protection on the SD card before inserting it Inserting or removing an SD card while the power is on could result in data loss When inserting an SD card be sure to insert...

Page 18: ...e adapter to an outlet DC IN 5V AC adapter connector Installing batteries To run the P8 on battery power open the battery compartment cover on the bottom and install 4 AA batteries Open while pressing...

Page 19: ...USB port Type C to a computer the P8 can be operated on USB bus power Operation using a portable battery is also possible Portable battery USB port Type C NOTE WhenTablet Mode page 29 is on operation...

Page 20: ...is turned on after purchase and after the P8 has been restored to its factory default state make initial settings Making initial settings on page 22 4 Turn on the output devices connected to the P8 NO...

Page 21: ...f output devices connected to the P8 2 Turn off the output devices connected to the P8 3 Set to OFF After Goodbye SeeYou appears on the touchscreen the power turns off NOTE When the power is turned of...

Page 22: ...when looking for files for example by allowing content to be identified by names The language shown on the touchscreen can also be selected 1 Tap the language to be shown on the touchscreen The touch...

Page 23: ...on to stereo files for podcasting individual files are also recorded for each channel The individual files for each channel are recorded before being affected by the fader Tone Comp DeEss and other ad...

Page 24: ...R connectors to connect them to INPUT jacks 1 6 2 HOT 1 GND 3 COLD ON AIR buttons 1 6 Confirm that they are lit Track buttons 1 6 Tap to adjust mic gain and audio quality page 32 Track buttons appear...

Page 25: ...t headphones to check the sound The PHONES 1 6 jacks output the same sound Up to 6 pairs of headphones can be connected PHONES knobs 1 6 Use these to adjust headphone volumes Headphones Connect to PHO...

Page 26: ...signal does not include the sound from the smartphone channel guests participating by phone will not have an echo Music played back on a smartphone can be input on the smartphone channel MUTE button C...

Page 27: ...P8 power on Turning the power on on page 20 The LED lights white when power is being supplied to the BTA 2 If a smartphone has already been paired it will automatically be connected at this time 3 Pr...

Page 28: ...nd sounds played with SOUND PAD buttons can be sent to a computer smartphone or tablet and streamed live as is Audio interface function overview on page 29 USB file transfer function Recording files o...

Page 29: ...ime that the P8 starts up HINT TheTablet Mode function is intended to prevent power draw from smartphones and tablets that are not capable of providing USB bus power Audio interface function overview...

Page 30: ...evice on the connected computer or other device NOTE ZOOM P8 Audio will appear on the computer Setting USB Mix Minus When using the P8 as an audio interface this can prevent feedback to a person parti...

Page 31: ...be output to connected powered speakers or other output equipment This is useful when for example listening to recorded files in a group and editing such files SPEAKER OUT knob This adjusts the volum...

Page 32: ...revent distortion by reducing input signals that have excessively high levels Input level meter Low Cut setting When on this can cut low frequencies to reduce the sound of air conditioning wind vocal...

Page 33: ...e compressor de esser Compressor and de esser functions can make voices easier to hear Turn it on or off and adjust the amount of the effect Compressor This compresses input sounds when they exceed a...

Page 34: ...Left cut Right boost HINT Double tap the slider or the bar to reset it to the default value Adjusting smartphone input tap The high and low frequencies of smartphone input can be boosted and cut to ad...

Page 35: ...s do not light Level meters for each channel Clipping indicators Level meters for stereo mix Adjust the output of each channel HINT Tapping the level meter area will show level guide values Channel 6...

Page 36: ...Press again to resume recording 2 Press or Recording will stop Press during recording to add marks to recording files page 40 These are convenient as guides when editing Fader volume adjustments do no...

Page 37: ...ginning of the file Playback file name Playback position bar green The elapsed playback time is shown above the playback position bar Slide the playback position bar or tap the desired position to mov...

Page 38: ...e converted to a compatible file format Select the file after conversion After the sample rate of a file has been converted to 44 1 kHz _441 will be added to the end of the file name After a file has...

Page 39: ...file playback During playback the PLAY indicator will light green See Playing recordings on the Home Screen on page 37 for operations during playback HINT See Managing files on page 49 for details abo...

Page 40: ...1 Press during recording and when the File Editing Screen is open During recording When is pressed a mark is immediately added at the elapsed recording time When the File Editing Screen is open A mark...

Page 41: ...n is open page 56 tap or press and hold the to be deleted If pressing and holding skip to step 3 File editing screen Mark 2 Press 3 Tap Delete The mark will be deleted and the File Editing Screen will...

Page 42: ...is adjusts the volume SOUND PAD level meters When a SOUND PAD is playing back that button will blink Switching banks The selected bank will be shown on the SOUND PAD settings screen and assigned audio...

Page 43: ...hen they are selected they can be converted to a compatible file format The new file will be automatically assigned after conversion After the sample rate of a file has been converted to 44 1 kHz _441...

Page 44: ...at you want to assign This assigns the selected audio file to the SOUND PAD Assigned audio file HINT When the Home Screen or SOUND PAD settings screen is open SOUND PAD buttons that have audio files a...

Page 45: ...ton A I to which you want to assign an audio file This assigns the file selected in step 2 to the selected SOUND PAD Tap Close to cancel assignment HINT This assigns audio files to SOUND PAD buttons i...

Page 46: ...playback levels differ significantly they can be made more consistent 1 Tap on the Home Screen 2 Tap the SOUND PAD button A I for which you want to change the level Change the bank as necessary page 4...

Page 47: ...ning to end This is useful for playing jingles and effect sounds for example Pause Each press alternately plays and pauses Playback stops at the end of the file Press and hold for 2 seconds to return...

Page 48: ...names of the SOUND PAD banks which are BANK A BANK D can be changed 1 Tap on the Home Screen 2 Tap Change the bank as necessary page 42 3 Input the bank name See Character input screen on page 16 for...

Page 49: ...it can be played page 37 and edited page 55 The creation date and time is shown below the file name File length Play button Tap to start and stop playback Favorite mark Tap to add remove as a favorite...

Page 50: ...eeded files can be deleted 1 Tap on the Home Screen 2 Tap 3 Tap one or more files that you want to delete Check marks will appear on selected files 4 Tap Tap to clear the selection and return to the F...

Page 51: ...5 Tap Delete The selected file will be deleted and the File List Screen will reopen Select Cancel to cancel deletion 51...

Page 52: ...o file for ending Combination example File format overview Audio files in the following formats can be combined Format WAV Sample rate 44 1 kHz Bit rate 16 24 bit Mono stereo NOTE When combining files...

Page 53: ...OTE The same file can be selected multiple times If the selected files cannot all be shown on the screen slide the bottom of the screen left and right to scroll through them Up to 20 files can be comb...

Page 54: ...6 Tap Close A new episode file that combines the selected files into one will be created and the File List Screen will reopen Combined file 54...

Page 55: ...f the file name After a file has been converted from MP3 to WAV it will have the same name A new file will be created during conversion so the original file will remain On the File Editing Screen the...

Page 56: ...o open these editing screens Cut unnecessary parts page 59 Divide files page 61 Fade in out page 63 Add background music page 66 Even out volume page 69 File name Waveform display Playback position ba...

Page 57: ...mes can be changed later Only the names of files that have been recorded on the P8 can be changed 1 Open the editing screen for the file with the name you want to change Opening the File Editing Scree...

Page 58: ...ed The SOUND PAD buttons light with the same colors as the file icons 1 Open the editing screen for the file with the icon you want to change Opening the File Editing Screen on page 56 2 Tap 3 Change...

Page 59: ...2 Tap 3 Slide cut points A and B to set them and tap Parts before cut point A and after cut point B shown in gray will be deleted Cut point A Cut point B Tap to cancel trimming HINT Files can be edit...

Page 60: ...ng and keep the untrimmed file as is Select Cancel to cancel trimming 5 Tap Close HINT If the original file has marks mark data will be retained in the file after trimming If a new file is created aft...

Page 61: ...vision points and tap File division point Tap to cancel division Setting file division points Slide to set the file division point Tap a mark to set it as the file division point Tap a point on the wa...

Page 62: ...Cancel to cancel division 5 Tap Close HINT If the original file has marks mark data will be retained in the files after division After division the file created from before the division point will hav...

Page 63: ...diting screen for the file to which you want to add a fade in Opening the File Editing Screen on page 56 2 Tap 3 Slide the fade in frame to set the desired range and tap Fade in range The fade in will...

Page 64: ...effect as is Select Cancel to cancel adding a fade in 5 Tap Close HINT If a new file is created after adding a fade in _FADEIN will be added to the end of the file name Fade out 1 Open the editing scr...

Page 65: ...dings on the Home Screen on page 37 for playback procedures Tap to zoom the waveform display enabling precise setting of the points 4 Tap Save Tap to add a check to create a new file with the fade out...

Page 66: ...ample rate 44 1 kHz Bit rate 16 24 bit Mono stereo NOTE The currently selected file cannot also be added as BGM The file name will appear gray If a file is not compatible as BGM its name will be gray...

Page 67: ...range Tap to cancel adding BGM HINT The file can be played to check the effect of adding the BGM See Playing recordings on the Home Screen on page 37 for playback procedures During file playback only...

Page 68: ...7 Tap Close HINT If a new file is created with BGM _BGM will be added to the end of the file name 68...

Page 69: ...1 Open the editing screen for the file for which you want to optimize the volume Opening the File Editing Screen on page 56 2 Tap 3 Tap Tap to cancel loudness normalization 4 Tap Save Tap to add a che...

Page 70: ...5 Tap Close HINT If a new file is created after loudness normalization _NORM will be added to the end of the file name 70...

Page 71: ...rmat for podcasts 1 Open the editing screen for the file you want to convert to MP3 format Opening the File Editing Screen on page 56 2 Tap 3 Tap Export Select Cancel to cancel MP3 conversion 4 Tap Cl...

Page 72: ...o computers smartphones and tablets 1 Tap on the Home Screen 2 Tap This opens the USB FILETRANSFER screen 3 Use a USB cable to connect the P8 with a computer smartphone or tablet Connecting a computer...

Page 73: ...for each track will be saved in it This happens only if KeepTrack Files is set to Original Data or WithTone Comp page 79 Mono file recording of signals from INPUT 2 Mono file recording of signals from...

Page 74: ...and time recording started are used in the file name Having the correct date and time set is helpful when looking for files for example by allowing content to be identified by names 1 Tap the date an...

Page 75: ...Changing the touchscreen display language The language used on the touchscreen can be changed 1 Tap the date and time display on the Home Screen 2 Tap the language to be shown on the touchscreen 75...

Page 76: ...ly so that the amount of remaining battery charge can be shown accurately 1 Tap the power button on the Home Screen 2 Tap the type of battery used Setting Explanation Alkaline Alkaline batteries Ni MH...

Page 77: ...touchscreen The brightness of the touchscreen can be adjusted 1 Tap the power button on the Home Screen 2 Slide to adjust the brightness of the touchscreen HINT Double tap the slider or the bar to re...

Page 78: ...re being used to record sound the noise reduction function of the P8 suppresses background noise to a constant level by automatically reducing the levels of the mic inputs not being used by people 1 T...

Page 79: ...ording file type setting Setting Explanation Off Only record stereo files for podcasting Original Data In addition to stereo files for podcasting individual files are also recorded for each channel Th...

Page 80: ...ith the P8 A quick test can be done in a short amount of time while a full test examines the entire SD card Conducting a quick test 1 Tap on the Home Screen 2 Tap 3 Tap QuickTest and then tap Execute...

Page 81: ...s no guarantee that writing errors will not occur This information is just to provide guidance HINT Tap to cancel a test while it is being executed Conducting a full test 1 Tap on the Home Screen 2 Ta...

Page 82: ...en it completes If the Access Rate Max reaches 100 the card will fail NG NOTE Even if a performance test result is OK there is no guarantee that writing errors will not occur This information is just...

Page 83: ...just been purchased or that have been formatted on a computer they must be formatted by the P8 Be aware that formatting an SD card will delete all data including files assigned to SOUND PAD buttons o...

Page 84: ...f each channel SOUND PAD functions recording and power can be backed up on SD cards Backing up frequently used settings can be useful Backing up 1 Tap on the Home Screen 2 Tap 3 Tap Save to SD card If...

Page 85: ...y exists on a SD card it will be overwritten and the old settings will be deleted The following items will not be backed up Channel fader positions PHONES USB OUT and SPEAKER OUT knob positions DATE T...

Page 86: ...4 Tap Load Tap Cancel to cancel loading backup settings NOTE Loading gain settings could cause sudden output of loud sounds Always lower the faders and knobs before loading settings 86...

Page 87: ...for 10 hours To keep the power on at all times turn off the AUTO POWER OFF function 1 While pressing set to ON 2 Tap the ON OFF button to change the setting Setting Explanation ON The power will auto...

Page 88: ...3 Set to OFF This resets the P8 to its factory default settings After Goodbye SeeYou appears on the touchscreen the power turns off NOTE A factory reset will overwrite all settings to their factory d...

Page 89: ...e The P8 firmware can be updated to the latest versions Download files for the latest firmware update from the ZOOM website zoomcorp com Follow the instructions in the P8 Firmware Update Guide on the...

Page 90: ...REC indicators are lit red Recording is not possible Confirm that the REC indicators are lit red Confirm that the SD card has open space Proper recording is not possible Stopping recording takes too...

Page 91: ...is connected to the P8 and turn the P8 off and on again Connect the P8 directly to a USB port on the computer or other device Do not connect it through a USB hub Sound skips during playback or recordi...

Page 92: ...16 bit mono stereo Recording media 4 32GB cards compatible with the SDHC specification class 10 or higher 64 512GB cards compatible with the SDXC specification class 10 or higher Audio interface 44 1...

Page 93: ...R PHONE L BACKUP PHONE R BACKUP VOLUME USB IN 1 BACKUP USB IN 2 BACKUP USB OUT L to PC USB OUT R to PC KEEP TRACK FILES REC DATA 7 L to SD CARD REC DATA 7 R to SD CARD REC DATA 8 L to SD CARD REC DATA...

Page 94: ...ZOOM CORPORATION 4 4 3 Kanda surugadai Chiyoda ku Tokyo 101 0062 Japan zoomcorp com Z2I 4118 01...

Reviews: