background image

Installation Description 

16

44


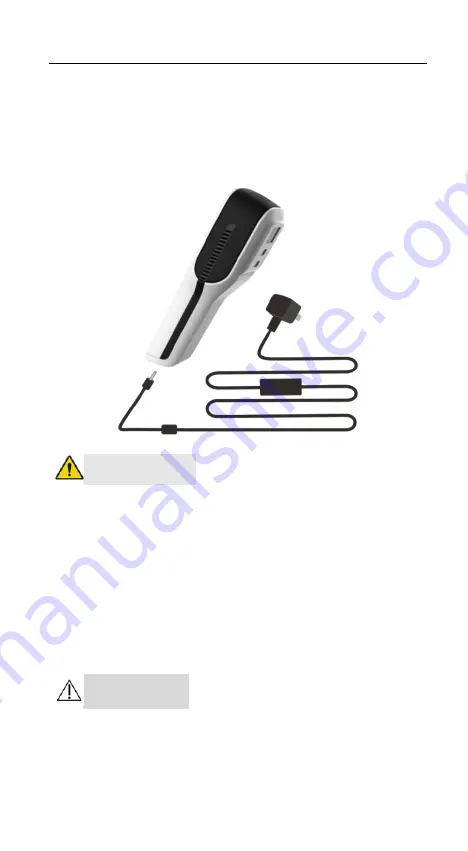
2. Connect the AC power cable and power adapter.   

3. Connect one end to the power interface at the bottom of the vein 

illuminator.   

4. Connect the other end to a matching AC power socket.   


WARNING:


Do  not  touch  the  power  plug  with  a  wet  hand.  If  any  liquid  or 

liquid  residue  exists  on  or  around  the  power  plug  or  power 

socket,  remove  this  liquid  or  liquid  residue  before  plugging  in 

the device. Otherwise, an accident may occur.   


Use the power cable provided by the manufacturer to ensure that 

the  device  is  properly  grounded.  If  the  device  is  not  properly 

grounded,  the  safety  performance  cannot  be  guaranteed  and  an 

electric shock may occur.   

CAUTION:


The  plug  of  the  AC  power  cable  must  be  firmly  and  fully 

inserted into the power socket.   

Summary of Contents for MEDCAPTAIN NAVI-30

Page 1: ...0 NAVI 60 Vein Illuminator Before using the NAVI 30 NAVI 60 vein illuminator please read this Manual carefully and follow the safety precautions and operating instructions contained herein Operation M...

Page 2: ...al interpretation right to this Manual To provide accurate and efficient product services MEDCAPTAIN shall have the right to change the contents of this Manual without prior notice under the premise o...

Page 3: ...your reference only The settings or data on the illustrations may differ from the actual settings or data of the product Version Information V1 0 Version of operation manual First release Software re...

Page 4: ...covered by the warranty if it is caused by Operator error Improper use Out of range grid voltage Force majeure such as natural disasters Replacement with or use of any component accessory or consumabl...

Page 5: ...verview 1 2 Safety 3 3 Product Specifications 8 4 Product Description 10 5 Installation Description 15 6 Operating Instructions 18 7 Common Faults 24 8 Cleaning and Disinfection 26 9 Maintenance 30 Ap...

Page 6: ...using light during operation By observing the vascular system projected on the skin surface qualified medical personnel can find a vein of appropriate size and position for venipuncture Veins beneath...

Page 7: ...detection positions This device can be used to detect and display the depth of the vein beneath skin The NAVI 60 vein illuminator is equipped with a display screen to display various operation informa...

Page 8: ...professional medical personnel or under the guidance of clinicians In addition the operator must receive a training related to the use of this device High frequency surgical equipment mobile phones w...

Page 9: ...e the dedicated accessories provided by MEDCAPTAIN Before use check the power cable power adapter and other accessories In case of any damage stop using the product and contact the after sales service...

Page 10: ...nnot completely substitute other vein locating methods that are based on reliable medical judgments or sight and touch judgments If the vein illuminator falls to the ground or it is affected by an ext...

Page 11: ...ower it off and report the conditions when the fault occurs to your local distributor or the after sales service department of MEDCAPTAIN Do not disassemble or reconstruct the vein illuminator without...

Page 12: ...ments of the Medical Device Directive 93 42 EEC DISPOSAL Do not dispose of this product as unsorted municipal waste Separate collection of such waste for special treatment is necessary Fragile handle...

Page 13: ...Ah Battery model 18650 2S1P Continuous operation duration of the lithium battery not shorter than 2 5 hours Time required for fully charging an exhausted lithium battery not longer than 4 hours the de...

Page 14: ...Life 5 years Classification 1 Class I Internally powered equipment 2 IPX0 3 Not sterilized 4 Not category AP APG equipment 5 Mode of operation continuous Date of Manufacture See the product label Main...

Page 15: ...veins has a stronger absorption of near infrared light The vein illuminator is designed based on this principle During use of the vein illuminator the reflected infrared light is perceived by the CCD...

Page 16: ...tton 7 Mode button 8 Power button Display screen only NAVI 60 has a display screen Displays various operation information like the remaining battery capacity mode color and projection size Running ind...

Page 17: ...wer supply the power indicator is slowly blinking blue Power button A user can press the power button to power on the device When the device is in running state a user can press the power button to po...

Page 18: ...ned to accurately show the vein distribution Depth mode The vein depth can be identified to assist medical personnel in inserting a needle 4 3 2 Rear View 1 Projection window Used to receive infrared...

Page 19: ...ssories No Accessory Name 1 AC power cable 2 Power adapter 3 Accuracy test card CAUTION All accessories of this device must be provided by the manufacturer Otherwise this device may be damaged an elec...

Page 20: ...please contact your local distributor or the after sales service department of the manufacturer immediately 1 Take the vein illuminator and accompanied accessories out of the packaging box 2 Check wh...

Page 21: ...d or liquid residue exists on or around the power plug or power socket remove this liquid or liquid residue before plugging in the device Otherwise an accident may occur Use the power cable provided b...

Page 22: ...check the accuracy of the device using an accuracy test card Place the accuracy test card in the projection area of the device and check the positional deviation of the projection image and test card...

Page 23: ...optimal effect or become the clearest 6 2 Setting the Mode The vein illuminator is suitable for the users with different visual feelings A user can press the mode button to set the mode Seven modes a...

Page 24: ...Operating Instructions 19 44 Mode Image Remarks Basic mode The image is monochrome Green light mode The image is green Red light mode The image is red...

Page 25: ...ions 20 44 Blue light mode The image is blue Light purple mode The image is light purple Depth mode 1 bar of green light The vein depth is 0 2mm shallow 2 bars of green light The vein depth is 2 4mm r...

Page 26: ...3 bars of green light or none The vein depth is 4mm or above deep Inverse color mode In any mode except depth mode a user can press and hold the mode button and then release to switch to the inverse c...

Page 27: ...f projection brightness are available for selection to match different use environments A user can press the brightness button to adjust the brightness See the following figures Level 1 brightness dar...

Page 28: ...suitable for different groups of people especially for children and infants A user can press the size button to switch the size See the following figures Minimum Size Middle Size Normal Size 360 192...

Page 29: ...ected to the power adapter by checking whether the power indicator is steady on b Check that the device can be powered on when it is powered by battery and cannot be powered on when it is connected to...

Page 30: ...ethod Connect the device to the power adapter If the battery indicator is blinking the battery is not fully charged If the battery indicator is not illuminated the battery is already fully charged The...

Page 31: ...rated after the cleaning and disinfection according to the relevant regulations of the local hospital 8 1 Preparations 1 Before cleaning and disinfection power off the device and disconnect the power...

Page 32: ...wring out the gauze and then use the gauze to wipe the device surface 2 Wipe all the surfaces of the device in sequence until all the contaminants are removed from the device surface 3 Drip several dr...

Page 33: ...gauze in the intermediate efficiency or high efficiency disinfectant solution wring out the gauze and then use the gauze to wipe the device surface 3 Wipe all the surfaces of the device in sequence F...

Page 34: ...opropanol 3min Wipe 3 hydrogen peroxide 30min Wipe 8 4 Air Drying and Transportation WARNING Do not dry the device by using a drying machine or similar products Connect the device to the power supply...

Page 35: ...9 1 1 Appearance Check Appearance check Check that no crack or damage exists Button operation Check that the buttons can be smoothly pressed and function properly Check that all the sealing parts and...

Page 36: ...a built in battery to ensure normal operation of the vein illuminator in case of an external power failure The battery starts to be charged when the vein illuminator is connected to an external power...

Page 37: ...interruptedly 3 Disconnect the vein illuminator from the AC power supply for the battery to power the vein illuminator until the battery is exhausted 4 Connect the vein illuminator to the AC power sup...

Page 38: ...old the battery and pull the socket CAUTION The service life or shelf life of the battery is one year It is recommended that the battery be replaced in time Aging may shorten the continuous operation...

Page 39: ...vein illuminator is allowed to be transported using a common vehicle but it must be protected from the drastic impact vibration and rain and snow splash during the transportation In addition the vein...

Page 40: ...CLASS and group and Immunity level please see the Appendix The NAVI 30 NAVI 60 vein illuminator is suitable for Professional healthcare facilities environment e g hospitals except for near active HF s...

Page 41: ...with other equipment should be avoided because it could result in improper operation If such use is necessary this equipment and the other equipment should be observed to verify that they are operatin...

Page 42: ...sed in such an environment Emission test Compliance Electromagnetic environment guidance RF emission CISPR 11 Group 1 The NAVI 30 NAVI 60 vein illuminator uses RF energy only for its internal function...

Page 43: ...ce Electrostat ic discharge ESD IEC 61000 4 2 8 kV contact 2 kV 4 kV 8 kV 15 kV air 8 kV contact 2 kV 4 kV 8 kV 15 kV air Floors should be wood concrete or ceramic tile If floors are covered with synt...

Page 44: ...cycle At 0 45 90 135 180 225 270 and 315 0 1 cycle And 70 25 30 cycles Single phase at 0 0 300 cycle Mains power quality should be that of a typical commercial or hospital environment If the user of t...

Page 45: ...of theNAVI 30 NAVI 60 vein illuminator should assure that it is used in such an environment Immuni ty Test IEC 60601 test level Compliance level Electromagnetic environment guidance Conduc ted RF IEC6...

Page 46: ...by an electromagnetic site surveyc a should be less than the compliance level in each frequency ranged Interference may occur in the vicinity of equipment marked with the following symbol Radiate d RF...

Page 47: ...s been incorporated into the formulae used in calculating the recommended separation distance for transmitters in these frequency ranges c Field strengths from fixed transmitters such as base stations...

Page 48: ...or as recommended below according to the maximum output power of the communications equipment Rated maximum output power of transmitte r W Separation distance according to frequency of transmitter m 1...

Page 49: ...10 3 has been incorporated into the formulae used in calculating the recommended separation distance for transmitters in the ISM frequency bands between 150 kHz and 80 MHz and in the frequency range...

Page 50: ......

Reviews: