


Pattern selection interface
Template machine - Touch screen E2
11
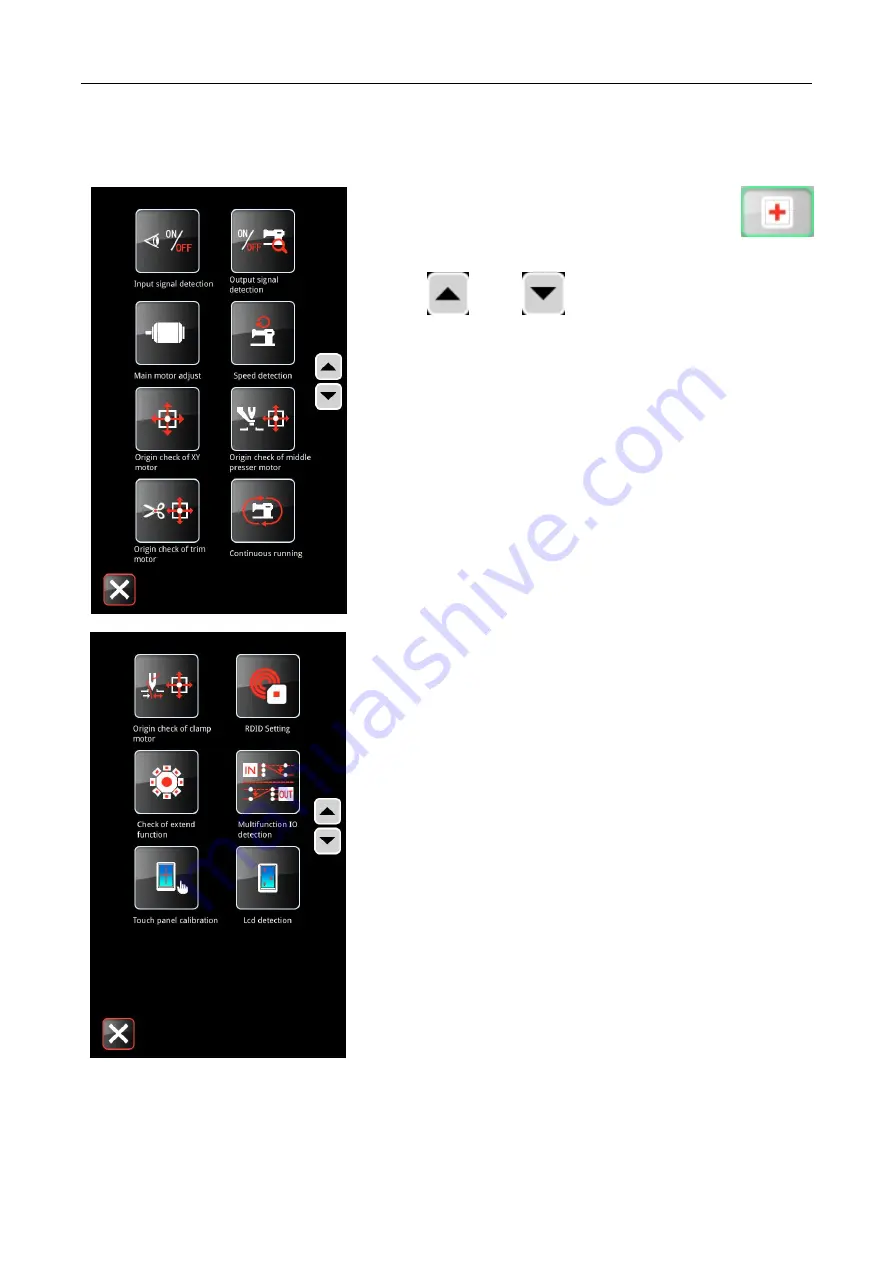
2.2 Test Mode
In the interface of "pattern selection", click "detect"
to enter the interface of "detect" and turn the page through the
up and
down
page turning key.
15
)
input signal detection
16
)
output signal detection
17
)
spindle motor calibration
18
)
speed detection
19
)
XY motor origin detection
20
)
medium pressure foot motor detection
21
)
detection of wire cutting motor
22
)
Continuous operation
9) wire grasping motor detection
10) RFID setting
11) extended function detection
12) multi-function IO detection
13) touch screen calibration
14) liquid crystal detection
Summary of Contents for ZJ-M3-S500-SF-LK2-V2
Page 1: ...模板机 触摸屏 E2 Template machine Touch screen E2 2019 01 ...
Page 4: ......
Page 15: ...模板机 触摸屏 E2 概要说明 3 1 3 主界面 开机后将直接进入 花样选择 界面 单击 可进入 花样缝制 界面 花样选择界面 花样缝制界面 ...
Page 18: ...概要说明 模板机 触摸屏 E2 6 在 读取花样 界面单击想要缝制的花样 选中该花样 单击 回车 确认花样并自动返回到 花样选择 界 面 在 花样选择 界面 单击 可进入 花样缝制 界面 ...
Page 37: ...模板机 触摸屏 E2 花样选择界面 25 旋转切刀电机 旋转切刀复位 提升气缸 压料气缸 切刀启动 切刀提升汽缸原点信号 直线切刀 21 直线切刀动作模拟 22 直线切刀原点传感器状态 ...
Page 46: ...花样缝制界面 模板机 触摸屏 E2 34 单击 退出 后 返回花样缝制界面 ...
Page 51: ...模板机 触摸屏 E2 花样管理 39 在 读取花样 界面 选中花样后 单击 修改 可 进入 花样修改 界面 修改花样 ...
Page 52: ...设置 模板机 触摸屏 E2 40 5 设置 在 花样选择 界面或 花样缝制 界面 按下 设置 键 进入 设置 界面 ...
Page 72: ...绕线 模板机 触摸屏 E2 60 6 绕线 在 花样缝制 或 花样选择 界面 单击 绕线 可进入 绕线 界面 ...
Page 76: ...信息 模板机 触摸屏 E2 64 6 输入分期密码 按下 密码 1 键 进入第一期密码设置界面 要求输入第 一个有效日期 选择合适的日期后 按 确认 ...
Page 77: ...模板机 触摸屏 E2 信息 65 然后进入密码设置界面 输入密码 日期不能小于系统日期 密码输入要求确认 两次密码必须一致 ...
Page 81: ...模板机 触摸屏 E2 信息 69 7 2 穿线示意 在 信息 界面下 单击 穿线示意 进入 穿线示意 界面 穿线时 请参阅 ...
Page 93: ...模板机 触摸屏 E2 附录 2 81 9 附录 2 9 1 电控箱连接示意图 图 1 电控箱连接示意图 ...
Page 94: ...附录 2 模板机 触摸屏 E2 82 9 2 操作箱示意图 图 2 操作箱示意图 ...
Page 95: ...模板机 触摸屏 E2 附录 2 83 9 3 系统框图 MHSC4056 2E2 B MBJ 三丝杠模板机 ...
Page 96: ......
Page 190: ...Template machine Touch screen E2 Appendix 2 94 9 3 Control System Diagram MHSC4056 2E2 B MBJ ...


