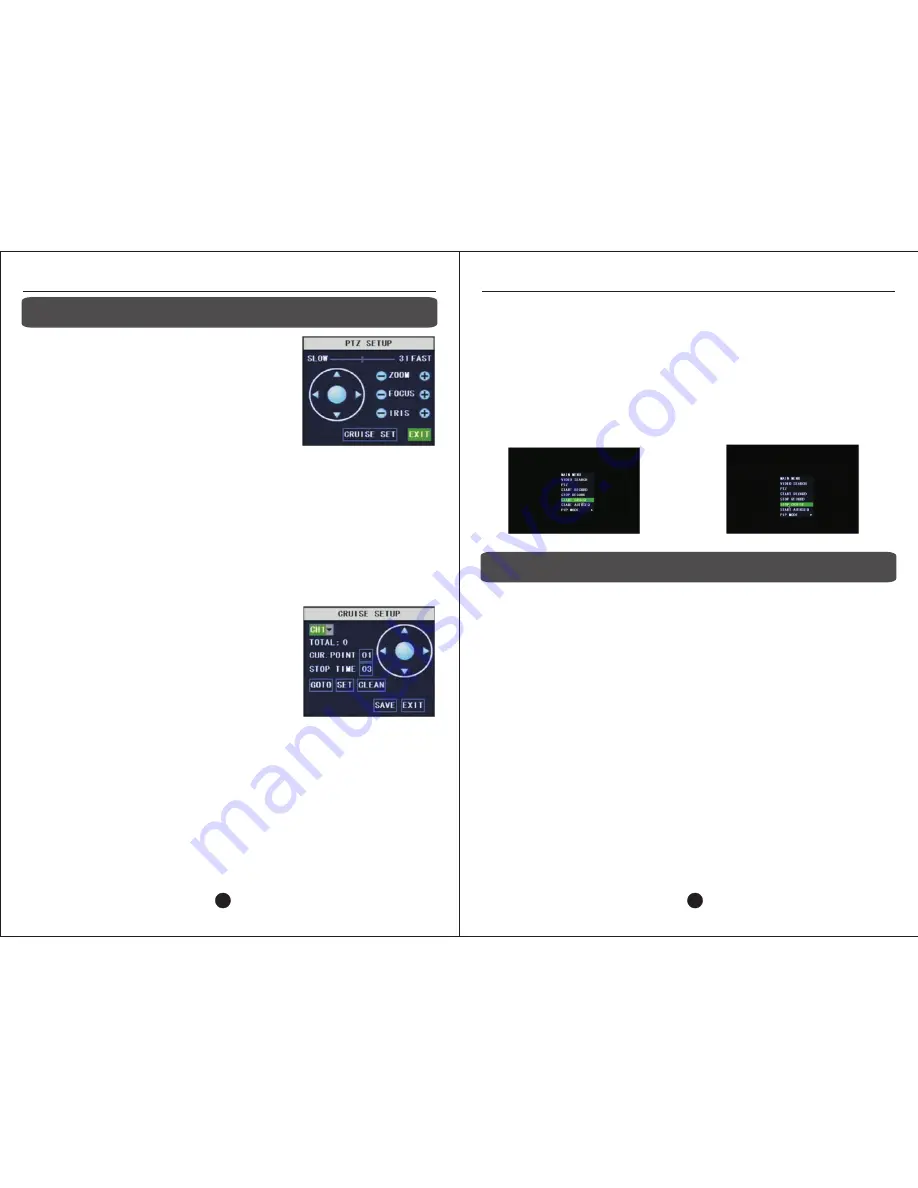
background image

15 – PTZ Cruising

15.1 – PTZ SETUP

The PTZ Setup control panel is used to manually 
control the PTZ camera.

To access the PTZ Setup control panel, go to Quick 
Launch > PTZ.

The EXIT button returns to the main video feed.

Figure 15-56:  PTZ Setup control panel

USER MANUAL

USER MANUAL

15.1.1 - PTZ CONTROL PANEL FUNCTIONS

·

Speed – Slide bar from SLOW to FAST.  The speed factor range is 0 to 63.

·

Zoom – Click – to zoom out and + to zoom in.

·

Focus – Click – to focus out and + to focus in.

·

Iris – Click – to close (narrow) the iris and + to open (widen) it.

15.2 – CRUISE SETUP

With Cruise Setup, each individual channel with a PTZ camera can be programmed to 
execute a defined surveillance routine.

If incorporating zoom, focus, and iris operations into the cruise program, return to the main 
PTZ setup controls, input the operation, and then return to Cruise Setup.

CHANNEL DROP-DOWN MENU

Selects the PTZ camera channel to be programmed.

TOTAL

Displays the number of set points currently programmed
on this channel.  A set point is a stop location to which the 
PTZ camera is instructed to cruise upon execution of program.

CUR. POINT

Current Point displays the set point currently being 
programmed or edited.

STOP TIME

The number of seconds the PTZ camera is instructed to remain at this set point before 
moving the next set point.

15.2.1 – PTZ COMMANDS

GOTO

Entering a set point number in CUR. POINT and then clicking the GOTO button will present 
the settings of that set point.

SET

Clicking the SET button will save the current set point configuration and automatically 
proceed to the next set point.

Figure 15-57:  Cruise Setup control panel

Figure 15-57:  Start Cruise Quick Launch command

Figure 15-58:  Stop Cruise Quick Launch command

Q:  What if the DVR does not detect the hard drive?

A

:  Hard Drive loss occurs when the hard drive is taken offline, either by drive 

failure or disconnection from the DVR.

A red square with a white H will be displayed on the main video screen if hard 
drive loss occurs.  The H icon will also appear if there is no hard drive installed or 
if it has not been formatted.

Refer to Section 3.1 for instructions on how to ensure the hard drive is properly 
installed.

If the hard drive continues to appear to be malfunctioning, please contact Zmodo 
technical support.

Q:  The DVR is requesting a password.  What if I don't remember the 
password?

A

:  In most cases, technical support can assist in unlocking a DVR.  The owner 

must contact us and provide the invoice or order number corresponding to the 
DVR.

Q:  Why does the main video screen display the message:  “VIDEO LOSS”?

A

:  Refer to Section 3.2 for instructions  on connecting the cameras properly.  

Ensure the cameras are receiving power.  Switch cables if some cameras display 

16 – FREQUENTLY ASKED QUESTIONS

CLEAN

Clicking the CLEAN button will clear the configuration of the set point.

Directional Arrows

Use the directional arrows to move the camera to the desired location of the current set 
point.

15.3 – STARTING AND STOPPING THE CRUISE PROGRAM

Starting the Cruise                                           Stopping the Cruise
1.

Open the Quick Launch menu.               1.

Open the Quick Launch menu.

2.

Click Start Cruise.                                    2.

Click Stop Cruise.

38

37

Summary of Contents for DVR-H9106UVD-SV

Page 1: ...DVR H9106UVD SV...

Page 2: ...Backup Device 3 7 Connecting a USB Mouse 3 8 Connecting Your DVR to Your Network 4 Starting up Your DVR 4 1 System Initialization 4 2 Main Video Feed Display 4 3 Setting System Date and Time 5 Main Ov...

Page 3: ...Setup 28 11 PTZ Setup 29 11 1 Options 29 12 Mobile Phone Setup 30 12 1 Setting Up Your Phone 31 13 Motion Detection 31 13 1 Options 32 13 2 MD Area 32 14 System Setup 32 14 1 Time Setup Date Time 33...

Page 4: ...and move your videos off site with either a USB flash drive external hard drive or DVD RW drive View what you recorded straight from the DVR or remotely from a computer Set up your DVR to be accessed...

Page 5: ...port for viewing on a computer monitor sold separately and a DVD RW Drive for backup H9106UVD SV H9106UVD SV H9106UVD SV D A N O 2 1 1 H9106UVD SV FRONT PANEL NAVIGATION Up Down Move Up Down REW Move...

Page 6: ...onnections Important There is only one way to correctly connect cables If the connections do not fit together properly reverse the cables 5 6 A B C D I J K L E F G H Figure 2 Front Right Panel Control...

Page 7: ...of the DVR The purpose of external alarm sensors is to activate recording on a given channel when the sensor is activated or a condition is met such as a door opening To configure the external alarm s...

Page 8: ...wo types of USB devices that can be connected to the DVR for backing up recording files are either a portable flash drive thumb drive or an external hard drive The DVR runs on a Linux platform so the...

Page 9: ...Click Time field and enter current time 4 Click Time Zone drop down menu and select proper time zone 5 Click DST drop down menu and select On or Off for your location 6 Click Apply OK Exit Figure 4 1...

Page 10: ...S TABLE Menu Option Sub Menus Function Function Display Setup Display Setup configures the live view for each channel Color Setup permits adjustment of video for each individual camera Color Setup Net...

Page 11: ...the live view Contrast creates a greater contrast between light and dark areas Saturation makes colors more or less vivid 6 4 LIVE Shows or hides live feed for respective channel 6 5 DISPLAY TIME OPT...

Page 12: ...TIME Choose the maximum recording time for a single video file Options are 15 30 45 and 60 minutes 7 7 RECORDING MODE Click the Recording Mode drop down menu to reveal the options which vary 8 NETWOR...

Page 13: ...er to which the DVR is connected The default value is 192 168 1 1 8 7 DNS DNS or Domain Name Server should also be set to the local address of the router 8 8 1 TESTING DVR LOCAL CONNECTION Method 1 Ne...

Page 14: ...domain e g mydvr dvrdns org that is associated with his her public IP address Entering the DDNS account information into the DDNS Setup menu maintains the link between the DDNS account and the public...

Page 15: ...ances to the last page of results All selects all files for backing up Inverse inverts the files that are checked to unchecked and vice versa Backup activates the backup procedure Figure 9 27 Log Sear...

Page 16: ...mouse port 3 Power on DVR 10 2 ALARM SETUP Figure 10 36 Device Management Menu Figure 10 33 HDD Management Console The Device Management menu is divided into the following six options 1 HDD displays...

Page 17: ...O CHANNEL AND STATUS I O input output channels are to connect external sensor alarms to the camera on the specified channel An example of an external sensor is a laser activated motion detector Extern...

Page 18: ...Stop bit as do Pelco D cameras Baud Rate Baud rate is the data transmission speed used for communication between the DVR and PTZ camera This setting must match the switch on the PTZ camera The baud ra...

Page 19: ...See Section 8 Network Setup or refer to the Network Setup Guide To access the Mobile Phone Setup from the Main Menu select Devices Mobile 13 MOTION DETECTION USER NAME Enter a username for the user c...

Page 20: ...DVR 14 2 2 PASSWORD ENABLE Switching this option to ON reveals the following settings 14 2 3 USER PASSWORD The user password grants access to the Search in Main Menu but all other sub menus are locked...

Page 21: ...4 5 3 MAC ADDRESS A MAC Address is another unique hardware identification used for a local area network On the changes to the MAC address cannot be saved 14 6 MAINTAIN SYSTEM MAINTAIN H9106UVD SV H910...

Page 22: ...tton will save the current set point configuration and automatically proceed to the next set point Figure 15 57 Cruise Setup control panel Figure 15 57 Start Cruise Quick Launch command Figure 15 58 S...

Page 23: ...riting the oldest file with the overwrite function enabled or formatting the hard drive which will erase everything Q Why can t I view my DVR online A Settings may be configured incorrectly or the DVR...

Page 24: ......

Page 25: ......

Page 26: ......

Page 27: ......

Page 28: ......

Page 29: ......

Page 30: ......

Page 31: ......

Page 32: ......

Page 33: ......

Page 34: ......

Page 35: ......

Page 36: ......

Page 37: ......

Page 38: ......

Reviews: