background image

10

9

Electrical Connection

Room V

entilation

BEFORE INSTALLATION

The induction cooktop must connect to a separate, grounded wire, single phase. 
AC only electrical supply with their own circuit breaker. These appliances must be 
installed in accordance with National Electrical Codes, as well as all state, municipal 
and local codes. This appliance must be supplied with the proper voltage, frequency, 
and amperage protected by a properly sized circuit breaker or time delay fuse. 

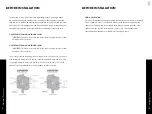
3-WIRE CABLE FROM HOME POWER SUPPLY

•  IMPORTANT: Use the 3-wire cable from Home Power Supply where local codes 

permit a 3-wire connection

4-WIRE CABLE FROM HOME POWER SUPPLY

•  IMPORTANT: Use the 3-wire cable from Home Power Supply where local codes 

permit a 3-wire connection.

The cooktop conduit wiring is approved for copper wire connection only, if you have 
aluminum house wiring, use only special connectors which are approved for joining 
copper and aluminum wires conform with local codes and ordinances. Follow the 
electrical connector manufacturer’s recommended procedure closely.

Room V

entilation

BEFORE INSTALLATION

ROOM VENTILATION

The use of this appliance generates heat and humidity in the room where it is installed. 
Proper ventilation in the room is needed. Make sure the kitchen is equipped with a 
range hood of appropriate power (400 CFM minimum). Activate the exhaust fan/
range hood when possible. Intensive and continuous use of the appliance may 
require additional ventilation, for example by opening a window.

Summary of Contents for RCIND-24

Page 1: ...Induction Cooktop Installation Guide and Users Manual...

Page 2: ...nd professional features into everyone s homes Because we continually strive to improve our products we may change specifications and designs without prior notice REGISTERING YOUR PRODUCT Please regis...

Page 3: ...e to secure certified warranty service per these terms will result in a forfeiture of the remaining warranty Out of pocket payments will not be reimbursed unless prior approval is received from ZLINE...

Page 4: ...ENTS IMPORTANT SAFETY INSTRUCTIONS 1 PRODUCT SPECIFICATIONS 7 ROOM VENTILATION 10 INSTALLATION INSTRUCTIONS 1 1 SURFACE BURNER LAYOUT 18 OPERATION 21 COOKWARE USES 27 MAINTENANCE AND CLEANING 28 TROUB...

Page 5: ...ity for examination repair or adjustment Do not cook on broken cooktop If cooktop breaks cleaning solutions and spillovers may penetrate the broken cooktop and create a risk of electric shock Do not s...

Page 6: ...o not use a towel or other bulky cloth Always remove the covers on sealed or canned goods and before heating to avoid explosion When the unit is on do not touch outside the control panel as the surfac...

Page 7: ...ervice must be performed by a qualified installer or service technician WARNING Always read and obey all safety information failure to follow these instructions can be killed or seriously injured BEFO...

Page 8: ...ELECTRIC POWER RATING Voltage 240 volts Frequency 60 Hz Amperage 40 amps Model RCIND 24 RCIND 30 Amperage 50 amps Model RCIND 36 1600W 3200W 3700W 2400W 2400W 2000W 3200W 2100W 1600W 2100W 3700W 2600W...

Page 9: ...MPORTANT Use the 3 wire cable from Home Power Supply where local codes permit a 3 wire connection The cooktop conduit wiring is approved for copper wire connection only if you have aluminum house wiri...

Page 10: ...WIDTH B DEPTH C HEIGHT 24 20 2 DO NOT obstruct these areas IMPORTANT For proper ventilation provide a vent under the countertop in front of the cabinet and in the back of the cabinet The ventilation o...

Page 11: ...H C HEIGHT 30 21 2 DO NOT obstruct these areas IMPORTANT For proper ventilation provide a vent under the countertop in front of the cabinet and in the back of the cabinet The ventilation opening is to...

Page 12: ...er the countertop in front of the cabinet and in the back of the cabinet The ventilation opening is to extend the full length of the cooktop cutout Junction box approximate location minimum 4 below th...

Page 13: ...s from the top of the cooktop surface 2 Clean cooktop before use Dry with a soft cloth See Maintenance and Cleaning for reference 3 Read Operation 4 Turn on the power to the cooktop 5 Verify all funct...

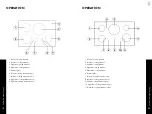
Page 14: ...front cooking element control 8 Right front cooking element control 9 Right rear cooking element control 1 Left rear cooking element 2 Left front cooking element 3 Middle cooking element 4 Right rear...

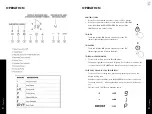
Page 15: ...n until a beep sounds The indicator light will turn off above the button TO TURN ON THE COOKTOP To turn on the cooktop touch the POWER button The indicator light above the button will light up If no f...

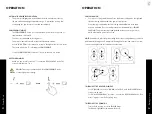
Page 16: ...er into KEEP WARM mode Then press again to turn off the cooking zone TO TURN OFF THE COOKTOP To turn off the cooktop touch the POWER button The indicator light above the button will turn off AUTOMATIC...

Page 17: ...y press adjusts the time by 1 minute and a long key press by 10 minutes The automatic timer range from 1 minute 99 minutes This is used to automatically turn off the cooktop NOTE Seconds are not used...

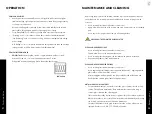
Page 18: ...ic glass cleaner when the cooktop is cool Apply a few drops directly to the cooktop and use a paper tower or a soft cleaning pad Use a dry cloth or paper towel to remove all cleaning residue NEVER RUN...

Page 19: ...inuously for 2 hours The cooktop control panel may register liquids or objects obstructing the panel which can cause the cooktop to shut off Clean up spills or remove objects and restart the unit Liqu...

Page 20: ...cooktop might be loose The connections in the cooktop might be damaged Noise Noises with humming crackling and buzzing This is a normal occurrence See cookware noise on page 27 Need additional inform...

Reviews: