background image


27 

3)


Start the “ZKOperaHostlnstall” middleware, add the IP address of OP-400 to the 
host, default Port: 9864, click “Save”. 


4)


Click “Cardholders” to start user enrollment: 


Summary of Contents for OP-400

Page 1: ...1 QUICK START GUIDE Applicable Model OP 400 Version 1 2 Date May 2019...

Page 2: ...ings 12 4 1 Enroll an administrator 12 4 1 1 Enroll Face 12 4 1 2 Enroll Card 12 4 2 Delete an administrator 13 4 2 1 Delete Face 13 4 2 2 Delete Card 13 5 Lenel OnGuard Configuration 15 5 1 OnGuard O...

Page 3: ...tings 37 7 3 5 Reader Input and Output Settings 38 7 3 6 Backup Database 42 7 3 7 Personnel Management 43 8 Guidance Notes 45 8 1 Operating Environment of the Device 45 8 2 Cautions for Using Face Rec...

Page 4: ...device Do not place the device next to heating equipment Prevent water drinks or chemicals leaking into the device This product is not intended for use by children unless they are supervised Do not dr...

Page 5: ...1 Features USB slot Reset button Side 2 8 inch TFT LCD LED indicator Camera Card reader area Front Speaker Back Bottom Security screw holes for securing the device onto its back plate 4PIN Ethernet T...

Page 6: ...3 1 2 Pin Layout 4 Pin cable connectors 2 Pin cable connectors 11 Pin cable connectors Tamper button...

Page 7: ...mm 4 06 in 103mm Fix the back plate on the wall using wall mounting screws Note We recommend drilling the mounting plate screws into solid wood i e stud beam If a stud beam cannot be found use supplie...

Page 8: ...5 1 4 Power Connection 1 5 Ethernet Connection LAN Connection GND 12V 12V DC Adaptor supplied with OP 400...

Page 9: ...rence with RS485 communication it s recommended using a bus topology instead of star topology 3 Adjust the communication speed as needed The signal strength varies depending on wiring conditions and i...

Page 10: ...7 1 7 Wiegand Output Connection Controller panel GLED WD0 WD1 GND LED D0 D1 GND...

Page 11: ...8 OP 400 Quick Start Guide 1 8 Standard Installation TCP IP Wiegand OSDP...

Page 12: ...configure the parameters for the actual network IP Address 192 168 1 201 Subnet Mask 255 255 255 0 Gateway 192 168 1 1 DNS 8 8 8 8 2 2 Webserver Settings Click to enter the Main Menu Comm Settings We...

Page 13: ...g data will be same as Comm Settings don t need change 2 4 Backup Restore Data Click to enter the Main Menu Device Settings Backup Data Backup to USB Disk Backup start the data user data and network s...

Page 14: ...Main Menu Comm Settings Primary Secondary Settings Turn off Primary Device the device will be used as secondary reader And please set the Primary IP the IP of the primary reader Primary Port is defau...

Page 15: ...r verification to enter the main menu An administrator can only enroll one face and one card 4 1 1 Enroll Face Click to enter the Main Menu Device Settings Admin Settings Enroll Face to enroll adminis...

Page 16: ...ick to enter the Main Menu Device Settings Admin Settings Enroll Face then click OK to delete administrator s face 4 2 2 Delete Card If the administrator has enrolled the card click to enter the Main...

Page 17: ...14 OP 400 Quick Start Guide...

Page 18: ...ard Opera Installation Extract the ZKOperaHostInstall zip file and run setup from ZKOperaHostInstall DISK1 folder The installation is currently simple and self explanatory When asked to choose a platf...

Page 19: ...t is permitted to perform the operation To do this DataConduIT checks which Windows account has made the DataConduIT call This is the account that the ZK Opera Service is configured to run under Once...

Page 20: ...ssion Groups form in the Users folder in System Administration All functionality available through DataConduIT is controlled by the same permissions that you are already using to manage data in ID Cre...

Page 21: ...In the OnGuard System Administration application in the Administration System Options page make sure that Generate software events is checked and make sure that the host name of the Linkage Server is...

Page 22: ...ge and create a DataConduIT source called Opera It is important that Opera is the Name given DataConduIT is based on names A DataConduIT Device can be created underneath the Opera source for each OP 4...

Page 23: ...entials to communicate with a remote DataConduIT However it is simplest if OnGuard DataConduIT and Opera are installed on the same machine Run the configuration app to set the IP address and port of t...

Page 24: ...tion if the ZK Opera Service is ever down when OnGuard changes are made This can be turned off for faster startup a manual resync request is also supported 5 5 ZK Opera Service Future versions of the...

Page 25: ...iguration application also has a Status tab which shows The status of the ZK Opera Service Started stopped etc Whether the configuration application is able to communicate with that service for additi...

Page 26: ...ctions in this document The log file Z9 Services ZkOpera in C Program Files x86 ZKTeco Opera log can be viewed As part of its startup the ZK Opera Service will connect to OnGuard DataconduIT to regist...

Page 27: ...wise if errors logged there is a problem connecting to OnGuard DataConduIT Check the earlier steps in this document to set things up properly If the Primary OP 400 is not online check that the IP Addr...

Page 28: ...25 6 OP 400 Connect Lenel Software 6 1 Start the OnGuard software local at the System Tree 6 2 Click the Hardware to add one Access Panel...

Page 29: ...Quick Start Guide 6 3 Add OP 400 1 In Additional Hardware click Data Conduit Sources then add DataConduIT Sources 2 Add DataConduIT OP 400 Note The name you enter here must match the name entered on t...

Page 30: ...27 3 Start the ZKOperaHostlnstall middleware add the IP address of OP 400 to the host default Port 9864 click Save 4 Click Cardholders to start user enrollment...

Page 31: ...28 OP 400 Quick Start Guide Note You have to assign the door access rights...

Page 32: ...Installing the Client xmzkteco local cer is bound with the domain name 127 0 0 1 Therefore use 127 0 0 1 when calling the HTTPS interface Installing the Certificate 1 Double click xmzkteco local cer a...

Page 33: ...30 OP 400 Quick Start Guide 3 Install the certificate to Trusted Root Certification Authorities...

Page 34: ...31 4 Complete the installation...

Page 35: ...OP 400 Quick Start Guide 7 2 Configuring the Firefox Browser Firefox of a higher version requires extra configuration of the certificate 1 Access the Firefox options 2 Display the certificate setting...

Page 36: ...33 3 Add the server exception 4 Add the server address to the exception ZKBIOOnline exception settings...

Page 37: ...tings 7 3 1 Login Webserver 1 Connect the controller to the network or PC start the browser enter the IP address of the reader Then you can visit the Webserver 2 When Webserver is used User Name and P...

Page 38: ...can set the relevant parameters by clicking on 1 or 2 7 3 2 Name the Readers Choose Configuration Opera Readers Primary OP400 Edit In Edit Opera Reader Interface you can Configure the Reader s name Sa...

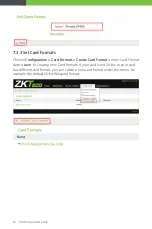
Page 39: ...figuration Card Formats Create Card Format enter Card Format date save to Create a new Card Formats If your card is not 26 bit or your card has different card format you can create a new card format u...

Page 40: ...37 7 3 4 Configure Door Settings Choose Configuration Doors Door Edit to set verification mode...

Page 41: ...k Start Guide 7 3 5 Reader Input and Output Settings Reader Input Choose Configuration Doors Door Door Door Reader Input Edit to choose Card Formats You can set card format which you want the reader t...

Page 42: ...39...

Page 43: ...40 OP 400 Quick Start Guide Reader Output Choose Configuration Doors Door Door Reader Output Edit to choose Card Formats You can set the format of Wiegand output here...

Page 44: ...41...

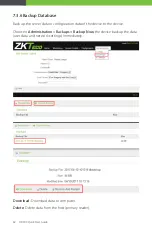
Page 45: ...he server data or configuration data of the device to the device Choose Administration Backups Backup Now the device backup the data user data and network settings immediately Download Download data t...

Page 46: ...s been downloaded to your pc then you first upload the backup data as following Upload Backup Choose Administration Backups Upload Backup you can insert the data on your computer backed up past times...

Page 47: ...44 OP 400 Quick Start Guide...

Page 48: ...Recommended installation position as shown in the left figure Install the device in an indoor position which is 9 8 feet far from the window and door and 6 5 feet far from the lamp source with illumin...

Page 49: ...sition of device should not be changed to avoid affecting the verification accuracy If it is necessary to move the device its vertical height should remain the same The height from the ground to the d...

Page 50: ...ns Note During enrollment and verification keep the facial expression and stance natural 8 3 Registration and Verification During registration please adjust your position and keep your eyes in the gre...

Page 51: ...ng a human face the user would record the face three times The user can wear the glasses for the first time or the second time and the other time can take off the glasses 3 Users in the use of the phe...

Reviews: