


4-34
IMACS System Release 5.1.9
Reference Guide
Model No.
Running Head
Assigning Time Slots
System Configuration and Operation
This chapter defines "assigning time slots" as the process of connecting user card ports to
WAN ports and time slots, and it defines "cross-connecting time slots” as the process of
connecting WAN time slots to other WAN time slots in the system.
4.15.1 Modes of Operation
In the 5.x system, the only mode available is
XCON
.
4.15.1.1 XCON Mode (XCON)
The XCON mode allows the user to cross-connect DS0s to user voice or data cards or to
cross-connect any DS0 on any WAN card to any DS0 on any other WAN card in the system.
The “Mode” setting on a WAN in a XCON system will only indicate the XCON option.
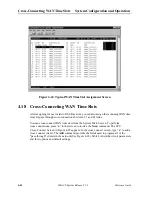
4.16
Assigning Time Slots
You must use a
time slot map
to specify the connections between all incoming and outgoing
lines connected to the system. The time slot map lets you split up your T1 and E1 bandwidths
into portions required for normal voice and data communications. It contains the connections
for all cards in your system.
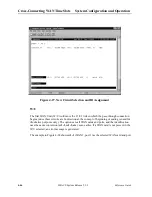
4.16.1 Assigning a Time Slot to a User Card Port
You can define a time slot map from any user card (data or voice) for connections involving
that card, or from a WAN card for cross-connections involving only WAN cards. For example,
Figure 4-17 shows the E&M Card Main Screen for the time slot assignments. Assign time
slots to a voice card as follows:
1. From the System Main Screen, select the desired voice card and press <Enter>. That
card’s Main Screen appears.
2. Select the WAN port from which you want to assign time slots to the E&M card. In
Figure 4-17, this is
W1-1
(for WAN 1, port
1).
3. Select a time slot (TS) for the first card port. A number appears at the bottom of the
screen for the corresponding time slot on the WAN port.
4. Set the time slot number by using the up and down arrow keys to highlight it, then press
the <Enter> key.
5. Change the STATE of the port from
stdby
to
actv
.
6. Repeat steps 2 through 5 for the remaining card ports, to assign time slots to them.