background image

Most of operations of planned maintenance may be carried out by the driver or other user of the tractor. In 

case you do not have sufficient technical equipment, let the difficult operations carried out by a specialised 
repair shop.

All works, connected with cleaning, lubrication and adjustments of the tractor or coupled 

mechanisms may only be carried out after stopping of the engine and other movable components 

except checks of brakes, recharging and hydraulic system

.

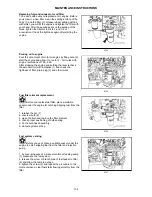
Front bonnet opening

Checking oil levels in engine

Draining oil from engine

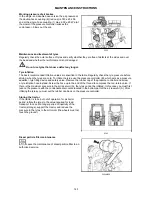
Opening the bonnet: 
Unlock the bonnet by pulling the draw bar (1) in the 

direction of an arrow, grip where the arrows are and 

heave. 

The bonnet is locked in the heaved position by a gas-fluid 

prop.

Closing the bonnet: 

Pull the bonnet by means of a belt, grip where the arrows 

are and snap in the downward direction so that the lock of 

bonnet snaps down. 

Rapid closing of the bonnet may damage 

filaments of bulbs in headlights in the front mask.

NM13N107

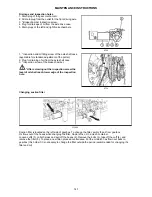
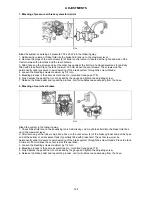
Check daily before starting the operation with the tractor 

standing horizontally. Engine oil dipstick (1) and filling hole 

(2) are placed on the rights side of the engine. Unscrew 
the dipstick (1), wipe off with a cloth and screw back in. 

When you unscrew the dipstick again, the level must not 

drop below the bottom gauge. If necessary, refill oil by 

a filling hole (2).

X903

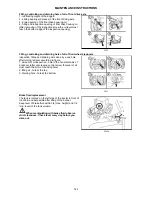
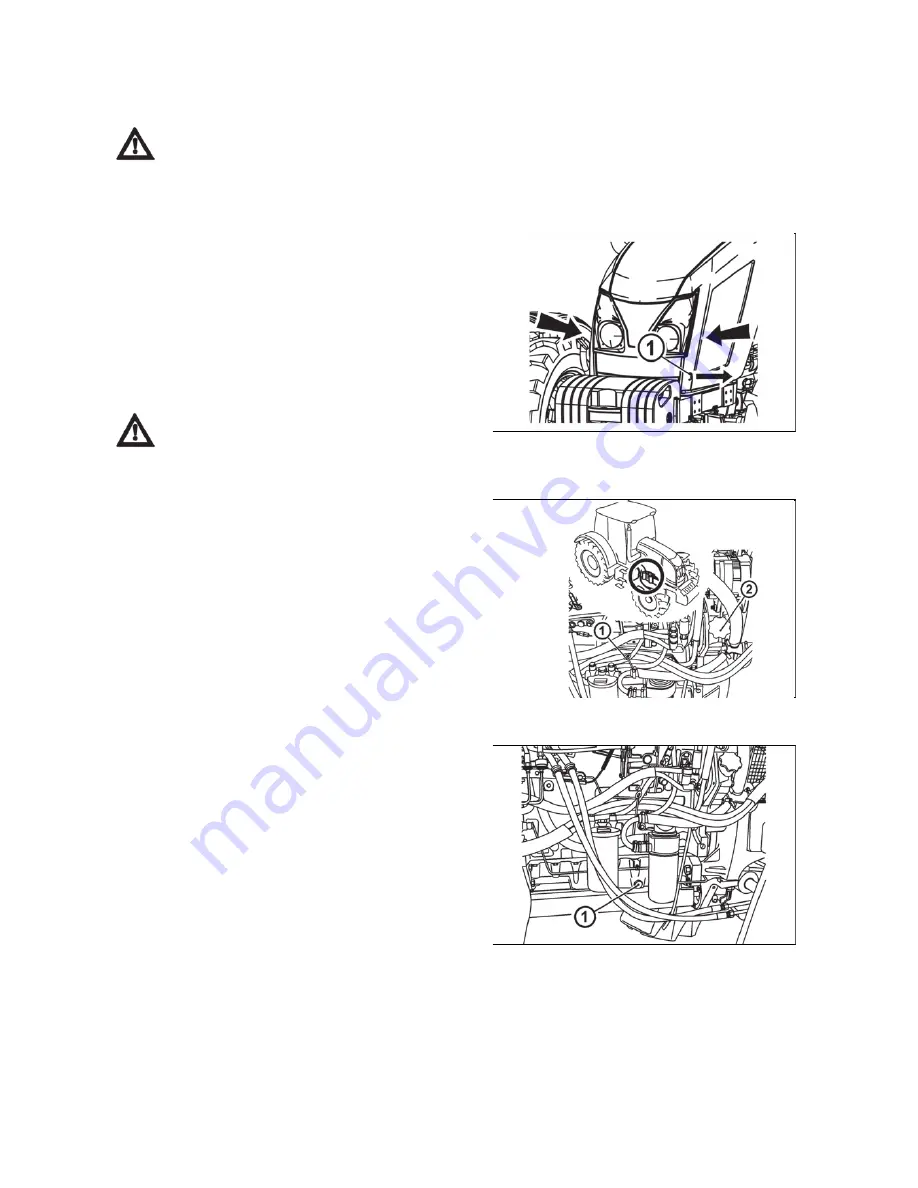
1. unscrew the drain plug (1), best immediately after 

terminating the drive or after heating the engine to working 

temperature 

2. drain oil
3. clean the drain plug

4. screw the drain plug (1) back in

E703

MAINTENANCE INSTRUCTIONS 

133

Summary of Contents for Proxima GP 80

Page 1: ...Tractor is Zetor Since 1946 PROXIMA GP 80 OPERATOR S MANUAL 07 2017 90...

Page 2: ...and get a perfect overview of how to use the tractor with maximum efficiency during various kinds of work If you observe the rules of tractor operation and maintenance and driving safety your new trac...

Page 3: ...2...

Page 4: ...akes 22 Hydrostatic steering 22 Air cleaner 23 Cab filtration 23 Hitches 23 After work with front implements and in case of cooler clogging 23 Tyres and wheels 24 Short functional test 24 Getting to k...

Page 5: ...single axle trailer 48 Battery disconnector 49 Fuel tank 49 Fuel tank drain plug 49 Driving 51 Before you start the engine 51 Starting the engine 51 If engine does not start 52 Ignition system failur...

Page 6: ...le axle CBM semi trailer 73 Coupling of a single axle trailer 73 Uncoupling of a single axle trailer 74 Hook of the mounting for a single axle trailer 74 Coupling with a trailer or semi trailer 74 Hyd...

Page 7: ...point hitch 105 Working and transport position of the front three point hitch 106 Driving with agricultural machines attached to the front three point hitch 106 Change of wheels tread 107 Change of fr...

Page 8: ...126 Oils for tractor transmission gearing 127 Front PTO oil 127 Oil for the front driving axle 128 Oil for the hydrostatic steering of the tractors 128 Plastic lubricant for the tractor 128 Hydraulic...

Page 9: ...and adjustment of service and parking brakes 150 Service brake adjustment 150 Parking brake adjustment 151 Adjustment of free travel of brake pedals 152 Adjustment of free travel of clutch pedal 152...

Page 10: ...ber 4 Tractor serial number When ordering spare parts and within all written and oral communication always specify the data of your tractor that should be written in the frames below Tractor type Trac...

Page 11: ...The right left front and back indications refer to the driving direction of the tractor G3 LOCATION OF SERIAL NUMBERS 10...

Page 12: ...his symbol refers to optional tractor accessories installed by the manufacturer on the customer s request Instruction manual s passages related only to models equipped with DPF diesel particle filter...

Page 13: ...when driving on a slope and muddy sandy icy or uneven ground Observe the maximum set angle of slope availability 12 with tractors with front drive axle During aggregations of the tractor with machine...

Page 14: ...door pay attention being in space of shifting lever and hand throttle control Brake the tractor with parking brake before leaving tractor with running engine Do not forget to brake the tractor with p...

Page 15: ...he end of their service life you must observe relevant provisions of valid acts and implementation directives of these acts of the country where the tractor is used The last seller of the tractor is o...

Page 16: ...onment e g working with chemical sprays fertilizers in environments with high concentrations of salt etc it is always necessary to clean the tractor thoroughly from chemically aggressive substances an...

Page 17: ...sorders or deafness Protect your hearing with protective measures e g headphones ear plugs etc Resulting levels of noise when measuring noise for hearing of driver Based on European directive 2009 76...

Page 18: ...uropean Union Two types of cab roofs are mounted to Zetor tractors 1 Standard cab roof 2 Cab roof designed for tractors equipped with front end loader meeting the OECD code 10 FOPS conditions Tractors...

Page 19: ...observe special instructions related to accidents prevention and general rules related to technical safety la bour medicine labour hygiene and regulation defining operation on roads The manufacturer d...

Page 20: ...can be mounted to ZETOR tractors In case of additional assembly of further tractor equipment for working in the woods full responsibility is borne by the supplier and manufacturer of the protective s...

Page 21: ...NOTES 20...

Page 22: ...he oil dip stick check the oil quantity in the engine and then check the connection of the engine lubrication system for leaks Maintain the oil level between the dipstick marks E6g Check the connectio...

Page 23: ...ir brakes Check tightness of the air system of the brakes and effectiveness of brakes of the tractor with a trailer Trailer hydraulic brakes Check tightness of hydraulic brakes of the trailer and effe...

Page 24: ...ating out or blowing with compressed air Do the cleaning or replacement of the filter elements after removing the covering grills in the roof overhang At the customer s request we supply filters with...

Page 25: ...ed value Check and if necessary retighten the bolts of the front and rear wheels Never drive with loose wheel bolts G11 After starting the engine check whether the hydrostatic steering failure engine...

Page 26: ...care in the area of gears lever and manual fuel control lever G101 Left cabin door is lockable from the outside Right door of the cabin are equipped only with a button from the outside After unlocking...

Page 27: ...sure that there is not a danger of collision between the mounted tools with maximum lifting of rear three point hitch and open rear window In case of collision we recommend to work with a closed wind...

Page 28: ...r the whole drive way or working field F_02_12 You can draw out the sun shield by pulling the handle in the direction of the arrow The shield gets back to initial position after pressing the button 1...

Page 29: ...tside side The washer tank capacity is 2 5 litres In summer the reservoir should be filled with distilled water or mixture for washers Antifreeze mixture for washers must be used in winter season for...

Page 30: ...0_1 Passenger s seat to be tilted out in the direction of an arrow 1 upward Locking of the seat is done automatically FH12N020_2 Lift the passenger s seat in the direction of an arrow 2 pull the lever...

Page 31: ...f rear seat cover Spring stroke is 120 mm Do not adjust the seat when driving Danger of accident C131 The seat can be longitudinally adjusted within range 75 mm 11 positions after unlocking of left ha...

Page 32: ...controller to the lower position to lock it 8 The seat height adjustment and seat suspension adjustment according to the weight of the driver push the controller to increase the air pressure in the pn...

Page 33: ...unlocking the lock by turning the lever 2 in the direction of the arrow After setting the steering wheel secure the lever 2 by retightening against the direction of the arrow Adjusting the angle of th...

Page 34: ...toxic substances Wear protective gloves when manipulating with the filter Do not clean the filter and do not blow through with compressed air DANGER Replace the active carbon filter every 200 hours o...

Page 35: ...snow flake lights up You will disengage the air condition system by repeated press of switch snow flake symbol switches off F_02_17a a Surrounding outside air is sucked in through filters to cabin su...

Page 36: ...control B 4 Set the expiration under the requested angle to avoid direct fanning of the people in the cabin 5 After heating the space of the cabin set the air circulation in the cabin control D to th...

Page 37: ...active carbon the recirculation controller should be in position air is drawn into from the outside and the fan controller should be in the position fan maximum work to create overpressure in the cabi...

Page 38: ...the angle of approx 45 towards the windshield Direct the side outlets 2 under the angle of approx 45 to the cab corners After defrosting of the front windshield direct the side outlets to the side gl...

Page 39: ...ndscreen wiper and washer 4 rear window wiper switch 5 switch of front working lights on cab roof 6 switch of rear working lights on cab roof 7 rear mirrors heating switch 8 rear window defroster swit...

Page 40: ...NOTES 39...

Page 41: ...p if the engine oil pressure drops below 120 to 60 kPa If the engine is stopped it must light up 9 Free 10 Free 11 Free 12 Indicator of engagement of multiplier green 1st degree 13 Free 14 Indicator o...

Page 42: ...29 1 000 rpm PTO button The rpm value with the resolutionof 10 rpm is shown on the display Serves only for operation data display 30 The switch of hours of operation The information is displayed on th...

Page 43: ...h d Working lamp switch off on Working lamp function is signalized by a lit symbol on a switch e Warning lights switch f Front drive axle button Engaged front drive axle is signalized by lit symbol on...

Page 44: ...a warning lights on b warning lights off Function of warning lights is signalized by interrupted blinking control on the dashboard F58 a roof lights on b roof lights off The switch controls the illumi...

Page 45: ...stopped engine switch key is switched of In the basic position the front driving axle is engaged indicator lamp is ON and disengaging of the axle is made with the switch indicator lamp is OFF C156 a D...

Page 46: ...rolled via the key is disconnected The key can be removed S43 The voltage is connected to all the equipment excluding starter The key is in this position with the engine running S44 Starter and supply...

Page 47: ...of speed of the engine within range A to B F13BN005 1 Travel clutch pedal 2 Foot operated service brake pedals connected by latch 3 Foot throttle pedal F13BN008 Main shifting lever E147 Reverse can be...

Page 48: ...ard position E149B Shifting is carried out with tractor in standstill H Road gears N Neutral L Reduced gears G150 The multiplier is controlled electro hydraulically using the pushbuttons located on th...

Page 49: ...output shaft and type of the termination shall be chosen depending on the prescribed speed of the aggregated machine a 1 000 min 1 or 540E min 1 b 540 min 1 G153a Shifting is made when the tractor st...

Page 50: ...the left hand tractor side in front of the cab A battery connected B battery disconnected E157 The fuel tank is fitted at the right hand tractor side A plastic 124 litre tank is installed as standard...

Page 51: ...NOTES 50...

Page 52: ...ystem by several strokes of the manual feeding fuel pump G201 1 Put the key in ignition 0 position 2 Depress the clutch pedal 3 Move the gear lever to the neutral position P 11NG202 4 Turn the key to...

Page 53: ...econd with engine at standstill ignition is not working If ignition control is blinking permanently with engine running there is a failure of ignition regulator and ignition has not been completed Fai...

Page 54: ...by lengthy idle run or abrupt revolutions increase is harmful to the engine If the temperature of coolant has not reached 45 C do not overcome engine revolutions over 2 000 rpm Coolant heater Is mount...

Page 55: ...ant heater including feeding cable pursuant to valid legislation of the state where the tractor is operated at least prior to each winter period Drive away C211 1 Depress the clutch pedal 2 Shift the...

Page 56: ...article filter which originate by burning diesel FH12N056 Failures in diesel particle system failure are signalized by a red control lighting up on the dashboard with engine running and subsequently b...

Page 57: ...followingly also by acoustic signal and on the display of displaying unit of diesel particle filter by failure code E 36 If this situation occurs increase the load of engine and continue working unti...

Page 58: ...uced speeds is the same as with road speeds Considering low speed of the tractor change nearly always means moving off from rest Shifting using the lever of road and reduced speeds is only possible wh...

Page 59: ...always shifted automatically the stage H H increase of travel speed L decrease of travel speed E216 Engagement of the multiplier decrease of travel speed is indicated by a light indicator on the dashb...

Page 60: ...lock when driving through road bends Shift gears from higher to lower gears in time when travelling up the slope so as to avoid drop of engine revolutions under 800 rpm and do not allow ride leading t...

Page 61: ...ds and hard surfaces up to 15 km h travel with engaged front driving axle causes increased wearing of front tyres Permanent engagement of the front driving axle is permitted if there is a farming mech...

Page 62: ...ed by a red lamp and red symbol of a tractor with a sign STOP on the dashboard In case of a pressure drop in the compressed air system under 450 kPa the tractor with braked trailer or semi trailer may...

Page 63: ...le of the set P11NX229 Connect hydraulic brakes of trailer or articulated trailer to the quick couplings marked by an arrow Control of hydraulic brakes of trailers articulated trailers and control of...

Page 64: ...ine must be cooled 1 When the engine is started leave it idling without load for ca 5 minutes 2 Move the manual regulation lever to the idling position 3 When the key is turned from I position to 0 po...

Page 65: ...or with low engine revolutions the control may blink if it switches off after starting or increasing the revolutions it is not a failure F_02_68 In case that indicator of lubrication battery recharge...

Page 66: ...ficiencies to be removed immediately you will thus prevent subsequent damage or endangered operation l Keep the same procedure also after tractor complete overhaul In first 10 hours of operation From...

Page 67: ...NOTES 66...

Page 68: ...tput shaft in position N neutral Front and rear PTO shaft control P 13N010 Engagement with minimum engine revolutions of 1 500 min 1 and disengagement of PTO shafts is done by switches A standard trac...

Page 69: ...ndardly with a combination of 540 and 1 000 rpm of the output shaft other optional combination is 540 and 540E rpm of the output shaft Shifting of 540 and 1 000 or 540E min 1 is possible regardless to...

Page 70: ...Against the direction of engine revolutions on request F_02_64 Drive of machines with greater inertia masses crushers rotary harrows reaping machines etc Output shaft Transferred power front 1 000 min...

Page 71: ...NOTES 70...

Page 72: ...s apart It is forbidden to use tractor axles individual travelling wheels such as reeling jack when rescuing a sunken tractor NM13N023 Serves for connecting double axle or lighter single axle trailers...

Page 73: ...types Fig B Swinging draw bar console Fig C Swinging draw bar console with a fixed pin Fig D Console with a 80 ball Disassembly fig A 1 Remove the locking screw 1 2 Secure the module against sinking r...

Page 74: ...a single axle trailer can be equipped with a hook A that is designed for coupling of single axle trailers having poles according to the standard ISO 5692 inner diameter of the eye 50 mm and height of...

Page 75: ...ch using the inner hydraulic circuit lever and disconnect the trailer pole eye E311 The hook of the mounting for a single axle trailer is located in the bracket on the left hand side of the cabin back...

Page 76: ...er 20 000kg Hitch type Permissible vertical static load Hitch pin Hitch type Permissible vertical static load Hitch pin 2 000 kg 31 mm 2 000 kg 38 mm Hitch class D2 Hitch class C 2 000 kg 43 mm 2 000...

Page 77: ...NOTES 76...

Page 78: ...o as electrohydraulics EHR the description of functions in a separate chapter 1 Rear three point hitch control internal hydraulic circuit 2 External hydraulic circuit control It consists of the inner...

Page 79: ...r every disconnection of quick couplers this residual oil must be removed with any textile material Quick couplings with drip collection Working area in flat terrain Max amount of oil taken 20 liters...

Page 80: ...d to use quick couplers 1 and 2 where the hydraulic engine is protected by the kick out function from overload This function stops the hydraulic engine if pressure in the filling arm exceeds 17 MPa If...

Page 81: ...ever a is locked in this position In case pressure exceeds 16 5 MPa when connected to quick coupler 1 lever a automatically returns to N position kick out function 2 Pressure in quick coupler 2 Quick...

Page 82: ...l connected to the three point hitch is automatically being adjusted depending on changing soil resistance All the regulations can also be used when working with a tool equipped with a support wheel i...

Page 83: ...he edge between floating position and the beginning of the range of lifting of the rear three point hitch b After pushing the lever towards you the lever can be moved over the adjustable stop P 11N009...

Page 84: ...nsport position turn the three point hitch lowering speed control knob 3 in the direction shown by the arrow up to the stop point which results in interrupting the oil flow in hydraulics Should tools...

Page 85: ...point hitch may start oscillating under the influence of changing soil resistance To reduce oscillation set lower hydraulic system sensitivity by turning the control knob 4 in b direction Mixed regula...

Page 86: ...rrows moving the lever is restricted with a link By repeating this procedure hydraulic arms are lowered in small steps Raising hydraulic arms img C Move lever 3 in the direction shown by the arrows mo...

Page 87: ...nt three point hitch use lever b to control it When the front three point hitch is used quick couplers cannot be connected as they are pressured together with the front three point hitch When you fini...

Page 88: ...out function P Floating position Both quick couplers 1 and 2 are connected with the drain and oil is free to flow in both directions Lever a is locked in this position N Neutral position Quick coupler...

Page 89: ...his position when released lever c automatically returns to N position In addition quick coupler 5 is equipped with a one way valve convenient for connecting a tool which requires higher degree of imp...

Page 90: ...g speed 4 Setting the position of lifting device 5 Upper position restriction 6 Smooth setting of manual control automatic control 7 LED diagnostic 8 LED lifting 9 LED lowering 10 Engaging compensator...

Page 91: ...started Activation of the EHR B system is only possible when the lubrication indicator has gone off The blocking can only be cancelled system activated with the engine running by moving the lifting le...

Page 92: ...r three point hitch sink by approx 4 which allows oscillation of the arms in the range of approx 8 of the lift The upward oscillation is always limited by the position of the upper position limiter 5...

Page 93: ...mbol of the maximum lowering speed Symbol of the minimum lowering speed F_02_170 For permanent work with free hydraulic system e g during work with a plough with a support wheel the position of the co...

Page 94: ...F_02_172a Do the step according to Cancel blocking part Set the control 6 to hitchtronic AHC position By control 4 set the working depth of tools attached to rear three point hitch When the implement...

Page 95: ...g of the control system and the Blocking cancellation must be repeated F_02_98 1 Lifting 2 Lowering The movement only lasts as long as the buttons are held External hydraulic control buttons are funct...

Page 96: ...Flashing combination of the diagnostic LED 7 Error category Error description Long pause No of flashes Short pause No of flashes 1x 1x Serious error Error with internal safety shutdown of the electro...

Page 97: ...tric pin Short circuit of the dynamometric pin conductor Possible overloading of the dynamometric pin 3x 4x Lowering speed control 3 Faulty potentiometer of the control 3 Faulty contact or interrupted...

Page 98: ...ped with front three point hitch use lever b to control it When the front three point hitch is used quick couplers cannot be connected as they are pressured together with the front three point hitch W...

Page 99: ...ut function P Floating position Both quick couplers 1 and 2 are connected with the drain and oil is free to flow in both directions Lever a is locked in this position N Neutral position Quick coupler...

Page 100: ...in this position P Floating position Both quick couplers 5 and 6 are connected with the drain and oil is free to flow in both directions Lever c is locked in this position N Neutral position Quick co...

Page 101: ...NOTES 100...

Page 102: ...pursuant to ISO 28 mm of upper draw bar hole 25 mm Category II Length of linkage axis 870 mm connecting balls holes of lower draw bars pursuant to ISO 28 mm of upper draw bar hole 25 mm E451 Persons t...

Page 103: ...ed position of the lower hydraulic draw bars A The pin head 1 and washer 2 are installed horizontally Free position of the lower hydraulic draw bars B The pin head 1 and washer 2 are installed vertica...

Page 104: ...ame length E457 Connection of the upper pull rod to some of the holes a to d of the bracket influences Sensitivity of hydraulic control system selection lever in position D or M When the drawbar is co...

Page 105: ...ve upper draw bar 4 and by lowering three point linkage disconnect lower draw bar 3 E460 For extremely demanding working conditions aggregation with heavy machinery on slopes or with aggregation side...

Page 106: ...port position and move the front three point hitch lever to the locked position 3 position lifting 4 position lowering N position locking the hitch P position not to be used P 11N021 Before the start...

Page 107: ...n 2 in the opening 2 and secure the pin Only insert the pin in the openings never check whether the opening is free with your fingers A Working position of the front three point hitch B Transport posi...

Page 108: ...k with nuts z Tighten nuts with a torque of 270 300 Nm z The nut of front wheels to be tightened with a torque of 250 290 Nm z After every release of a foot joint tighten the screws to a prescribed va...

Page 109: ...After travelling the distance of 100 m with an unloaded tractor tighten the nuts tightening the front wheels again to the prescribed torque After loading the tractor tighten the nuts tightening the fr...

Page 110: ...drive axle Set the stops always with any wheel track change or tire replacement with front drive axle Wheel stops with front drive axle must be set so that there would be a distance of at least 50 mm...

Page 111: ...on requested wheel tracks and the kind of used tires C508 Used tires Tire width in mm Adjustable tread 12 4 36 315 1350 1800 13 6 36 348 1350 1800 14 9 28 315 1425 1800 14 9R28 378 1425 1800 16 9 28 4...

Page 112: ...lease of foot joint z After travelling a distance of 100 m with an unloaded tractor retighten the joints again to a prescribed torque z After loading the tractor tighten the joints after 3 Mh z Retest...

Page 113: ...NOTES 112...

Page 114: ...eights of rear wheels Combination of weights pcs Weights kg 4 1 4x50 66 266 8 1 8x50 66 466 P11NE551 Combination of weights pcs Weights kg 10 10x28 280 P11NE552a A Mounting of weights for rear wheel t...

Page 115: ...for water filling 7 Screw on the valve insert and inflate the tyre to the prescribed pressure 8 After inflating screw the protective cap on the valve 9 Fill the other tyre in the same way Water must n...

Page 116: ...es if you have purchases additional tubes Caution the tractor is equipped with tubeless tyres by the manufacturer Solution preparation 1 Dry calcium chloride CaCl2 is added to water never the other wa...

Page 117: ...NOTES 116...

Page 118: ...e battery disconnector This way you will avoid accidental short circuits on the terminals In case of any handling or repair of the started motor the minus pole of the battery must be disconnected and...

Page 119: ...oap 4 During charging hydrogen is released from the electrolyte on the electrodes Hydrogen mixed with the air forms an explosive mixture Therefore it is prohibited to handle open fire near the battery...

Page 120: ...ding of the alternator Poles of the alternator may not be re versed even for a short time Charging control Fuse box Charging control has two functions If there is 1 red light with the engine running i...

Page 121: ...ht low beams fog light indicator 8 7 5A Left low beams indicator of lights in the mask on the roof of the tractor 9 15A Working lights in the front mask 10 3A Front VH Zuidberg 1A 15A Diesel particle...

Page 122: ...grill headlights l distance of the test wall from the headlight 5 m h height of the headlight centre above the road surface h headlight inclination 3 5 to the distance of the test wall 17 5 cm raisin...

Page 123: ...roads when the tractor carries a frontally attached machine or implement covering the main headlights in the tractor grill List of lamps G612 Pos Lamp position Voltage Power Socket Note 1 Main headlig...

Page 124: ...nction of engine lubrication signal lamp Checking the function of charging signal lamp Checking the function of driving signal lamp Checking the function and tightness of the control circuit Checking...

Page 125: ...work Replacement of engine oil o o o o o 500 Replacement of engine oil filter cartridge o o o o o 500 Replacement of fuel filter cartridge o o o o 500 Replacement of air filter cartridge o o 1 000 Re...

Page 126: ...Zetor engines which are equipped with diesel particle filter Engine oil Zetor 15W40 L SAPS Oil to gear systems of tractors gearbox with final drive housing portals of the rear axle Oil for gearing mec...

Page 127: ...ance class API 80W GL 4 Use oils with additives for the limited slip differential Specification of oil for the tractor hydrostatic control system Viscosity class SAE Performance class API 80W 80W 90 1...

Page 128: ...4 MV Austromatic HGN 80W GL 4 Gear Oil EC 4 80W 85 GL 4 Austrotrac 10W 40 GL 4 Austrotrac 10W 30 GL 4 Fuchs Titan Hydramot 1030MC 10W 30 GL 4 Renolin G 100 80W GL 4 MOL Farm NH Ultra UTTO 80W GL 4 OR...

Page 129: ...latinum Gear 80W 90 80W 90 GL 5 Plastic lubricant for the tractor Manufacturer Oil designation Classification Shell TELLUS DO 32 HLP DIN 51524 Aral Vitam DE 32 HLP DIN 51524 Fuchs RENOLIND10VG32 HLP D...

Page 130: ...ortion of 1 1 5 replenish the mixture in this proportion Antifreeze liquids for replacement abroad must contain anti corrosion additives protecting all materials incl rubber and head gaskets of the co...

Page 131: ...etc Prior to starting the work secure the tractor against movement using manual brake Lubrication must be performed only when the engine is at standstill Solid front drive axle Hitch for a single axl...

Page 132: ...tification No of lubrication points 1 Pins of auxiliary hydraulic cylinders 2 2 Lifting draw bars 2 21 Pos no Identification No of lubrication points 1 Hitch mouth for a trailer 1 5P Pos No Name Numbe...

Page 133: ...rm the maintenance in the same way as with a new tractor Pos No Name Number of lubr points 1 Pin of coupling switching off 2 7P Disassemble the left side cover of the control panel Disassemble the loc...

Page 134: ...cked in the heaved position by a gas fluid prop Closing the bonnet Pull the bonnet by means of a belt grip where the arrows are and snap in the downward direction so that the lock of bonnet snaps down...

Page 135: ...e engine and settling the level recheck the amount of oil with a dipstick 1 and check the tightness of filter drain plug 3 and other joints E705 Before you replace fuel filter place a suitable vessel...

Page 136: ...n is signalized by the position of driver 1 in indicator window If the driver 1 reaches a red box with a label service 2 it is necessary to do dry air filter maintenance After completing dry air filte...

Page 137: ...main element after 5 maintenances of air filter at least once in two years G714 Do back assembly of air filter elements reversely Mind the following with back assembly contact surfaces cleanliness el...

Page 138: ...from working roller and waste pipeline from the tank place vessels for used oil under working roller hoses and waste pipeline 11 start the engine and with idle run max 10 seconds turn the steering wh...

Page 139: ...turn the steering wheel 3 times alternately slowly and quickly to both sides to restricting wheel stop 5 stop the engine 6 after completing the venting check or replenish the oil level to control gau...

Page 140: ...le drive and rear axle portals Proceed in the following way 1 Open the heating valve and release the pressure cap C on equalizing vessel 2 Drain the coolant from the radiator Plug A is accessible afte...

Page 141: ...f it is necessary to change the filter outside the period recommended for changing the filter and oil 1 Drain plug of the gear mechanism 2 Oil drain plug from the outlet for the front driving axle 3 B...

Page 142: ...filling plug of oil 1 is situated on the front side of the front PTO case Note The front PTO with the standard turning direction is equipped with a hollow bolt of the oil cooler hose instead of the in...

Page 143: ...33 Inspection filling and draining oil is done by a one hole after turning reducer according to figure 1 amount of oil inspection hole in the horizontal axis of a reducer after unscrewing control scre...

Page 144: ...og the carbon filter in a very short time During its use the recirculation control must be in the position of air suctioned from the outside The fan control must be in the maximum position The filter...

Page 145: ...ut the proper routing of hoses to the oil cooler F_02_120 When the air conditioning functions properly water condenses in the roof space of the cab and the condensate is drained through hoses in the c...

Page 146: ...servoir A the tyres cannot be inflated In this case you must first reduce the pressure with the condensate drain valve located in the bottom part of the air reservoir A After inflating the tyres you m...

Page 147: ...ind the fuel tank the oil cleaner is accessible from the bottom of the tractor Before replacement of the oil cleaner cartridge put a suitable container under the tractor to catch any leaking oil 1 Scr...

Page 148: ...tic brake system for trailers 2 Foot brakes of rear wheels 3 Brake system of the front driving axle 4 Hydraulic brakes of the trailer Carry out bleeding of the pneumatic brake system for trailers and...

Page 149: ...he gauge and tighten the adjusting screw 7 Release the brake pedal and repeat the process until air bubbles cease escaping from the hose 2 Bleeding of rear wheel brakes E759 Bleed the system in the fo...

Page 150: ...he bleeding screws max by 1 4 of turn 6 Tread on coupled brake pedals up to their stop and tighten the bleeding screws 7 Release the brake pedals and repeat the procedure until air bubbles stop escapi...

Page 151: ...one wheel and simultaneously tighten the screw 5 until the wheel starts to be braked 5 Loosen the screw 7 by 5 6 turn check if the wheel can turn freely and secure the screw 7 with the nut 6 6 Adjust...

Page 152: ...lay 5 Rise and lower the parking brake lever 1 several times You will eliminate possible mutual plays among the parts by this way 6 Check adjustment of the parking brake system in case of necessity re...

Page 153: ...eye 1 is adjusted so that the piston rod might be maximally pulled out from the cylinder and simultaneously the play between the pedal and the upper stop screw 2 might be 0 1 0 2 mm Subsequently the...

Page 154: ...th the transmission Adjustment of hitch for single axle trailers Adjustment of bowden cable 1 Lift the hydraulic arms to their upper transport position with selected position regulation P 2 Screw the...

Page 155: ...and B buttons simultaneously Keep the buttons pressed for 7 sec There will be an acoustic signal and in c n t inscription starts flashing on the display Release both buttons A and B c n t inscription...

Page 156: ...uards 1 890 Height to the exhaust pipe mouth 2 694 2 780 acc to tyre size Height of the tractor to the cabin upper edge 2 639 2 725 acc to tyre size Clearance under front axle beam 468 508 acc to tyre...

Page 157: ...m 800 25 Net power at nominal speed measured acc to EC24 kW 56 64 Specific fuel consumption at the given power g kWh 216 258 Max torque Mt Nm 329 355 Excess of Mt 35 38 Lubrication of engine Pressure...

Page 158: ...ding capacity of rear tyres Permitted maximum weight of vehicle set tractor mechanism kg Condition of steerage Travel speed km h 1 Wheel gauge mm 1 525 1 610 1 620 1 680 1 690 1 760 1 770 1 825 1 835...

Page 159: ...ng capacity of the axle Inflation values are minimum values adapted to the maximum permitted loading capacity of the axle In case of driving on hard surfaces it is suitable to increase pressure by 30...

Page 160: ...160 480 70R30 2575 5000 160 2530 5000 140 18 4 30 8 PR 1950 3900 140 2430 4860 140 18 4R30 2545 5000 150 2600 5000 140 16 9 34 8 PR 1950 3900 170 2430 4860 170 16 9R34 2650 5000 160 2620 5000 140 480...

Page 161: ...n kPa Tyre loading capacity inflation kPa kg kg tyre axle tyre axle 1 ks 1 ks 16 9 30 8 PR 2760 5000 170 2885 5500 140 16 9R30 2680 5000 160 3000 5500 140 480 70R30 2570 5000 120 2860 5500 100 18 4 30...

Page 162: ...W 2 at the nominal engine speed and engaged 1000 rpm of the PTO Engine in the running in stage until 100 hours 43 5 50 Engine after the running in stage from 100 hours on 46 52 5 Tractor type Proxima...

Page 163: ...712 5 1344 4 1061 9 1344 4 L 23 0 23 8 22 2 22 1 712 5 1344 4 1061 9 1344 4 3 Hi H 20 5 21 2 19 8 19 7 490 5 925 5 731 0 925 5 L 15 8 16 3 15 3 15 2 490 5 925 5 731 0 925 5 2 Hi H 12 8 13 2 12 4 12 3...

Page 164: ...9 1430 2 1129 6 1430 2 L 24 4 25 2 23 6 23 4 757 9 1430 2 1129 6 1430 2 3 Hi H 21 8 22 5 21 1 20 9 521 8 984 6 777 7 984 6 L 16 8 17 4 16 2 16 1 521 8 984 6 777 7 984 6 2 Hi H 13 6 14 1 13 1 13 1 326...

Page 165: ...4 4 L 27 7 28 6 26 8 26 6 712 5 1344 4 1061 9 1344 4 3 Hi H 24 8 25 6 24 0 23 8 490 5 925 5 731 0 925 5 L 19 1 19 7 18 5 18 3 490 5 925 5 731 0 925 5 2 Hi H 15 5 16 0 15 0 14 9 306 7 578 7 457 1 578 7...

Page 166: ...2 L 29 5 30 5 28 5 28 3 757 9 1430 2 1129 6 1430 2 3 Hi H 26 3 27 2 25 4 25 2 521 8 984 6 777 7 984 6 L 20 3 21 0 19 6 19 5 521 8 984 6 777 7 984 6 2 Hi H 16 5 17 1 15 9 15 8 326 2 615 6 486 2 615 6 L...

Page 167: ...front 1 610mm To the left mm To the right mm rear 1 500mm Track diameter mm Without engaged front driving axle PHN 11 850 11 380 Without engaged front driving axle with partial braking of the inner re...

Page 168: ...se c m distance between the centre of the rear axle and the centre of fixing holes of lower hydraulic arms d m distance between the centre of fixing holes of lower hydraulic arms and the gravity centr...

Page 169: ...se of the tractor designed for the front axle should be recorded in the table 4 Calculation of the real total load G tat If the necessary rear axle load cannot be reached with the rear attached machin...

Page 170: ...e rear axle Real value according to the calculation Allowed value according to the manufacturer Total tractor weight 6 000 kg Front axle load 2 600 kg Rear axle load 5 000 kg During aggregation with s...

Page 171: ...NOTES 170...

Page 172: ...Dashboard 40 Description of minor errors of the EHR B electro hydraulic system 96 Diesel particle filter 55 Diesel particle filter system failures signalization 55 Diesel particle filter failure code...

Page 173: ...of lamps 122 Loading capacity of front tyres 158 Loading capacity of rear tyres 159 Location of serial numbers 9 Locking control levers 86 Locking control levers 97 Lower draw bar with CBM hooks 104...

Page 174: ...of work 124 Stop position 91 Stopping the engine 63 Stopping the tractor manual brake 63 Storing the tractor 145 Sun screen 27 Swinging draw bar console module 72 Swinging draw bar console with a fix...

Page 175: ...Operator s manual Proxima GP 80 Proxima GP 90 Edition 7 100 2017 Publication No 222 213 012 ZETOR TRACTORS a s Department of Technical Documentation Trnkova 111 628 00 Brno 174...

Page 176: ...Made in EU www zetor com zetor zetor com...

Reviews: