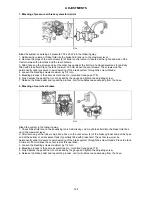
3. Bleeding of the brake system of front driving axle
E761
Before bleeding procedure it is always necessary to carry out bleeding of the trailer control valve, as
described in par. 1. Bleeding of air brake system for trailers, even in case that air brakes are not mounted
for the trailer.
Carry out bleeding at operating air pressure 730 ± 20 kPa in the system.
Carry out bleeding as follows:
1. Check level of brake fluid in the expansion tank. Refill missing volume to the maximum if necessary.
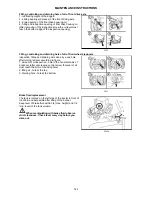
2. Remove plastic caps of bleeding screws on brakes of the front driving axle (the screws are located on
upper surfaces of the reducers).
3. Slide hoses onto the screws and sink their other ends to the bottom of a transparent container (3), filled
partly with brake fluid. Put the container at least 300mm above the bleeding screws. The screws shall be still
under pressure to prevent penetration of air into the system through their threads.
4. Bleed left and right brakes simultaneously.
5. Release the bleeding screws max. by 1/4 of turn.
6. Tread on coupled brake pedals up to their stop and tighten the bleeding screws.
7. Release the brake pedals and repeat the procedure until air bubbles stop escaping from the hose.
8. After bleeding of the brake system of the front driving axle tighten the bleeding screws by a torque 0.8 to
1.2 Nm (3).
4. Bleeding the hydraulic brakes of a trailer
E762
Bleed the system in the following way:
1. Add missing volume of brake fluid into the equalising tank up to maximum level.
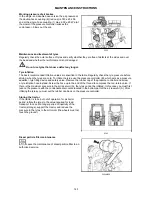
2. Remove plug of vent screw (2) of hydraulic trailer control valve (1) located at the left-hand front support of
the cab silent-block.
3. Slide a hose on the screw and put the hose other end at the bottom of a transparent tank (3) partially filled
with brake fluid. Place the tank minimally 300 mm above the vent screw. The vent screw must be
permanently under pressure to avoid aerating of brake system through the screw threads.
4. Loosen the bleeding screws maximum by 1/4 turn.
5. Fully depress the latched brake pedals to the stop and tighten the adjusting screws.
6. Release the brake pedals and repeat the process, until air bubbles cease escaping from the hose.
ADJUSTMENTS
149
Summary of Contents for Proxima GP 80
Page 1: ...Tractor is Zetor Since 1946 PROXIMA GP 80 OPERATOR S MANUAL 07 2017 90...
Page 3: ...2...
Page 21: ...NOTES 20...
Page 40: ...NOTES 39...
Page 51: ...NOTES 50...
Page 67: ...NOTES 66...
Page 71: ...NOTES 70...
Page 77: ...NOTES 76...
Page 101: ...NOTES 100...
Page 113: ...NOTES 112...
Page 117: ...NOTES 116...
Page 171: ...NOTES 170...


