background image

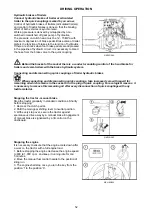
Front PTO shaft

Activation of the front PTO shaft - common working mode

MCL18N031

When the tractor is going or is not going with its engine running:

A - The operator must sit on the driver's seat.

B - Press the button on the panel of the instrument panel to activate the front PTO shaft. 

The operator must sit on the driver's seat when pressing the button.

C - Activation of the front PTO shaft is indicated with the activated symbol on the switch of the front PTO 
shaft and the symbol on the display of the instrument panel.

Front PTO shaft is equipped with a solid six or twenty-one 
splined end point and it comes only in design of 1,000 

revolutions. 

Tractor may be equipped with front PTO shaft with varied 

direction of spinning:

a -

In compliance with the direction of engine 

revolutions (standard)

b -

Against the direction of engine revolutions 

(*on request)

NM15D066

If the operator, when working with the front PTO shaft in 

the common working mode, leaves the driver's seat, an 

audio signal is generated, the warning symbol appears on 
the display of the instrument panel and the front PTO shaft

is stopped.

During the period when the warning symbol is 

displayed on the display of the instrument panel, the 

front PTO shaft does not rotate even if the switch of 

the front PTO shaft and the symbol on this switch are 

activated.

To reactivate the front PTO shaft, you must sit on the 

driver's seat, switch off and then switch on the switch of 

the front PTO shaft on the panel of the instrument panel.

MCL18N010

DRIVE OF AGRICULTURAL MACHINERY 

66

Summary of Contents for MAJOR CL

Page 1: ...OPERATOR S MANUAL MAJOR CL 3 2018 60 Tractor is Zetor Since 1946 80 ...

Page 2: ... and get a perfect overview of how to use the tractor with maximum efficiency during various kinds of work If you observe the rules of tractor operation and maintenance and driving safety your new tractor will become your reliable and long term friend The manufacturer of the tractor wishes you thousands of hours of satisfactory work ZETOR Brno The technical specifications and information about the...

Page 3: ...2 ...

Page 4: ...h front implements and in case of cooler clogging 22 Tyres and wheels 23 Short functional test 23 Acquaintance with the tractor 25 Safety cab 25 Opening doors from the outside 25 Opening doors from the inside 25 Rear window 26 Bottom rear window 26 Side window 26 Hinged lid 27 Emergency exits 27 Driver s seat 27 Tilting steering wheel 27 Panel of switches on cab s roof 28 Switches and controls on ...

Page 5: ...es of trailers and semi trailers 49 Connection of the ABS system of the trailer or semi trailer 49 The button for temporary deactivation of brakes of the trailer or semi trailer 49 Trailer and semi trailer air brakes 50 Notification signalization of air pressure drop 50 One hose and two hose brakes 50 One hose brakes 51 Two hose brakes 51 Hydraulic brakes of trailers 52 Connecting and disconnectin...

Page 6: ...ernal hydraulic circuit control elements 72 Two section switchboard external hydraulic circuit controlling levers function 73 One section switchboard external hydraulic circuit controlling levers function 74 Quick couplers engagement and disengagement 74 Connecting machines and tools to external hydraulic circuit 75 Control of the front 3 point hitch 75 Front outlets of the external hydraulic circ...

Page 7: ...ng axle 99 Other recommended service fillings tested on Zetor tractors 100 Oil to gear systems of tractors 100 Oil for the front driving axle 100 Front PTO oil 101 Plastic lubricant for the tractor 101 Liquid for the cooling system of the tractors 101 Fuel 101 Tractor greasing plan 102 Safety instructions for lubrication of the tractor 102 Three point linkage and rear semi axes bearings 102 Front ...

Page 8: ...belt drive tension of accessories 117 Stretching the V belt in the air conditioner compressor 117 Stretching the V belt in the compressor 117 P T O shaft clutch control lever adjustment 118 Adjusting clutch pedal 118 Foot brake check 118 Foot brake adjustment 119 Parking brake adjustment 119 Main technical parameters 121 Main tractor s parameters mm 121 Tractor s weight 121 Technical data of engin...

Page 9: ...8 ...

Page 10: ...serial number is impressed on a label located at the top of the engine When ordering spare parts and within all written and oral communication always specify the data of your tractor that should be written in the frames below Tractor type Tractor serial number Engine serial number LOCATION OF SERIAL NUMBERS 9 ...

Page 11: ...The right left front and back indications refer to the driving direction of the tractor NM13N082 LOCATION OF SERIAL NUMBERS 10 ...

Page 12: ...the tractor mounted in the production site on the customer s request This symbol is used to indicate the parts of the instructions for use related only to the models equipped with the diesel particulate filter DPF This symbol is used to indicate hot surfaces Increased care should be taken when working in their vicinity risk of injury Accessories which are not mounted as a standard or on the custom...

Page 13: ...in the perfect condition all the time z During driving on roads with trailers and tools the brake pedals must be connected with a latch z Driving downhill without an engaged gear is forbidden z Pay special attention when driving on a slope and muddy sandy icy or uneven ground z Observe the maximum set angle of slope availability 12 with tractors with front drive axle z During aggregations of the t...

Page 14: ...ified in the technical certificate of the tractor z Persons that are not authorized to work with the attached implement must not stand between the tractor and the hitched machine implement z Before putting the tractor in motion make sure there is no person or obstacle in the driving direction Recovery pushing z To recover a tractor that has sunk in mud use a tow bar or rope attached to the front h...

Page 15: ... the tractor z At tractor equipped with reversor gear shift the reversor lever into forward drive position With stopped engine only z All work connected with refuelling cleaning lubricating and adjusting the tractor or attached implements may only be performed with the engine and moving parts of the tractor stopped except functional checks of the brakes hydraulic system and charging z Before remov...

Page 16: ... liquids after the end of their service life you must observe relevant provisions of valid acts and implementation directives of these acts of the country where the tractor is used The last seller of the tractor is obliged in accordance with the Waste Act to inform the consumer during the sale of the tractor about the way of collection of some used parts of the tractor This is the case of oil and ...

Page 17: ...ious failure of the tractor Work in a chemically aggressive environment z If the tractor is operating in a chemically aggressive environment e g working with chemical sprays fertilizers in environments with high concentrations of salt etc it is always necessary to clean the tractor thoroughly from chemically aggressive substances and neutralize them after the termination of the work according to t...

Page 18: ...2014 Annex XIII Model Major 60 Major 80 Travel speed 30 km h Tractor noise levels when travelling dB 78 0 79 0 Tractor noise levels when standing dB 78 0 78 5 The level of vibrations on driver s seat ZETOR tractors are classified in the category A and the class I II The category A includes all tractors with specified levels of vibration due to similar specifications of the construction The followi...

Page 19: ... 2 Cab roof designed for tractors equipped with front end loader meeting the OECD code 10 FOPS conditions Tractors ZETOR supplied already from production with front end loader are equipped with cab roof according to point 2 From safety reasons series ZETOR tractors supplied without front end loader with standard roof pursuant to point 1 must not be equipped or used with front end loader In case of...

Page 20: ... observe special instructions related to accidents prevention and general rules related to technical safety la bour medicine labour hygiene and regulation defining operation on roads z The manufacturer does not bear any responsibility for any potential damage incurred as a result of changes conducted on the loader without their consent z Do not ever adjust the front end loader by yourselves and do...

Page 21: ... can be mounted to ZETOR tractors In case of additional assembly of further tractor equipment for working in the woods full responsibility is borne by the supplier and manufacturer of the protective structure that all the safety regulations e g OPS FOPS all the conditions of homologation e g the area of driver s view lighting parameters permissible weight etc are met same as for the provision of d...

Page 22: ...cated on the right side of the engine Take out the dipstick 1 wipe it with a clean cloth without fibres and insert it back till the end When the dipstick is taken out again check the oil level The oil level must always be in the range from MIN and MAX Add the oil as necessary NM15D65 Check the connections of the engine cooling system for leaks and the coolant quantity in the expansion tank Repleni...

Page 23: ... in the trailer and braking efficiency of the tractor with the trailer NM13N085 Check the condition of the hitching and attachment systems of the tractor and trailer NM13N063 After work with front implements Check the connections of the external hydraulic circuit of the control of the front three point hitch for leaks Clogging of the coolers Release and slide the cooler to the left side of the tra...

Page 24: ...ue Check and if necessary retighten the bolts of the front and rear wheels Never drive with loose wheel bolts NM13N086 After starting the engine check whether the hydrostatic steering failure engine lubrication and charging indicators have gone off Verify the function of the hydraulic steering circuits and check them for leaks NM14D050 PREVENTIVE DAILY MAINTENANCE 23 ...

Page 25: ...NOTES 24 ...

Page 26: ...e from the outside Right door of the cabin are equipped only with a button from the outside After unlocking and pressing the button of the lock the door opens by pulling the handle NM13N025 By pressing the button 1 doors of the cab can be opened from the inside Lever 2 on right door serves for locking the lock of right door The door lock is locked by shifting the lever 2 in the direction of an arr...

Page 27: ...arting work with machines mounted in rear three point linkage of the tractor make sure that there is no risk of collision between mounted tools with maximum heave of rear three point linkage and open rear window If there is collision we recommend working with a closed window NM13N027 For opening the bottom rear window it is necessary to push the lever 1 in the direction of an arrow Close the windo...

Page 28: ... tilt is adjusted 2 The lever of the longitudinal adjustment of the seat press the lever from the seat perform longitudinal adjustment of the seat and release the lever 3 The controller of the seat suspension adjustment according to the driver s weight performed by turning the controller By turning to the left the adjusted weight is decreased by turning to the right the adjusted weight is increase...

Page 29: ...the fog lamp is indicated with the activated symbol on the switch 7 Heating switch 8 Valve heating controller 9 Switch box 10 The button for temporary deactivation of brakes of the trailer More information in chapter DRIVING 11 The clutch switch of the front PTO shaft More information in chapter POWER OF AGRICULTURAL MACHINES 12 Switch of the front wiper and windshield washer MCL18N001 Direction l...

Page 30: ...iper should be switched again move the switch from the position a to the position b Leave the switch in this position and the cycler of the windshield wiper is adjusted The windshield washer is switched by pulling the lever 12 towards the steering wheel MCL18N011 When the switch 3 is switched the direction lights on the left and right sides start flashing simultaneously Activation of the switch 3 ...

Page 31: ... The key can be removed S43 The voltage is connected to all the equipment excluding starter The key is in this position with the engine running S44 Starter and supply of all equipment is connected in this position apart from wipers washer cab ventilator and air condition After starting the key automatically returns back to I position S45 ACQUAINTANCE WITH THE TRACTOR 30 ...

Page 32: ...rs are placed in the upper A and face B part of the dashboard panel The lower registers B are opened by shifting the levers 1 in the direction of arrows By shifting the levers against the direction of arrows registers close NM15D089 The air conditioning cabin is switched by the switch 1 the switch 2 is used for adjustment of the air conditioning fan power The switches are positioned on the ceiling...

Page 33: ... GUIDELINES 10 Hand brake signal lamp dark red It is lit with engaged hand brake 11 Minimum air pressure in brake system signal lamp dark red It is activated with the air pressure drop for air brakes of trailer below the critical limit 12 Signal lamp dark red of a failure in the hydrostatic control system It lights with engine operation in hydrostatic control system failure 13 Signal lamp of direc...

Page 34: ...multaneously the orange engine failure signal lamp is activated If there are more defects the displayed DTC codes of individual defects change each two seconds The DTC code is displayed until the defect is fixed If this situation occurs stop the tractor and contact the service centre MCL18N007 The hand brake symbol is displayed on the display of the instrument panel in case that the tractor must b...

Page 35: ...ication of PTO shafts Manual fuel control lever The PTO shaft symbol is displayed on the display of the instrument panel in case that the engine will be switched off afterwards due to wrong PTO shaft handling Indication of the PTO shaft symbol is accompanied by an acoustic signal More information in chapter POWER OF AGRICULTURAL MACHINES MCL18N010 a idle run b maximum supply The lever enables to s...

Page 36: ...2 foot brake pedals connected with a flap 3 foot fuel supply control pedal NM15N087 Differential lockis controlled by a pedal placed on the right side of driver s seat Engaging differential lock is done by depressing a pedal for the time of pedal depression the lock is engaged after releasing the lock pedal the pedal returns to its original positional and the differential lock is disengaged When g...

Page 37: ...pressed NM13N044 Gear shifting lever serves for change of gear box gear Gear shifting is done with clutch pedal depressed NM13N045 Road and reduced speeds shifting lever serves for shifting gear groups Gear shifting is done with the tractor at standstill and depressed clutch pedal H Road speeds M Average speeds N Neutral L Reduced speeds NM13N046 Manual brake and PTO clutch disengagement levers ar...

Page 38: ...aft drive revolutions are dependent on engine revolutions Gear shifting is done with a tractor at standstill and engaged manual clutch lever NM13N004 Shifting 540 or 1 000 revolutions of rear PTO shaft is done with the lever 1 placed from the outside of the tractor above the rear PTO shaft a 540 rpm b 1 000 rpm Gear shifting is done with the lever of PTO shaft drive engagement in n position PTO sh...

Page 39: ...tank with a volume of 80 litres is mounted as a standard Do not step on the tank NM13N089 When working on slope if the tractor inclination is near the value of maximum slope availability i e 12 the fuel amount in the fuel tank must be at least 20 of the fuel tank volume NM14D055 ACQUAINTANCE WITH THE TRACTOR 38 ...

Page 40: ...the reversing lever is in the neutral position 5 the switch of the front PTO shaft on the instrument panel is deactivated The switching of the front or rear PTO shaft after moving the key in the switch box from the position 0 to the position I is indicated by the symbol on the instrument panel A Both PTO shafts are activated move the lever for activation of the rear PTO shaft drive to the neutral ...

Page 41: ... Wait until the glowing signal lamp goes out the time depends on the temperature of the cooling liquid 7 Immediately after the lamp goes out 5 s max turn the key from I position to II position start 8 After starting the engine immediately release the key and it is automatically returned to the position I Do not perform starting for a longer period than 15 s If engine does not start Return the key ...

Page 42: ...ith any manipulation or starter repair it is necessary to disconnect minus battery pole and all shifting levers including PTO shaft shifting lever must be in neutral position Starter contacts are covered with a cap NM13N093 When the engine is started set the revolutions to 900 1100 rpm and leave the engine idling without load for ca 2 minutes During this time perform checking of lubrication chargi...

Page 43: ... If the temperature of the cooling liquid when the engine is running at idling speed does not drop stop the engine and check the amount of the cooling liquid z If the pressure of the cooling liquid in the equalizing vessel drops below the critical limit the error message DTC 111 1 is indicated on the instrument panel B Check tightness of connections of the engine cooling system and amount of the c...

Page 44: ...essure increases and the signal lamp is deactivated 9 Signal lamp dark red of a failure in the hydrostatic control system If the signal lamp is on when the engine is running it indicates a failure of the hydrostatic control system if the signal lamp is activated when the tractor is operated stop the tractor and contact the service centre When starting the tractor or at low engine revolutions the s...

Page 45: ... revolutions slightly 9 Prepare manual brake for unbraking 10 Release the clutch pedal only to the point of travel engagement and with simultaneous increase of engine revolutions continue in smooth release of clutch pedal 11 Unbrake manual brake completely 12 Drive away smoothly and slowly A very fast drive away may cause overload of driving set increased fuel consumption excessive tires wear and ...

Page 46: ... speeds NM13N046 Gear shifting lever serves for changes of gear box gears Gear shifting is done with a depressed clutch pedal Only gears are shifted by main gear shifting lever the direction of travel is shifted by reversing lever NM13N045 Reversing lever 1 serves for the change of tractor s travel direction F drive forward lever in the front N neutral R reversing lever at the back Gear shifting i...

Page 47: ...aged smoothly and at same time increase engine revolutions Note For increasing the life cycle of synchrones it is possible to shift from higher to lower gear with the socalled double declutching NM13N052 Depress the clutch pedal and shift the gear shifting lever through neutral to lower gear Note For increasing the life cycle of synchrones it is possible to shift from higher to lower gear with the...

Page 48: ... lower gear before the slope if possible Note The gear with which you will reliably overcome ascension it is the one with which you will safely go down NM13N096 Differential lockis controlled by a pedal placed on the right side of driver s seat Differential lock is engaged by depressing the pedal for the time of pedal depressing is the lock engaged after releasing the pedal of the lock the pedal r...

Page 49: ...itch off the drive of the front axle When both brake pedals are pressed the drive of the front axle is automatically connected MCL18N016 Use front drive axle with slip of rear wheels to increase pull of tractor On the road and on hard surface causes driving with front drive axle engaged increased tire wear of front wheels Permanent engagement of front drive axle is admissible if front mounted agri...

Page 50: ... hand brake and the key in the switch box is in the position I and we press the button for temporary deactivation of brakes of the trailer or semi trailer the trailer or semi trailer is deactivated for the time when the button is pressed the trailer or semi trailer does not brake When the button for temporary deactivation of brakes of the trailer or semi trailer is released the brakes of the trail...

Page 51: ...ailer are not in operation Note When travelling down a steep slope with a trailer or semi trailer equipped with air brakes it is necessary to brake with a foot brake before the descent starts NM13N097 If the air pressure in the air brake system falls under a critical limit a red indicator on the dash board comes on In case the pressure in the air pressure system drops under a critical limit the in...

Page 52: ...ed of the slower vehicle of the set NM15D057 Operating pressure is adjusted with the control valve at 740 20 kPa Capacity of air tank is 20 l The valve of the left head is labelled in yellow braking branch the valve of the right head is labelled in red filling branch With the connected trailer or semi trailer with a maximum allowed speed approved for the specific type of the tractor is the maximum...

Page 53: ...on switched off gear pump of hydraulics The pressure on clutch head must be 12 15 MPa with maximum depression of brake pedal Brake valve of trailer prefers the function of brakes to the function of hydraulics If there are shocks when foot brake pedals are depressed in the pipeline of hydraulic circuit it is necessary to bleed the hose from the brake valve to the quick coupling NM14D040 Stop the tr...

Page 54: ...e tractor with a safety cab do not forget to remove the key from the switch box in position 0 only with engine at standstill charging control must be on and lock the cab The key cannot be pulled out in positions I and II Tractor must be secured against spontaneous drive away 1 engine disengaged 2 1st gear engaged 3 braked with the manual brake If the tractor is on the slope wheels must be made sta...

Page 55: ...NOTES 54 ...

Page 56: ...f the engine z Avoid excessive idle run operation z Check oil levels in engine often during this time increased oil consumption is normal z Check screw joints in particular in supporting parts of tractor z Learned insufficiencies to be removed immediately you will thus prevent subsequent damage or endangered operation z Keep the same procedure also after tractor complete overhaul nm15d059 z perfor...

Page 57: ...NOTES 56 ...

Page 58: ...er use chains The possibility of fatal injury if a chain pulls apart It is forbidden to use tractor axles individual travelling wheels such as reeling jack when rescuing a sunken tractor Multistage adjustable suspension Vertical adjustment and multistage suspension disassembly Serves for connecting double axle or lighter single axle trailers Guidance nozzle is vertically adjustable When working wi...

Page 59: ...pin is signalled by the retracted indicator 3 see fig B After the attachment of the trailer you must always check whether the indicator 3 is retracted in accordance with fig B E304 The draw rod can transversely be set to five positions You fix it in a given position using a clip NM14D043 1 Demount locking screw 1 2 Secure the module against drop unlock and demount pins 2 3 Protrude the module from...

Page 60: ...2 200 max trailer weight 10 800 kg Tractor must be aggregated only with a tractor trailer for balancing tractor operation brakes or hydraulic brakes of trailer Static load of tractor rear axle in aggregation with semitrailer must not exceed the value of maximum permitted load NM13N097 Suspension type Permitted vertical static load Ø of suspension pin Suspension type Permitted vertical static load ...

Page 61: ...NOTES 60 ...

Page 62: ...e at halt disengaged PTO shaft clutch and dependent and independent revolutions of PTO shaft lever in N neutral position 4 Connecting and disconnecting cardan shaft of aggregated machine to front PTO shaft of tractor to be done always only with engine at standstill and disengaged PTO shaft 5 Any repairs or cleaning of parts of aggregated machines driven by PTO shaft to be done only with engine at ...

Page 63: ...lay of the instrument panel in case that the engine will be switched off afterwards due to wrong PTO shaft handling Indication of the PTO shaft symbol is accompanied by an acoustic signal MCL18N010 By pulling manual clutch disengagement lever to upper position disengagement of PTO shaft clutch occurs The upper position of the lever is signalized by a lit control on a dashboard The lever is automat...

Page 64: ... standstill and engaged manual clutch lever a dependent revolutions of PTO with PTO shaft drive via gearbox revolutions are dependent on the engaged gear n Neutral position b independent revolutions of PTO shaft drive revolutions are dependent on engine revolutions NM13N004 Shifting 540 or 1 000 revolutions of rear PTO shaft is done with a lever 1 placed on the outer side of tractor on rear PTO sh...

Page 65: ...de common working mode the operator must sit on the driver s seat Pull the clutch release lever for the manual deactivation of the rear PTO shaft for short term interruption of torque transmission from the engine Move the lever for activation of the PTO shaft drive to the position n for long term interruption of torque transmission from the engine The number of revolutions of the independent PTO s...

Page 66: ...erm interruption of torque transmission from the engine The number of revolutions of the independent PTO shaft see the Chapter Main technical parameters If the operator when working with the rear PTO shaft in the stationary working mode sits on the driver s seat the working mode automatically changes to the common mode Rear PTO shaft dependent revolutions With dependent revolutions of rear PTO sha...

Page 67: ...ipped with front PTO shaft with varied direction of spinning a In compliance with the direction of engine revolutions standard b Against the direction of engine revolutions on request NM15D066 If the operator when working with the front PTO shaft in the common working mode leaves the driver s seat an audio signal is generated the warning symbol appears on the display of the instrument panel and th...

Page 68: ... when working with the front PTO shaft in the common working mode sits on the driver s seat or the hand brake is or is not pulled an audio signal is generated the warning symbol appears on the display of the instrument panel and the front PTO shaft is stopped During the period when the warning symbol is displayed on the display of the instrument panel the front PTO shaft does not rotate even if th...

Page 69: ... min 1 full engine power rear 1 000 min 1 full engine power 540 min 1 full engine power Cardan shaft fro drive of these machines must be equipped with the socalled free wheel which ensures the disconnection of torque transmission with retroactive effect from the machine to tractor C220 DRIVE OF AGRICULTURAL MACHINERY 68 ...

Page 70: ...ected in three point linkage are kept automatically at constant height position to tractor Mixed regulation fig 2 which is the combination of position and power regulation It is suitable mostly for tillage on lots with different soil resistance Power regulation fig 3 with which tools connected in three point linkage are automatically vertically adjustable depending on the change in soil resistance...

Page 71: ...e in this position Shift lever 2 to front position a Position of lever 1 is not decisive NM13N011 Speed of three point linkage lowering control 4 serves for setting the speed of lowering three point linkage arms When turning the control of speed of three point linkage lowering in b direction the speed of three point linkage arms lowering decreases in a direction it increases If we turn speed of lo...

Page 72: ...of three point linkage arms in transport position during transport If lowering speed control 3 is permitted and still a tool it cannot be lowered move the lever 2 to floating position c for a short time and immediately return to the lowering range b The arms of rear three point linkage start dropping according to a set lever 2 Power regulation of three point linkage heave NM13N015 Power regulation...

Page 73: ...original setting External hydraulic circuit Extrernal hydraulic circuit control elements The control levers of the outer hydraulic circuit are distinguished by colours The lever colour corresponds to the colour of quick coupler dusters that are controlled by the corresponding lever Supplies pressure oil for hydraulic devices connected to external outlet of hydraulics finished with quick couplers Q...

Page 74: ... couplers 1 a 2 are connected with waste and oil can freely flow in them in both directions Lever a is locked in this position N Neutral position Outlets to quick couplers 3 and 4 are locked and the oil in the connected hydraulic device is blocked Lever b is locked in this position 3 Pressure in quick coupler 3 Quick coupler 4 is connected with waste After release lever returns to position N 4 Pre...

Page 75: ...release lever returns to position N P Floating position Both quick couplers 1 a 2 are connected with waste and oil can freely flow in them in both directions Lever a is locked in this position NM13N021 Quick coupler 0 is directly connected with the area of final house driving and is designed for returned oil from external hydraulic devices e g from rotation hydro engines etc NM13N022 With quick co...

Page 76: ...nches which reliably restrict pressure peaks with machine run out Waste from these valves is connected to a quick coupler 0 Auxiliary machines using oil filling of external hydraulic circuit must be filled with the same kind of oil which is recommended for gear system of the tractor Quick couplers sockets of an auxiliary machine need to be properly cleaned before connecting Control of the front 3 ...

Page 77: ... directly connected to the space of the axle final drive housing and is designed so that the return oil can flow back from the external hydraulic appliances The quick couplings sockets with the 12 5 mm inside diameter comply with the international ISO recommendations NM15D061 Lever b function N Neutral position Outlets to quick couplers 3 and 4 are locked and the oil in the connected hydraulic dev...

Page 78: ...of the lower pull rods according to ISO 28 mm hole diameter of upper pull rod 25 mm NM13N053 Persons who are not charged with work with auxiliary device of a tractor must not stand between a tractor and connected machinery tools A Do not park tractor with mounted tools in a lifted position B When driving without tools it is neces sary to connect lower draw bars 5 by springs and upper draw bars 1 t...

Page 79: ...tools Both ends of draw bars can in this case move freely vertically one against another E454 Limiting draw bars 1 limit or completely exclude side swing of lower draw bars The adjustment of left and right limiting draw bar is done by inserting a peg and to some of the holes b Both limiting draw bars must be mounted at all times NM13N054 Upper draw bar 1 is horizontally adjustable It is connected ...

Page 80: ...tightening pins of mounted tools After connecting the mounted tools release the arms of hydraulics By lowering them down and reverse travel of a tractor endpoints 2 are slid onto draw bars and automatically are locked in working position by means of locking pegs 1 Always check the position of slipped out end pieces and locking pegs see fig 3 E459 Both lower 3 and upper 4 draw bars of linkage are e...

Page 81: ...mended even in case no machine is attached to the three point hitch E461 The hitch is equipped with two single acting hydraulic cylinders which are supplied with oil from an additional hydraulic distributor To lift or lower use lever a of the additional distributor If the tractor is equipped with front three point hitch use lever a to control it When the front three point hitch is used quick coupl...

Page 82: ...with the ball valve in the front part of the tractor 2 A Free position Valve levers are in the horizontal position The hitch can be controlled from the cabin B Locked position Valve levers are in the vertical position The hitch is locked X464 Changing the position of the draw bars of the front three point hitch 1 Release and remove the pin 1 from the opening 2 Lift the arm from position A to posit...

Page 83: ...HITCHES 82 ...

Page 84: ...y setting the rim to a requested position z Mount the screws back with pads and lock with nuts z Tighten nuts with a torque of 270 300 Nm z The nut of front wheels to be tightened with a torque of 250 290 Nm z After every release of a foot joint tighten the screws to a prescribed value z After travelling a distance of 100 m with an unloaded tractor retighten the joints to a prescribed torque z Aft...

Page 85: ...ront axle to the maximum swing front axle leans against the bracket and check according to point 1 and 2 4 Hoist the other side of front axle to the maximum swing front axle leans against the bracket and check according to point 1 and 2 The setting of stops A changes after the release of a nut 2 and unscrewing or screwing in a screw 1 After the change in setting wheel stops with front drive axle i...

Page 86: ...es z Release locking nuts of ball joint heads 2 of connecting rods of devices in hydraulic cylinder z Adjust toe in by turning the pin of ball joint 3 Do the adjusting symmetrically with both joints to keep the same lock of wheels to both sides do the measurement on the sides of rims z Locking nuts of heads of ball joints 2 tighten with a torque of 122 136 N Upper surfaces of heads must be 1 paral...

Page 87: ...ghten the screws to a prescribed value after every release of foot joint z After travelling a distance of 100 m with an unloaded tractor retighten the joints again to a prescribed torque z After loading the tractor tighten the joints after 3 Mh z Retest the tightening of disc nuts and foots of wheel rims after 10 Mh z Until you travel first 100 Mh check the disc nuts and foot of front and rear whe...

Page 88: ...e point hitch Weights of rear wheels If rear tyres 13 6 36 340 85 R 36 13 6 R 36 are used it is obligatory to use the weight in rear wheels with the weigh of 128 kg Combination of weights pcs Weights of weights kg 4 1 4x50 66 266 NM13N072 Combination of weights pcs Weights weight kg 1 300 P11NE552a Combination of weights pcs Weights kg 2 2 2 x 64 128 4 4 4 x 64 256 NM14D026 BALLAST WEIGHTS 87 ...

Page 89: ...the hose and unscrew the adapter for water filling 7 screw in the insertion of a valve and inflate the tire to prescribed pressure D 8 after inflating screw in a protective cap on the valve 9 fill the second tire in the same way All air locks of rear wheels are equipped with a valve which enables to fill air locks with liquid when using an adapter Tubeless tires are not filled with liquid Filling ...

Page 90: ... valve into upper position B Anti freezing solution for filling tires Solution preparation 1 Calcium chloride CaCl2 is added to water not the other way round 2 The solution is not hazardous but it needs to be handled with care Wash spilled drops with clean water 3 Allow the solution to cool off before filling Keep the prescribe amount of calcium hydroxide 4 The solution must not come in touch with...

Page 91: ...NOTES 90 ...

Page 92: ...bout 1 minute because of storage of operation data During this time the supply of current from the accumulator must not be interrupted Do not disconnect the accumulator before this time expires Accumulator battery Battery disconnector Attention When the engine is switched off the engine control unit remains active for about 1 minute because of storage of operation data During this time the supply ...

Page 93: ... from children 4 When recharging from electrolyte hydrogen is released on electrodes which makes an explosive mixture when mixed with air It is therefore forbidden to manipulate with open fire near accumulator 5 An explosion may be caused by a spark incurring after disconnection or release of clamp with engaged charging circuit 6 Discarded accumulator is environmentally hazardous waste when buying...

Page 94: ...ver short circuit any clamp of alternator in operation Alternator must not be over activated There is a risk of semiconductors damage with this intervention Mind the perfect electrical joint on connecting clamps and on perfect alternator grounding Alternator must not be overpoled not even for a short time Fuse box Is accessible after removing the left lid of the steering bracket Lid can be removed...

Page 95: ...beacon cabin lighting 5 10A dim light left 6 10A dim light right 7 15A position lights right 8 15A position lights left number plate lighting 9 15A distance lights with signal lamp 10 20A supply of the instrument panel 11 15A brake lights 12 15A direction lights 13 80A glowing 14 unoccupied 15 3A front PTO 16 30A engine control unit 17 25A fuel pump ELECTRIC INSTALLATION 94 ...

Page 96: ...ction headlight beams must be parallel with longitudinal axis of tractor symmetry Perform the lights adjustment check with service weight of the tractor Front roof headlights can be used for operation on roads only in such cases when a front mounted tool is hanged on the tractor or a device covering main headlights in tractor s grill I Distance of test wall from a headlight 5 m h Height of the cen...

Page 97: ... 1 headlights 12 V 55 60 W H4 2 work and ploughing headlights 12 V 55 W H3 3 direction lights 12 V 21 W BA 15s 4 position lights 12 V 5 W BA 15s 5 brake lights 12 V 5 21W BAY 15d 6 number plate lighting 12 V 5 W C5W 7 cabin lighting 12 V 5 W C5W ELECTRIC INSTALLATION 96 ...

Page 98: ...er or semi trailer brakes check Steps taken after every 100 hours of operation Maintenance of the dry air cleaner daily when using front mounted implements Lubrication of the tractor according to the lubrication schedule Cleaning the cooler plates with air pressure Checking the oil level in the gearbox housing and final drive housing Checking the oil level in the reductors and in the housing of th...

Page 99: ...ars Replacement of filter element of heating and air conditioning o o after every 1000 EH or every 2 years Replacement of cooling liquid every 2 years Replacement of oil in gearbox and final drive housing o 1500 Replacement of suction filter suction filter of hydraulics pump o o o o o 500 Replacement of filter element of pushing filter of hydraulics pump o o o o o 500 Replacement of filter element...

Page 100: ...While changing or refilling the oil fill in the engine always use an oil complying with the specification DQC III 10 LA Specification of the oil for the gearbox housing and the final drive housing Specification of oil for the front driving axle Determination name amount in litres Cooling liquid Cooling liquid with the cabin 12 Oil in engine 8 Oil for housing of front driving axle 5 5 Oil for plane...

Page 101: ... 10W 30 GL 4 Fuchs AGRIFARM STOU 10W 30 MC 10W 30 GL 4 Manufacturer Oil labelling Viscosity class SAE Performance class API Agip Rotra Multi THT 80W GL 4 Aral Fluid HGS 80W GL 4 Esso Torque Fluid 62 80W GL 4 Fuchs Titan Supergear 80W 90 GL 4 GL 5 Titan Hydramot 1030MC 10W 30 GL 4 Titan Renep 8090MC 80W 90 GL 4 GL 5 ÖMV Gear Oil LS 85W 90 GL 5 Shell Spirax AX 80W 90 GL 5 MOL Hykomol K 80W 90 80W 90...

Page 102: ...n impurities or additional additives in fuel are not allowed for engines with Common Rail injection Manufacturer Oil designation Shell Donax TX BP Autran DX III Fluid 9 Esso ATF E 25131 Castrol Transmax S Elf Elfmatic G2 Syn Elfmatic G3 FINA Finamatic HP Finamatic S6726 Mobil Mobil ATF Texaco Texamatic 7045 Valvoline ATF Dextron II E Beverol Dextron II E Fina matic HP JD Hygard JDMJ 20C Total Flui...

Page 103: ...the work secure the tractor against movement using manual brake Lubrication must be performed only when the engine is at standstill Front drive axle Three point linkage and rear semi axes bearings Front three point hitch Position number Name Number of greasing points 1 Pivot pins 4 2 Spigot shaft 2 3 Cardan shaft joint 2 8P Number of position Name Number of greasing points 1 Rear semi axes bearing...

Page 104: ...ng horizontally and the engine is not running The engine oil dipstick 1 is located on the right side of the engine The filling hole 2 is located in the left side of the engine Take out the dipstick 1 wipe it with a clean cloth without fibres and insert it back till the end When the dipstick is taken out again check the oil level The oil level must always be in the range from MIN and MAX Add the oi...

Page 105: ... on the contact surface tighten up the filter manually For tigtening the filter with a special tool a tightening moment of 15 17 Nm is required 6 Check tightness after the engine has started up NM14D008 The engine is equipped with two filling holes On the upper side of the engine a On the left hand side of the engine above the oil level gauge b While filling oil choose a hole which best suits the ...

Page 106: ...ug the cable of the condensate level sensor 3 in the raw fuel filter 3 Loosen the raw fuel filter cartridge 2 and screw it off using appropriate tools 4 Dismantle the draining bolt 4 with the condensate level sensor 5 Before screwing on a new filter cartridge clean the packing surface of the filter body 1 6 Smear fuel on the rubber packing of the new filter cartridge 2 and screw on the filter cart...

Page 107: ...ore times at least 6 After you start up the engine make a tightness check of the fuel system 1 Put a catch reservoir under the fine fuel filter 2 Loosen the cartridge of the fine fuel filter 2 and screw it off using appropriate tools 3 Before screwing on a new filter cartridge clean the packing surface of the filter body 1 4 Smear fuel on the rubber packing of the new filter cartridge 2 and screw ...

Page 108: ... cover marked with arrows 3 Take off the filter cover 1 NM14D014 Remove the main element of the dry cleaner 2 by pulling If the main element is not damaged there must not be any dust on the inner side of the element recover it by blowing pressurized air from the inner side of the element This way you can recover the main element 3 times at the most The element must be replaced once a year NM14D015...

Page 109: ...ng valve of the heater 1 is located on the left hand side of the tractor in front of the cabin and it is accessible after the bonnet has been lifted off Bleeding procedure Set the heater valve control on the dashboard to maximum volume Fit a hose on the tube of the heater bleeding valve Dip the other end of the hose in the coolant vessel Start up the engine Loosen the bolt of the heater bleeding v...

Page 110: ...tem with an antifreeze 6 Start up the engine and keep it running for cca 1 minute 7 Top up the antifreeze in the equalizing reservoir up to the upper mark labelled with MAX 8 Close up the equalizing reservoir with the overpressure plug 9 After having the engine warm up and the thermostat open let the coolant cool down again and check the coolant and top it up once more if necessary 10 Bleed the he...

Page 111: ...ment of the filter of the hydraulics suction Gear system has a common oil filling The state of oil is checked with a dipstick a which is placed in the rear part of final drive housing Dipstick hole serves as filling Do the inspection with a tractor at standstill Oil must be in the range A of dipstick NM13N066 The suction cleaner is located on the left side of the tractor behind the fuel tank Repla...

Page 112: ...the tractor 1 release and unscrew the filter element 1 with an appropriate tool 2 clean the sealing surface of the filter body prior to screwing a new filter element 3 lubricate the rubber sealing of the new filter element with oil and screw the element 4 after a contact of the sealing to the contact surface tighten the filter element 1 by hand 5 check the oil level in the gearbox add oil if neces...

Page 113: ...replaced four years from the date of their manufacture date is given on their surface or after working 3 500 hours with tractor or right after learning the symptoms of their damage hose local swelling penetration of working medium around endpoints and hose surface wrapping damage by mechanical smear to a metallic body damage to external buckle braid with low pressure hoses If a pump gets damaged o...

Page 114: ...emoving of the inspection screw the oil level must reach the bottom edge of the inspection opening E733 Inspection filling and draining oil is done by a one hole after turning reducer according to figure 1 amount of oil inspection hole in the horizontal axis of a reducer after unscrewing control screw the level of oil must reach the brim of checking hole 2 filling oil hole at the top 3 draining ho...

Page 115: ... operation with a trailer or a semitrailer If pressure in the brake system drops down under a critical limit a warning indicator on the dashboard will come on NM14D039 Is placed under the bonnet in front of the cab After opening the bonnet it is necessary to unscrew the screws 2 and remove heating filtration element 1 NM13N111 Are placed in the rear overhang of cab roof It is necessary to unscrew ...

Page 116: ...r the cab Draining the condensate from air collectorto be done by deviation of venting valve by pulling a ring Valve is located on the bottom part of air collector NM13N074 The main element of air condition system maintenance is cleaning air condition condenser is placed in front of engine radiator Clogged air condition condenser decreases not only the efficiency of cooling system but also the eff...

Page 117: ...compressed air or rinse out with pressure water against the tractor driving direction Then insert the cooler back and fix properly with the nut Make sure that the hoses to the oil cooler are correctly guided NM15D022 Regularly inspect the outer surface of a tire and inspect that there are no defects in side or above the base part of rollers and that body is not damaged NM13N071 When putting the tr...

Page 118: ...drive belt A The belt gets stretched automatically NM14D002 If V belt tightness B is appropriate the belt sagging must be 5 5 mm while a force of 50 N is acting on the belt Stretch tight the V belt according to the prescribed value after having loosened the fixing bolts on the air conditioner compressor NM14D003 If V belt tightness C is appropriate the belt sagging must be 5 5 mm while a force of ...

Page 119: ...ition and the point when the control force on lever increases is the free run of PTO shaft clutch control lever Adjusting clutch pedal Foot brake check Adjusting free run of clutch pedal a is done by changing the length of Bowden 1 Clutch pedal free run a must be 25 to 35 mm Free run of clutch pedal represents the track of pedal between the upper position of clutch pedal and the point when control...

Page 120: ...d end of the bowdens B of pedals so that the threaded area protrudes by 20 mm After this basic adjustment check operation of the foot brakes and whether the braking effect of both wheels is the same If this is not the case loosen the adjusting nut of the bowden B on the side with higher braking effect by the required value When the pedals of the foot brake are disconnected there must be no contact...

Page 121: ...of the tractor and secure the lever of the hand brake to the fifth claw of the ratchet wheel Simultaneously with the helper turning one wheel tighten the adjusting nut F on the bowden of the hand brake until the wheel stops rotating After this basic adjustment check operation of the hand brake and whether the braking effect of both wheels is sufficient When the hand brake is unlocked both wheels m...

Page 122: ...0 Height to the mouth of exhaust pipe 2 605 Height of tractor to upper cab s rim 2 615 Clearance height under the girder of front axle 400 Height of nozzle of multistage suspension linkage in its topmost position the centre of nozzle 890 840 790 690 Height of swinging draw bar on internal bottom fork surface 418 455 Rear PTO shaft height 725 Wheel base 2 210 Tractor s weight kg 3300 MAIN TECHNICAL...

Page 123: ...alyst DOC Number of rollers 4 Volume of rollers cm3 2925 Drilling x heave mm 92x110 Nominal revolutions rpm 2200 Max speed rpm 2300 Idle run revolutions rpm 900 Injection sequence 1 3 4 2 Compression ratio 1 17 8 Maximum output EC 24 kW 45 55 4 Specific fuel consumption 2200 rpm g kW h 237 77 229 67 Max torque engine speed Nm rpm 239 1600 300 1600 Minimum oil pressure loe idle engine warm MPa 0 14...

Page 124: ...on of tires Bearing capacity of rear tires Note Bearing capacity values apply for rear wheel base of 1725 mm and are in accordance with the bearing capacity of axle When operating on hard surfaces it is advisable to increase the pressure by 30 kPa with regard for slippage and abrasion of tires Travel speed km h 1 Wheel base mm 1620 30 2000 Travel speed km h 1 Wheel base mm 1505 30 2300 Travel spee...

Page 125: ...le range of heave with maximum useful pressure kN 24 Hydraulic system pump supply l min 50 Working pressure MPA 18 Gear reduction Gear Forward speed Reversing speed L 1 L 1 43 1 20 2 L 2 12 1 78 3 L 3 11 2 61 4 L 4 37 3 67 M 1 M 3 64 3 05 2 M 5 39 4 52 3 M 7 89 6 62 4 M 11 08 9 30 H 1 H 9 65 8 11 2 H 14 29 12 00 3 H 20 91 17 56 4 H 29 39 24 68 Performance on PTO shaft kW 2 with nominal engine revo...

Page 126: ...ft revolutions engine revolutions 540 613 2200 540 1938 1 000 986 2200 1000 2231 option Sense of rotation PTO shaft speed engine speed PTO shaft speed engine speed right 1000 1818 1210 2200 left 1000 1870 1176 2200 NM15D066 Wheel base front 1502 mm Parameter of tires front 11 2 24 On the left On the right rear 1505 mm rear 16 9 30 Turning circle diameter mm without engaged front drive axle 10610 1...

Page 127: ...ase c m distance between the centre of the rear axle and the centre of fixing holes of lower hydraulic arms d m distance between the centre of fixing holes of lower hydraulic arms and the gravity centre of the machine suspended in the rear rear load see instructions for use of the tractor see instructions for use of the machine machine measurement Connection of machines to the front or rear hydrau...

Page 128: ...use of the tractor designed for the front axle should be recorded in the table 4 Calculation of the real total load G tat If the necessary rear axle load cannot be reached with the rear attached machine GH the weight of the rear carried machine must be increased to the minimum allowed load The real values and allowed values specified in the instructions for use of the tractor designed for the tota...

Page 129: ... the rear axle Real value according to the calculation Allowed value according to the manufacturer Total tractor weight 4300 kg Front axle load 2000 kg Rear axle load 2300 kg During aggregation with side moving machines side ditch trimmers and similar types of aggregation there is an unequal distribution of the load on the right and on the left side of the tractor axle It is necessary to ensure th...

Page 130: ...109 Cooling system 21 D Dashboard 32 Dependent PTO shaft revolutions with nominal engine revolutions 125 Differential lock 35 Differential lock 47 Direction indicator switch 28 Draining liquid from tires procedure 89 Draining oil from engine 103 Draining the condensate from air collector 115 Drive away 44 Drive of agricultural machinery 61 Drive of machines with greater inertia masses 68 Driver s ...

Page 131: ...nt linkage heave 71 Preventive daily maintenance 15 Preventive daily maintenance 21 Preventive daily maintenance 21 Principles for operating tractors equipped with front end loader 19 Proper clothing 11 Protection of cab against aerosols 16 PTO shaft covers 61 PTO shaft drive engagement lever 37 PTO shaft drive engagement lever 63 PTO shaft revolutions 540 and 1000 rpm shifting lever 37 PTO shaft ...

Page 132: ...hydraulic circuit controlling levers function 73 Tyres and wheels 23 U Upper draw bar 78 Used operation liquids and fillings amount 99 User s safety instructions 11 V Valve for filling tires with liquid 88 Venting hydraulic circuit of hydrostatic steering 112 Vertical adjusment of lifting draw bars 78 Vertical adjustment and multistage suspension disassembly 57 W Weights of rear wheels 87 Weights ...

Page 133: ...Operator s manual MAJOR 60 MAJOR 80 Edition 3 100 2018 Publication No 222 212 988 ZETOR TRACTORS a s Department of Technical Documentation Trnkova 111 628 00 Brno 132 ...

Page 134: ...www zetor com zetor zetor com Made in EU ...

Reviews: