
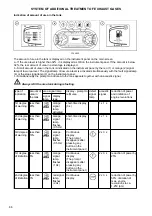

Travel speed calibration
FHSXS5N015
The instrument panel is calibrated after assembly at the factory. Re-calibrate the ground speed:
- after the tires are considerably worn
- when installing new tires
- when replacing the instrument panel
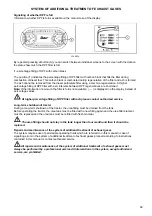
Calibration procedure
- Mark a 100 m long track in a suitable area.
- Inflate the tractor tires to the prescribed pressure, see tables in this Operator´s manual.
- Start the engine.
- Drive the tractor to the beginning of the 100 m track.
- Press the (B) button to enter the service menu.
a - Use the (C) and (D) buttons to select the
setting
item indicated by the arrow, press the (B) button to go to
the settings menu.
B - Use the (C) and (D) buttons to select the speed item indicated by the arrow, press the (B) button to go to
the speed menu.
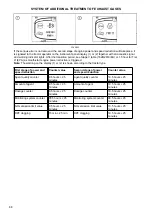
c - The following data are listed on the speed menu screen:
1 - Tractor type.
2 - The range of permitted values applicable to the type and design of the tractor, the values cannot be
changed.
3 - The value saved at the last ground speed calibration
by pressing (B) on the next screen.
d - The screen asking to travel 100 m is displayed, start the ground speed calibration by pressing the (B)
button.
e - The (e) screen is displayed.
- Drive the tractor at a steady speed of approx. 10 km/h.
- After driving the entire distance of 100 m, stop the tractor at the marked end of the track.
- Press the (B) button.
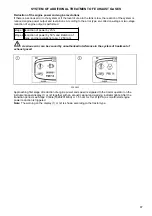
f - The screen shows the original calibration value (4) and the new calibration value (5); save the new value
by pressing the (B) button. If the calibration was been performed correctly, the service menu will be
displayed on the display after pressing the (B) button.
g - If the new calibration value (f) of the position (5) is outside the set values range (c) of the position (2), the
error message (g) is displayed on the display. Press the (B) button to return to the service menu; the original
calibration value is saved. Repeat the entire calibration process again.
If this situation occurs after replacing wheels with wheels of a different size than the ones
originally mounted, it is likely that the new wheel size is unsuitable for the relevant type of tractor.
INSTRUMENT PANEL
74
Summary of Contents for FORTERRA HSX 120
Page 1: ...FORTERRA HSX 120 130 Tractor is Zetor Since 1946 140 OPERATOR S MANUAL 04 2020...
Page 3: ...2...
Page 93: ...NOTES 92...
Page 125: ...NOTES 124...
Page 131: ...NOTES 130...
Page 163: ...NOTES 162...
Page 179: ...Fuse panel B Tractors without light controller only FHSXS5N010 ELECTRIC INSTALLATION 178...
Page 181: ...Fuse panel B Tractors with light controller only FHSXS5N008 ELECTRIC INSTALLATION 180...
Page 195: ...NOTES 194...
Page 225: ...NOTES 224...
Page 230: ...229...