background image

PREMIER QUATRO ZT-TSRI Installation Manual                                                                                                                         Firmware Version: 2_0z3 


11 

Doc No: GLT-281-7-1                                Issue: 1.1                                  Author: TE                                    DATE: 16/11/2016 


To exit the Zones menu, press the 

  button to return to the repeater main 

screen. 


4.6.4 To Remove a Map/Image 


Choose a map from the map list. 


Click on the delete button on the right. 


4.7


Uploading of Zone Maps, Drawings and Images 

This process must be done from webserver “Map files” tab. The maps will be the areas that 
will be associated with the zones. In each map we can configure more than one zone. Each 
zone must be associated to a map. It allows the following image formats: JPEG, PNG, GIF, 
BMP....etc. The map names cannot contain spaces. 


4.8


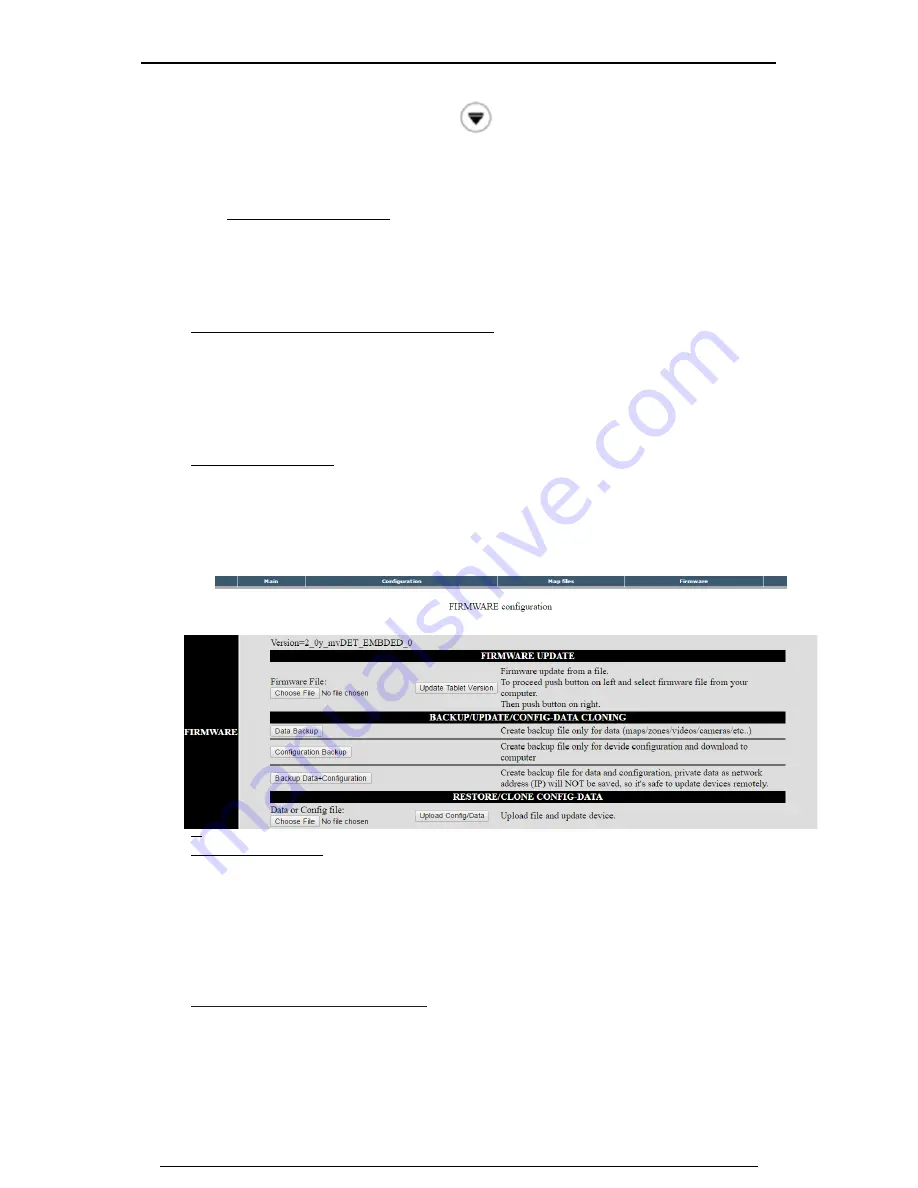
Backups and Updates. 

We can perform Backups of the information on the repeater, as well as update its firmware 
version in a quick simple way. To do this, we access the Web Server and once there, click the 
option "Firmware". At the top will indicate the version of firmware that is installed. 


T
o
  
U
pdate the Firmware: 


Click on "Choose file in the Browser.  


Search for update file. 


Click on "Update Tablet Version" 


Wait for the repeater to restart. 


To perform a Data Backup / Restore: 

This includes backing up the configuration of Areas and Devices. 


To Backup

, Click on "Data Backup". In the Browser that shows select a name and a 

location to save the Backup. 

Summary of Contents for PREM1ER QUATRO

Page 1: ...Doc No GLT 281 7 1 Issue 1 0 Author TE DATE 16 11 2016 ZETA TOUCHSCREEN REPEATER INTERFACE ZT TSRI Installation Manual ...

Page 2: ...he Display 6 4 2 Configuring the Repeater from the Web Server 6 4 3 Repeater Network Configuration 7 4 3 1 Configuration of the Ethernet 7 4 3 2 Master Slave Configuration 8 4 4 Repeater Configuration 8 4 4 1 General Settings 8 4 4 2 Serial IP Ports 8 4 4 3 Sound 8 4 4 4 Miscellaneous 9 4 5 User Levels 9 4 6 Configuration of Zone maps Drawings and Images 9 4 6 1 Registering an Area 10 4 6 2 Drawin...

Page 3: ...o the equipment Do not perform any configuration without fully understanding how it functions 2 Setup 2 1 Connecting the Power The ZT TSRI is powered by 5v and is provided with a 5v micro mini USB power supply The power supply is to be plugged into the micro USB port positioned to the left of the HDMI port 2 2 Connections to the Quatro Panel The ZT TSRI will connect to the QT NC Modbus via the pro...

Page 4: ...ter can then be inserted into any of the 4 USB slots on the ZT TSRI 2 3 Connection to a Screen Monitor The ZT TSRI can be connected to either a touch screen monitor interface or a regular PC monitor TV can only be used with a USB mouse keyboard with this option It needs to be connected via its HDMI port located next to the micro USB port Note When looking at the QT NC if the Modbus red LED is flas...

Page 5: ...power The repeater will take around 30 40 seconds to boot when turned on Once it has booted it will load into its main repeater screen If the repeater is connected and communicating to the Quatro panel correctly the CONNECTION WITH PANEL ON digital LED will be GREEN If there is a connection issue this digital LED will be shown in YELLOW If connection problems do arise then make sure the system set...

Page 6: ...gure the network options of the equipment and draw the areas on the maps From the Webserver we can upload maps and icons update firmware and perform backups and restorations From both options we configure zones language Ports Filters Sound E mails etc 4 1 Configuring the Repeater from the Display Click on the button Enter the Level 3 password default 2222 on the keyboard that appears Click on the ...

Page 7: ...Network and Sharing Center in W7 Local Area Connection Change Adapter Settings in W7 Right click on this option Properties Check the Internet Protocol option The configuration must be the same as in the attached image where X is any integer between 1 254 always different from the gateway which is the router and 200 which is the repeater default Also make sure it is different from those used in the...

Page 8: ...r the display be disconnected Time for the screen to go into idle mode with no activity 0 to 65 000 secs Zone filtering The repeater allows you to filter zones and display only the ones configured here To determine which zones to supervise the following formula must be applied To supervise Panel 2 Zones 1 44 p2z1 44 to supervise Panel 1 zones 20 50 p1z20 50 etc Simple mode By enabling it the repea...

Page 9: ...ould be activated Email destination in Alarms Set the destination email address of Alarm events If more than one separate with commas Email destination in Faults Set the destination email address of Fault events If more than one separate with commas Panel Address The address of the panel connected 4 5 User Levels The Repeater has 3 user levels Level 1 No password No access to perform actions or to...

Page 10: ...ously added from Web Server Select Associated Video previously added from Web Server We can relate this area to another one configuring it in the Parent Area section 4 6 2 Drawing area zone boundaries on a map drawing or image Press Draw on Map You will now be able to start marking the vertices of the polygon that show the area that the zone covers To be precise when drawing it s best to connect a...

Page 11: ...ted to a map It allows the following image formats JPEG PNG GIF BMP etc The map names cannot contain spaces 4 8 Backups and Updates We can perform Backups of the information on the repeater as well as update its firmware version in a quick simple way To do this we access the Web Server and once there click the option Firmware At the top will indicate the version of firmware that is installed T o U...

Page 12: ...iguration file to restore Finally click on Upload Config Data 4 9 Devices The digital repeater allows you to locate different types of devices in the form of icons and associate them with an area To configure them click on and then the Devices tab 4 9 1 Parameters to be configured per device Description A description that we give to the device Area The area to which the device belongs to I Normal ...

Page 13: ...press on Add the repeater will add one device and will locate it in the part Bottom of the list of devices After modifying the parameters of the new device click on Modify to save the changes Modify Select a device to modify from the bottom list To save the changes click on Modify Remove Select a device to be deleted from the bottom list When selected click on Delete ...

Reviews: