


31
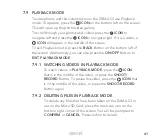
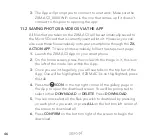
7.4 LAPSE MODE
To use
LAPSE MODE
(also know as time lapse mode which takes a
sequence of photos in a selected interval of time), follow the steps
under
“7.0 PICTURE & VIDEO SETTINGS.”
Press
LAPSE
to activate this mode.
There are multiple settings in this mode that you can adjust. To change
these settings please follow the below steps once you are in
LAPSE
MODE
.
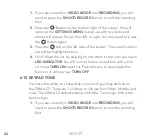
1.
If you are currently in
VIDEO MODE
and
RECORDING
, you will
need to press the
SHOOT/RECORD
Button to end the recording
first.
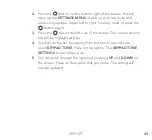
2.
Press the
Button
on the bottom right of the screen, this will
open up the
SETTINGS MENU
. A pop up with two locks and
arrows may appear. Swipe from left to right. You may need to press
the
Button
again.
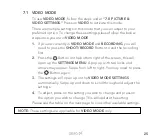
3.
The settings will open up on the
LAPSE MODE SETTINGS
automatically. Swipe up and down to scroll through the settings
you can adjust.
4.
To adjust, press on the setting you wish to change and select your
choice. This will update the setting.
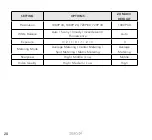
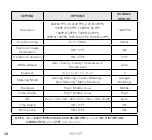
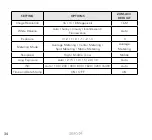
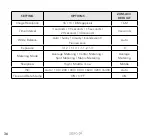
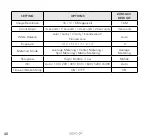
Please see the table on the next page to view other available settings.
NOTE:
These Settings are applicable for
TIME LAPSE MODE
only.
Summary of Contents for ZXM-AC3
Page 1: ...4K UHD Action Camera with Touch Screen WiFi USER MANUAL ZXM AC3...
Page 2: ......
Page 53: ...53 13 0 NOTES...
Page 54: ...54...
Page 55: ......


