background image

26

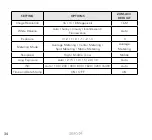
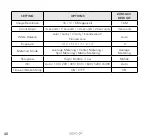
SETTING

OPTIONS

ZXM-AC3 

DEFAULT

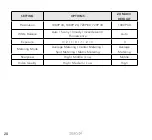
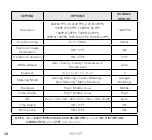
Resolution

4K@60 FPS, 4K @ 30 FPS, 2.7K @ 30FPS, 

1080P @ 120FPS, 1080P @ 60 FPS, 

1080P @ 30FPS, 720P @ 240FPS, 

720P @ 120FPS, 720P @ 60 FPS, 720P @ 30FPS

4K @ 30FPS

White Balance - 

Electronic Image 

Stabilization

ON / OFF

OFF

White Balance - 

Distortion Correction

ON / OFF

OFF

Exposure

3 / 2 / 1 / 0 / -1 / -2 / -3

0

Metering Mode

Average Metering / Center Metering /  

Spot Metering / Matrix Metering

Average 

Metering

Sharpness

High / Middle / Low

Middle

Video Quality

High / Middle / Low

High

ISO

Auto / 100 / 200 / 400 / 800 / 1600 / 3200 / 6400

Auto

Time Stamp

ON / OFF

ON

Microphone

ON / OFF

ON

Summary of Contents for ZXM-AC3

Page 1: ...4K UHD Action Camera with Touch Screen WiFi USER MANUAL ZXM AC3...

Page 2: ......

Page 3: ...Y 9 5 2 MICRO SD CARD COMPATIBILITY 10 5 3 TOUCH SCREEN COMPONENTS 10 5 4 POWERING ON YOUR ZXM AC3 10 5 5 FORMAT YOUR MICRO SD CARD 11 6 0 ZXM AC3 CONTROLS AND FUNCTIONS 12 6 1 POWER ON OFF Button 12...

Page 4: ...TATE IMAGE 19 6 12 DVR MODE 19 6 13 SCREEN SAVER 20 6 14 LED INDICATOR 21 6 15 KEYPAD TONE 22 7 0 PICTURE VIDEO SETTINGS 24 7 1 VIDEO MODE 25 7 2 SLOW MODE 27 7 3 LOOP MODE 29 7 4 LAPSE MODE 31 7 5 PH...

Page 5: ...D USING THE ZX ACTION APP 43 11 0 MANUAL STEPS FOR CONNECTING TO THE ZX ACTION APP 44 11 1 ZX ACTION APP 45 11 2 SAVING PHOTOS VIDEOS VIA THE APP 46 11 3 REMOTE PHOTO RECORD VIA THE APP 47 11 4 ADJUST...

Page 6: ...0 ABOUT THE ZXM AC3 The Zero X ZXM AC3 shoots footage with dynamic realism where action is effortlessly captured into moments you can keep There is a range of ZXM AC3 accessories available for purchas...

Page 7: ...3M Adhesive Mounts 3 x 3 Way Mounts 1 x Frame Mount 4 x Straps 1 x Adaptor Mount 1 x Metal Tether 1 x Lens Cleaning Cloth 2 x 3M Adhesive Pads 1 x Tripod Adaptor 1 x Battery 1 Shoot Record Button 2 L...

Page 8: ...in water Do not attempt to open the ZXM AC3 or modify it in any way If the ZXM AC3 has been tampered with the warranty will be void Maintenance and repairs should only be performed by Zero X If you h...

Page 9: ...Check your local recycling facility for more information Only use a certified 5V 1 5A USB charger to charge the ZXM AC3 Using non certified chargers could potentially damage the ZXM AC3 or the ZXM AC3...

Page 10: ...ur ZXM AC3 It should easily slide in Do not force the card into the slot as it may damage the unit and the card 5 3 TOUCH SCREEN COMPONENTS 5 4 POWERING ON YOUR ZXM AC3 To power ON your ZXM AC3 follow...

Page 11: ...n ON the ZXM AC3 4 Press the Button on the bottom right of the screen this will open up the SETTINGS MENU A pop up with two locks and arrows may appear Swipe from left to right You may need to Press t...

Page 12: ...s Button is used to shoot images and also record videos to start and stop videos The SHOOT RECORD Button is also used to access the navigation settings menus select menu items and confirm your selecti...

Page 13: ...de of the screen The current section tab will be highlighted blue 4 Scroll down the list by swiping from bottom to top until you reach TIME SETTING Press on this option The time settings screen will p...

Page 14: ...You may need to press the Button again 3 Press the tab on the left side of the screen The current section tab will be highlighted blue 4 Scroll down the list by swiping from bottom to top until you r...

Page 15: ...h by pressing on either year month and day on the screen To change the numbers press the UP and DOWN arrows on the screen until you reach the required number 6 Once you have adjusted the date confirm...

Page 16: ...screen Press on the option that you prefer The setting will now be updated 6 8 WIFI The ZXM AC3 comes with inbuilt WiFi allowing you to easily access your footage and photos through your smartphone an...

Page 17: ...hone as a wireless recording monitor when in WiFi mode You can control functions via the ZXM AC3 camera again once you have finished using the functions of the ZX ACTION APP and disconnect from your s...

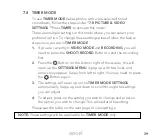
Page 18: ...follow the steps 1 If you are currently in VIDEO MODE and RECORDING you will need to press the SHOOT RECORD Button to end the recording first 2 Press the Button on the bottom right of the screen this...

Page 19: ...wipe from left to right You may need to press the Button again 3 Press the tab on the left side of the screen The current section tab will be highlighted blue 4 Image Rotation is the first option on t...

Page 20: ...om to top until you reach DVR MODE You will notice there is a small box with TURN OFF next to it Press the box to activate this function It will now say TURN ON 6 13 SCREEN SAVER You can record videos...

Page 21: ...croll through the options by swiping UP and DOWN on the screen Press on the option that you prefer The setting will now be updated 6 14 LED INDICATOR The ZXM AC3 has LED indicator lights that allow yo...

Page 22: ...will be highlighted blue 4 Scroll down the list by swiping from bottom to top until you reach LED INDICATOR You will notice there is a small box with a tick on it and TURN ON next to it Press the box...

Page 23: ...again 3 Press the tab on the left side of the screen The current section tab will be highlighted blue 4 Scroll down the list by swiping from bottom to top until you reach KEYPAD TONE Press on this op...

Page 24: ...ps 1 On the screen press the MODE SELECTION drop down see 5 3 TOUCH SCREEN COMPONENTS This will open up the screen image to the right where you can select a MODE from this panel VIDEO SLOW LOOP LAPSE...

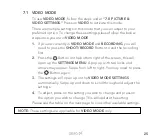
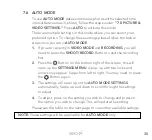
Page 25: ...he recording first 2 Press the Button on the bottom right of the screen this will open up the SETTINGS MENU A pop up with two locks and arrows may appear Swipe from left to right You may need to press...

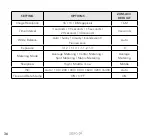
Page 26: ...te Balance Electronic Image Stabilization ON OFF OFF White Balance Distortion Correction ON OFF OFF Exposure 3 2 1 0 1 2 3 0 Metering Mode Average Metering Center Metering Spot Metering Matrix Meterin...

Page 27: ...he recording first 2 Press the Button on the bottom right of the screen this will open up the SETTINGS MENU A pop up with two locks and arrows may appear Swipe from left to right You may need to press...

Page 28: ...8X 720P 4X 1080P 4X White Balance Auto Sunny Cloudy Incandescent Fluorescence Auto Exposure 3 2 1 0 1 2 3 0 Metering Mode Average Metering Center Metering Spot Metering Matrix Metering Average Meterin...

Page 29: ...Button to end the recording first 2 Press the Button on the bottom right of the screen this will open up the SETTINGS MENU A pop up with two locks and arrows may appear Swipe from left to right You ma...

Page 30: ...rection ON OFF OFF White Balance Auto Sunny Cloudy Incandescent Fluorescence Auto Exposure 3 2 1 0 1 2 3 0 Metering Mode Average Metering Center Metering Spot Metering Matrix Metering Average Metering...

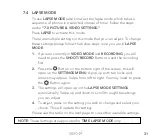
Page 31: ...press the SHOOT RECORD Button to end the recording first 2 Press the Button on the bottom right of the screen this will open up the SETTINGS MENU A pop up with two locks and arrows may appear Swipe fr...

Page 32: ...ny Cloudy Incandescent Fluorescence Auto Exposure 3 2 1 0 1 2 3 0 Video Length Unlimited 6 seconds 8 seconds 10 seconds 20 seconds 30 seconds 60 seconds 120 seconds Unlimited Metering Mode Average Met...

Page 33: ...recording first 2 Press the Button on the bottom right of the screen this will open up the SETTINGS MENU A pop up with two locks and arrows may appear Swipe from left to right You may need to press th...

Page 34: ...oudy Incandescent Fluorescence Auto Exposure 3 2 1 0 1 2 3 0 Metering Mode Average Metering Center Metering Spot Metering Matrix Metering Average Metering Sharpness High Middle Low Middle Long Exposur...

Page 35: ...the SHOOT RECORD Button to end the recording first 2 Press the Button on the bottom right of the screen this will open up the SETTINGS MENU A pop up with two locks and arrows may appear Swipe from lef...

Page 36: ...20 seconds 30 seconds 3 seconds White Balance Auto Sunny Cloudy Incandescent Fluorescence Auto Exposure 3 2 1 0 1 2 3 0 Metering Mode Average Metering Center Metering Spot Metering Matrix Metering Ave...

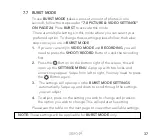
Page 37: ...RECORD Button to end the recording first 2 Press the Button on the bottom right of the screen this will open up the SETTINGS MENU A pop up with two locks and arrows may appear Swipe from left to righ...

Page 38: ...10 Photos sec 3 Photos sec White Balance Auto Sunny Cloudy Incandescent Fluorescence Auto Exposure 3 2 1 0 1 2 3 0 Metering Mode Average Metering Center Metering Spot Metering Matrix Metering Average...

Page 39: ...OOT RECORD Button to end the recording first 2 Press the Button on the bottom right of the screen this will open up the SETTINGS MENU A pop up with two locks and arrows may appear Swipe from left to r...

Page 40: ...ds 20 seconds 3 seconds White Balance Auto Sunny Cloudy Incandescent Fluorescence Auto Exposure 3 2 1 0 1 2 3 0 Metering Mode Average Metering Center Metering Spot Metering Matrix Metering Average Met...

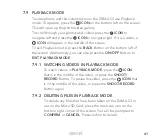
Page 41: ...bottom left of the screen Alternatively you can also press the ON OFF Button to EXIT PLAYBACK MODE 7 9 1 WATCHING VIDEOS IN PLAYBACK MODE To watch videos in PLAYBACK MODE press the ICON that is in the...

Page 42: ...creen this will open up the SETTINGS MENU A pop up with two locks and arrows may appear Swipe from left to right You may need to press the Button again 3 Press the tab on the left side of the screen T...

Page 43: ...b will be highlighted blue 3 Scroll down the list by swiping from bottom to top until you reach DEVICE INFO Press on this option 4 To exit press the ON OFF Button once and then press the back Button o...

Page 44: ...App please note Android users will be taken to a home screen before entering the shoot screen iPhone users will be taken straight to the shoot screen once they have connected the ZX ACTION to the App...

Page 45: ...can scan the above QR code to take you directly to the App CONNECTING TO THE ZXM AC3 WIFI 1 Once the App is downloaded go to your smartphone s WiFi settings and select the connection ZXM AC3_XXXX XXX...

Page 46: ...he ZXM AC3 App on your smartphone 2 On the home screen press the circle with the image in it this is on the left of the mode icon within the App 3 Once you are in the gallery you will see tabs on the...

Page 47: ...mode you have chosen again to either take the photo or begin recording 11 4 ADJUSTING SETTINGS VIA THE APP If you prefer to change the Settings of the ZXM AC3 via the App you can do this through the S...

Page 48: ...ty Ltd Directed Electronics warrants that this product is free from defects in material and workmanship for a period of 12 months from the date of purchase or for the period stated on the packaging Th...

Page 49: ...ent and or trademark infringement against Zero X and its subsidiaries and affiliates relating to or arising out of your breach of any provision of these terms your misuse of Zero X products or its ser...

Page 50: ...hall not be liable for any damages caused by viruses that may infect your Zero X In the event of any loss damage or injury you will not look to Zero X to compensate you or anyone else You release and...

Page 51: ...oduct wear product misuse abuse product modification improper product selection or your non compliance with all applicable federal state or local laws This warranty and warranty disclaimer give you sp...

Page 52: ...iability for negligence is limited to direct losses usually and typically foreseeable in such case Should the claim for damages be based on wilful or grossly negligent breach of contractual duty or ob...

Page 53: ...53 13 0 NOTES...

Page 54: ...54...

Page 55: ......

Page 56: ...zero x com au www zero x co nz Zero X v1 0 2022 All Images Information and Content are Copyright 2022 Directed Electronics Australia Pty Ltd All Rights Reserved Capture the action ANOTHER DIRECTED BR...

Reviews: