background image

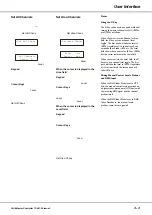
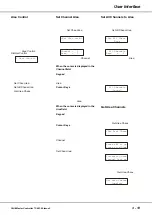
Daily Event

This option allows the user to set the
day(s) of the week that the selected
event will be triggered (eg every
Monday or every Friday, Saturday and
Sunday).

Select the 

Daily Event

 option:

<  Daily Event >
                

Press the ENT key. The LCD shows
the following:

SuMoTuWeThFrSa  
N N N N N N N   

The top line of the LCD shows the
days of the week from Sunday (Su)
through to Saturday (Sa). 

The bottom line of the LCD indicates
whether the day is enabled (Y) or
disabled (N). 

The cursor is displayed on the
character under Sunday.

Use the cursor keys to move along the
bottom line of the LCD to select a day.

Press the ‘1’ key to enable the day, or
press the ‘0’ key to disable the day.

Set each day to enabled or disabled as 
required, then press the ENT key to
save the data.

The LCD displays the following for 3
seconds before returning to the Daily
Event screen:

  Daily Event   
     Saved      

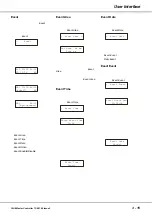
Event Action

This option allows the user to set the 
action for the selected event. 

The action can be either Play Memory
or Play Sequence.

Select the 

Event Action

 option:

< Event Action >
                

Press the ENT key to enter the
sub-menu which contains the following
options:

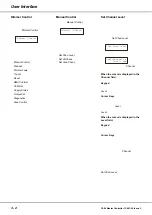
Action Memory

Action Sequence

Action Memory

This option allows the user to set a
memory action for the selected event.

Select the 

Action Memory

 option:

< Action Memory>
                

Press the ENT key. The LCD shows:

 Area:xx  Ev:xx 
   Memory:xx    

The top line of the LCD displays the
area number and event number for
information only.

The cursor is displayed in the Memory
field. 

Use the numeric or cursor keys to
select the required memory (0 - 12).

Press the ENT key to save the data.
The LCD displays the following for 3
seconds before returning to the 

Action

Memory

 screen:

  Memory Action 
     Saved      

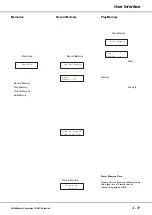
Action Sequence

This option allows the user to set  a
sequence action for the selected event.

Select the 

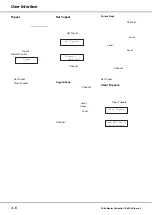
Action Seq

 option:

<  Action Seq  >
                

Press the ENT key. The LCD shows:

 Area:xx  Ev:xx 
   Sequence:x   

The top line of the LCD displays the
area number and event number for
information only.

The cursor is displayed in the
Sequence number field. 

Use the numeric or cursor keys to
select the required sequence(0 - 3).
Sequence 0 is used to stop playing a
sequence.

Press the ENT key to save the data.
The LCD displays the following for 3
seconds before returning to the 

Action

Sequence

 screen:

Sequence Action 
     Saved      

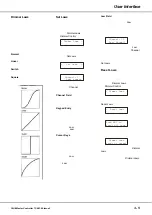
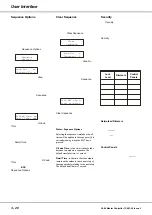
Event Enable/Disable

This option allows the user to enable or 
disable the selected event.

Select the 

Event Enable Disable

option:

< Event Enable >
     Disable    

Press the ENT key. The LCD shows:

  Event No:xx   
    Disabled    

Use the cursor keys to toggle between
Enabled and Disabled.

Press the ENT key to save the data. 

3 - 16 

Chilli Master Controller 73-861-00 Issue 3

User Interface

Summary of Contents for 01-201-00

Page 1: ...CHILLI MASTER CONTROLLER OPERATING MANUAL ...

Page 2: ......

Page 3: ...e when the equipment is operated in a commercial environment This equipment generates uses and can radiate radio frequency energy and if not installed and used in accordance with the instruction manual may cause harmful interference to radio communications Operation of this equipment in a residential area is likely to cause harmful interference in which case the user will be required to correct th...

Page 4: ...mer Control 3 2 Manual Control 3 2 Preheat 3 4 Dimmer Laws 3 5 Topset 3 6 Reset 3 7 DMX Controls 3 7 Chilli Net 3 10 Supply Status 3 12 Output Calibration 3 12 Diagnostics 3 12 Area Control 3 13 Timed Events 3 14 Memories 3 17 Sequences 3 19 Security 3 20 Alarm State 3 22 4 Technical Specification Introduction 4 1 Electrical 4 1 Mechanical 4 1 Environmental 4 1 EMC 4 1 ii Chilli Master Controller ...

Page 5: ...e master controller which can be set up and operated via the front panel controls The manual concludes with a chapter on the Technical Specification of the Master Controller Conventions Throughout this manual the following conventions are used References to front panel controls appear in capital letters for example ENT key ESC key References to the LCD screen on the control panel are shown as foll...

Page 6: ...psetted if required to limit its maximum output level The network can be programmed with up to 12 memories per area Each networked dimmer grabs its own outputs and stores them internally when instructed Individual memories can be played back on an area basis The network can be programmed with up to three sequences per area comprising the memories Individual sequences can be played back when requir...

Page 7: ...rovided Poke the Chilli network cable through the hole in the wallplate see Figure 2 3 Hook the rear of the case over the hook in the wallplate and refix the case to the wallplate with the screws removed earlier see Figure 2 4 Connect the Chilli network cable to the 5 pin header on the PCB ensuring correct orientation see Figure 2 5 Refit the front part of the unit by pushing the hinges into the t...

Page 8: ...2 2 Chilli Master Controller 73 861 00 Issue 3 Installation Figure 2 4 Figure 2 5 Figure 2 6 ...

Page 9: ...ked dimmers is not responding Further details of the above faults can be obtained via the Diagnostics menu Menu Structure If the Master Controller is in the alarm state all menu access will be disabled In normal operation when the LCD is displaying the Main Screen press the ENT key to enter the menu structure The current lock level on the Master Controller determines which of the menu options can ...

Page 10: ...eloption from the menu Set Chan Level Press the ENT key The LCD shows A01 Channel xx Level xxx A cursor is shown in the Channel field The channel number defaults to 1 When the cursor is displayed in the Channel field Keypad Enter the channel number using the numeric keys then press the ENT key The cursor moves to the Level field Cursor Keys Use the cursor keys to select the channel number As the c...

Page 11: ...moves to the Level field When the cursor is displayed in the Level field Keypad Enter the required channel level 0 100 using the numeric keys then press the ENT key Cursor Keys Use the cursor keys to adjust the level Press the ENT key The output of the master channels matches the level entered and the cursor returns to the Area field The key can also be used to toggle the manual control level betw...

Page 12: ...umeric keys 0 9 then press the ENT key The cursor returns to the Channelfield Cursor Keys When the cursor is in the Channel field pressing the A key increments the channel number pressing the B key decrements the channel number As the channel number changes the corresponding preheat level is shown in the Level field Press the ENT key The cursor moves to the Levelfield which shows the current prehe...

Page 13: ...n the Law field and the cursor moves to the Law field Cursor Keys Press the A key to increase the channel number by 1 press the B key to decrease the channel number by 1 As the channel number changes the corresponding law for the channel is shown in the Law field Press the ENT key The cursor moves to the Law field Law Field When the cursor is in the Law field either of the cursor keys will cycle t...

Page 14: ...opset level for the selected channel is shown in the Levelfield and the cursor moves to the Level field When the cursor is in the Levelfield enter the required level using the numeric keys 0 9 then press the ENT key The cursor returns to the Channelfield Cursor Keys When the cursor is in the Channel field pressing the A key increments the channel number pressing the B key decrements the channel nu...

Page 15: ...r results in a different DMX patch to resetting each of the individual dimmers DMX Controls This option allows the user to set the DMX start address for the entire network patch individual or blocks of channels to the DMX and reset the DMX patch The user can also set the DMX input mode and DMX fail modes for all the networked dimmers Select the DMX Controls option from the Dimmer Control menu opti...

Page 16: ...address then press the ENT key to patch the channel and return the cursor to the Channelfield Pushing the ESC key at any point on this screen will return the LCD to the Set DMX Patch screen Block Patch This option allows the user to patch a block of master channels to the DMX in a single operation Select the Block Patch option from the menu Block Patch Press the ENT key The LCD shows Start Chan xx...

Page 17: ... to select the Fade to Black option Press the ENT key The LCD returns to the DMX Input screen Fade to Memory use the cursor keys to select the Fade to Memory option The LCD shows DMX Fail Mode Fade to Mem xx The cursor is displayed in the memory number field and defaults to 1 Enter the required memory number using the numeric keys and press the ENT key to confirm The LCD returns to the DMX Input s...

Page 18: ...o the Chilli Net screen Auto Assign Complete AddDimmer The Add Dimmer function is used when a new dimmer is added into an existing Chilli network After validation the master controller will add the dimmer into its network map by assigning the next available master channel numbers to the physical channels on the dimmer The new dimmer can then be controlled from the master controller Select the Add ...

Page 19: ... This option provides the user with various information on the dimmers connected to the Chilli network Select the Network Info option from the Chilli Net menu Network Info Press the ENT key The LCD shows an information screen with data on the first dimmer on the network Num Chans Start 001 12 001 The information displayed on this screen is as follows Num The dimmer number 001 128 Chans The number ...

Page 20: ...key The LCD shows the following screen Dimmer Number XX Use the numeric keys or cursor keys to select the required dimmer number then press the ENT key If the selected dimmer is a Spice dimmer the LCD shows the following State OFF Voltage 220 A cursor is displayed in the State field Use the cursor keys to set the State to On then press the ENT key to move the cursor to the Voltagefield Use the num...

Page 21: ...ypad Enter the required area number 1 10 using the numeric keys then press the ENT key Cursor Keys Use the cursor keys to select the area number then press the ENT key The area is assigned to the master channel and the cursor returns to the Channelfield Pressing the ESC key at any point on this screen will return the screen to the Set Chan Areascreen Set All Channels to Area This option allows the...

Page 22: ...t Press the ENT key to enter the Timed Event sub menu The following menu options are available Display Date and Time Set Time Set Date Event Use the cursor keys to select the required menu option Press the ENT key to enter the corresponding sub menu Display Date and Time This option allows the user to display the current date and time held in the Master Controller Select the Display Date and Time ...

Page 23: ...mber Press the ENT key to save the data and return to the Event Area screen Pressing the ESC key will quit the operation and return to the Event Area screen Event Time This option allows the user to set the time for the selected event Select the Event Time option Event Time Press the ENT key The LCD shows Enter Event Time 00 00 The cursor is displayed on the first digit of the time field Use the n...

Page 24: ...selected event Select the Action Memory option Action Memory Press the ENT key The LCD shows Area xx Ev xx Memory xx The top line of the LCD displays the area number and event number for information only The cursor is displayed in the Memory field Use the numeric or cursor keys to select the required memory 0 12 Press the ENT key to save the data The LCD displays the following for 3 seconds before...

Page 25: ...confirm the memory selection The LCD shows Area xx Mem xx Fade Time xx The Area and Mem fields on the top line are for information only The cursor is displayed in the Fade Time field Use the numeric or cursor keys to adjust the memory fade time as required 1 60 seconds then press the ENT key to save the data The networked dimmers will grab their own current output levels for those channels assigne...

Page 26: ...ries are indicated by a next to the memory number and cannot be edited Press the ENT key to confirm the memory selection Assuming the selected memory is programmed the networked dimmers output the selected memory and the LCD shows the following A01 Channel 1 Level xxx The cursor is displayed in the Channel field The channel number defaults to the first channel in the selected area The Levelfield s...

Page 27: ... to select the first step in the sequence then press the ENT key The cursor moves to the Memory field Use the numeric or cursor keys to select a memory number Press the ENT key to assign the memory to the sequence step The cursor returns to the Stepfield Use the cursor keys to select the next step in the sequence then press the ENT key The cursor moves to the Memory field Use the numeric or cursor...

Page 28: ...equence 1 Use the numeric or cursor keys to select the required sequence 1 3 then press the ENT key The LCD shows the following Push ENT key to clear sequence Press the ENT key The sequence is cleared and the LCD returns to the Clear Sequence screen Notes Sequence Options Adjusting the sequence crossfade or dwell times will be applied to the sequence if it is currently running when the ENT key is ...

Page 29: ... level is displayed Use the numeric or cursor keys to set the required lock level 0 4 Press the ENT key The LCD returns to the Security screen Security Code This option allows the user to change the lock code on the Master Controller Select the Security Codeoption from the Security sub menu Security Code Press the ENT key The LCD shows Enter New Code Code xxxx Use the numeric keys to enter the new...

Page 30: ...ers the Alarm State All menu access via the control panel is disabled The main screen on the LCD shows the following message PANEL LOCKED ALARM ACTIVE Alarm Off Message When the Master Controller receives an Alarm Off message The Master Controller exits the Alarm State Menu access via the control panel is returned to normal The LCD shows the main screen 3 22 Chilli Master Controller 73 861 00 Issu...

Page 31: ...tions 5 way 2 part rising clamp screw terminal connector with the following pin configuration Pin 1 12V Orange pair Pin 2 CAN H Blue White Pin 3 CAN L Blue Pin 4 0V Green pair Pin 5 Shield Brown pair Mechanical Size 150 x 92 x 31 mm Maximum Weight 0 35 kg Environmental Operating Temperature Range 0 to 40 C Humidity 0 to 90 Non condensing EMC Emissions EN50 081 1 Susceptibility EN50 082 1 LVD BS EN...

Page 32: ...4 2 Chilli Master Controller 73 861 00 Issue 3 Technical Specification ...

Page 33: ......

Page 34: ...Zero 88 Lighting Ltd Usk House Llantarnam Park Cwmbran Gwent NP44 3HD United Kingdom Tel 44 0 1633 838088 Fax 44 0 1633 867880 e mail sales zero88 com Web www zero88 com 24 hour answerphone ...

Reviews: