background image

21

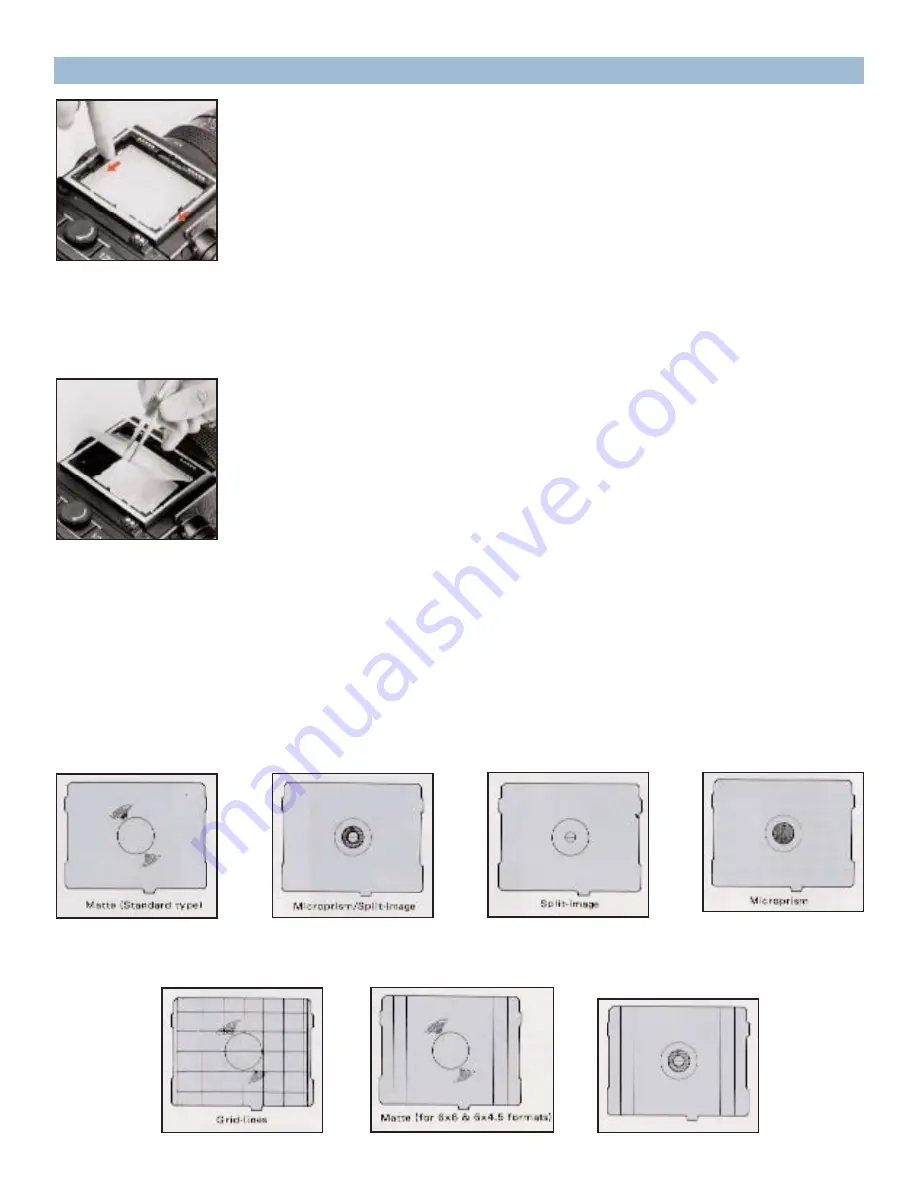
26. Interchanging Focusing Screens

A. The focusing screen can be exchanged, depending on the type of
photographic work being undertaken. First, remove the finder
attached to the camera main body. Then, move the screen removal
levers on both sides in the arrow-indicated directions, as illustrated.
Then, using a pincer or similar tool, lift up the screen with the protru-
sion at the rear end.

B. To install the focusing screen, nest the protrusion at the rear end of
the screen in a corresponding groove on the camera main body.
Then, slide both screen removal levers forward to secure the focusing
screen.

* It will not be possible to attach the finder, if the screen removal
levers are not in their forward positions.

* There are seven interchangeable focusing screens for the Zenza
Bronica GS-1.

Summary of Contents for GS-1

Page 1: ...a wide field of applications including commercial photography news photography scientific photography etc as well as giving this 6 x 7 format single reflex versatility equal to the 35mm single reflex...

Page 2: ...6 Exchanging Lenses 17 Interchanging Finders 18 Setting the Aperture Ring 19 Focusing Adjustments 20 Distance Scale and Depth of Field Scale 21 Infrared Photography 22 Flash Photography 23 Multiple Ex...

Page 3: ...a GS mount exclusive four claw bayo net Focusing Adjustment Helical focusing system built into each lens Lens Diaphragm Fully automatic instant reopening lens diaphragm stop increments equal distant a...

Page 4: ...gits 7 segments and dot indication depending on the finder attached Flash Synchronization X setting for all speeds up to 1 500 sec Battery Checking Steady illumination or flickering of shutter speed d...

Page 5: ...r contacts Mirror lock up lever Screen removal lever left Shutter release button Spool holder Film winding crank assembly release lever Screen removal lever right ASA ISO film speed contacts Manual fi...

Page 6: ...her direction until it locks The shutter will not operate when the battery is loaded with polari ty marks reserved The main switch is located on the upper left side of the main body There will be no o...

Page 7: ...film speed dial and an exposure compensation dial are available on the film backs When used for setting the film speed of the film loaded in the film back there is automatic coupling when finders with...

Page 8: ...anger of the film back becoming detached from the main body if the dark slide is left in its slit while the camera is being car ried Therefore make it a rule to withdraw the dark slide whenever the fi...

Page 9: ...er has two spool holders with the right one for the fresh film spool while the left one is for the empty take up spool The top spool holder is opened as illustrated by sliding the film spool in the ar...

Page 10: ...nning If the film is not advanced when the film winding crank is rotated however the film holder is not loaded properly in the film back and or the camera main body may be set for multiple exposures I...

Page 11: ...lm loaded in the film back when using finders with a built in exposure meter To set the film speed depress the ASA ISO film speed dial lock button and at the same time rotate the ASA ISO film speed di...

Page 12: ...ame This will help you keep track of the film loaded in the film back even when two or more film backs are used with different types of films 9 Film Type Indicator Frame 10 Exposure Counter The film w...

Page 13: ...al The numbers on the scale are shutter speed settings with numbers 1 to 16S full numbers and numbers 2 to 500 fractions of a second For example 16S is 16 seconds 2 is sec and 500 is 1 500 sec A is th...

Page 14: ...el in the top center of the finder outside the screen area The display will go out when the release button is stroked all the way and a shutter release warning LED will light up momentarily when the e...

Page 15: ...so that the letter A is visible on the lens barrel and keep the time expo sure lever release pushed in all the way 16 Exchanging Lenses The lens cannot be attached or detached unless the shutter is c...

Page 16: ...te the white index dot The aperture ring click stops at the numbered settings as well as intermediate stop settings The aperture ring may also be set midway between the click stops also The intermedia...

Page 17: ...out use of the find er simply rotate the focusing ring and set the distance opposite the orange colored index When the lens is focused there is an apparent zone of sharpness both in front and back of...

Page 18: ...3m to the red col ored infrared index by shifting the distance ring which will focus the lens properly at 3 meters for the infrared film loaded in the camera Follow instructions enclosed with the film...

Page 19: ...hooting with the mirror locked up first rotate the film wind ing crank and advance the film and cock the shutter Then turn the mirror lock up lever in the arrow indicated direction which will close th...

Page 20: ...up lever Then take the next exposure with the multiple exposure lever turned Reverse the multiple exposure lever upon taking the picture See 23 Multiple Exposures The Zenza Bronica GS 1 has an electr...

Page 21: ...ed Then using a pincer or similar tool lift up the screen with the protru sion at the rear end B To install the focusing screen nest the protrusion at the rear end of the screen in a corresponding gro...

Page 22: ...nding crank assembly from the main body place the cover which is supplied with the Speed Grip G over the exposed bayonet mount to protect it from dust and foreign mat ters B To attach the film winding...

Page 23: ...hen storing the camera Leaving the battery in the camera for a long time without using it can lead to leakage problems and result in poor contact Discard a battery with leakage or corrosion and thor o...

Page 24: ...rface of the screens as this will lead to inaccurate focusing A shutter release warning LED will flash above the focusing screen in the top center of the finder and signal closing of the shutter when...

Page 25: ...the camera and lens very carefully after using it outdoors in wet weather or at the seashore Wipe the camera carefully with a well wrung damp cloth using fresh water if the exterior is affected by sal...

Page 26: ...cocked condition to attach or remove the lens In other words the cocking pin of the lens must be set between the red band and green dot in this case while the cocking pin of the body mount must be set...

Page 27: ...02 4 59 3 92 3 28 2 67 24 5 16 6 12 6 9 52 7 30 6 21 4 97 4 29 3 56 3 17 2 77 2 35 F nu mbers Meters oo 15 8 5 3 2 1 5 1 2 1 0 0 9 0 8 0 75 3 5 oo 21 9 9 58 5 56 3 18 2 08 1 54 1 22 1 02 0 91 0 81 0 7...

Page 28: ...w half click 4 22 w half click 3 5 22 w half click Minimum focusing dis tance m 0 5 0 6 0 55 Filter Size 95 72 72 Overall length Weight 74 x 98 790 71 x 87 715 71 5 x 87 765 Equivalent focal length i...

Page 29: ...lick 4 32 w half click 3 5 22 w half click Minimum focusing dis tance m 0 75 0 66 1 5 Filter Size 72 72 72 Overall length Weight 67 5 x 87 630 78 5 x 87 725 62 x 87 650 Equivalent focal length in 35mm...

Page 30: ...half click 5 6 32 w half click 8 64 w half click Minimum focusing dis tance m 2 3 8 Filter Size 82 82 122 Overall length Weight 97 5 x 87 970 142 x 87 1200 307 5 x 87 3760 Equivalent focal length in 3...

Reviews: