background image


(844) 200-1945 

[email protected]


Page 20 of 31


Copyright © Zenty AV


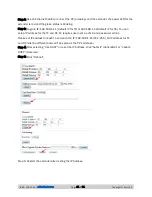
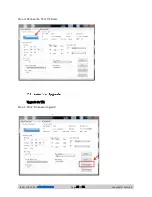
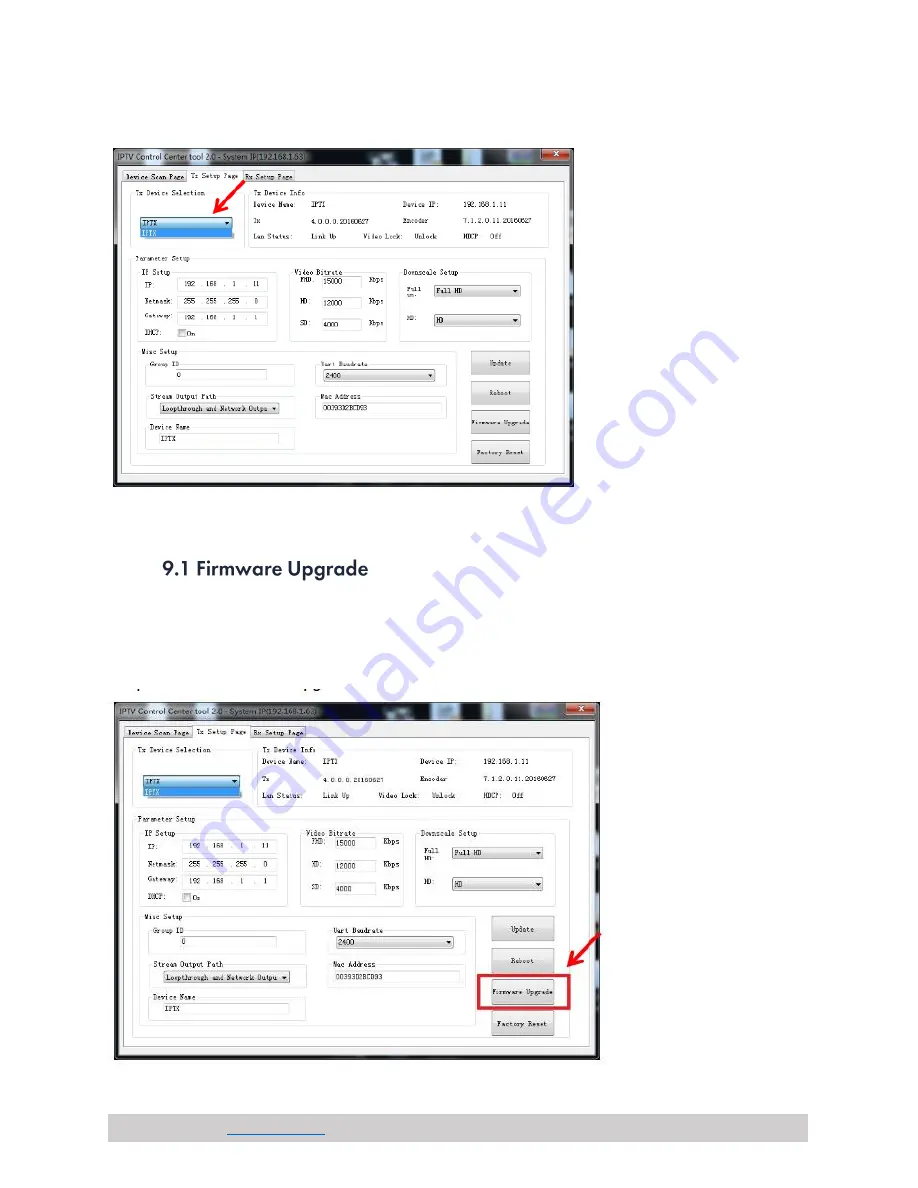
Step 4: Choose the TX or RX Name 


Upgrade for TX: 

Step 1: Click “Firmware Upgrade”.


Summary of Contents for ZT-111

Page 1: ...844 200 1945 sales zenty com Page 1 of 31 Copyright Zenty AV Zenty Professional A V Solution Provider ZENTY 9807 EMILY LANE STAFFORD TX 77477 844 200 1945 SUPPORT ZENTY COM...

Page 2: ...844 200 1945 sales zenty com Page 2 of 31 Copyright Zenty AV...

Page 3: ...844 200 1945 sales zenty com Page 3 of 31 Copyright Zenty AV...

Page 4: ...cable with 1x looping HDMI output With IR Remote to choose the source with LED to show the Group ID Comply with TCP IP protocol streaming bit rate is up to 15Mbps Supports LPCM audio format Smart IP...

Page 5: ...rt Supports 38 56kHz IR Ext Port Supports 38kHz Receiver Connectors Input 1 x RJ45 Input Output 1 x HDMI Female Port Looping Output RS232 Phoenix RS232 Port IR IR RX Port Supports 38 56kHz IR Ext Port...

Page 6: ...25Hz 1080P VESA Resolutions Frequency Resolution 50Hz 576i 576P 720P 1080P 1080i 60Hz 59 94Hz 480i 480P 720P 1080P 30Hz 29 97Hz 1080P 24Hz 1080P 25Hz 1080P 1 x Transmitter 1 x Receiver 1 x IR TX cabl...

Page 7: ...844 200 1945 sales zenty com Page 7 of 31 Copyright Zenty AV...

Page 8: ...844 200 1945 sales zenty com Page 8 of 31 Copyright Zenty AV...

Page 9: ...address every TX has unique group ID This over IP Extender has been assigned unique default MAC address for every TX and RX so you don t have to set the MAC for the units You just need to set the IP...

Page 10: ...he default IP address of the TX is 192 168 1 11 user name admin password admin The default IP address of the RX is 192 168 1 12 Step 1 Make sure the Transmitter and PC are in the same domain Access th...

Page 11: ...192 168 1 12 default IP for RX You can setup IP address for the TX and RX TX requires user name admin and password admin Please set IP address for each TX and each RX IP 192 168 1 XX XX 1 255 All IP...

Page 12: ...ge to 01 press 0 then press 1 Choose the Baud Rate Press the Button switch to Baud Rate mode press or to change the Baud Rate F0 2400 default F1 4800 F2 9600 F3 19200 F4 28800 F5 38400 F6 57600 F7 115...

Page 13: ...1 Step 2 Use an Ethernet Cable to connect the PC or laptop and the Extender the power LED for the extender is red and the green status LED is blinking Step 3 Power on the TX or RX with 5V 1A power su...

Page 14: ...ble 2 Connect the HDMI looping output of the Transmitter to the local HDMI display 3 Connect another HDMI display and the HDMI Receiver unit with HDMI Cable 4 Connect the Transmitter and Receiver with...

Page 15: ...r cat6 cable 5 Connect all the Receivers and the switch router with Cat5e 6 cable 6 Connect the HDMI displays and the HDMI Receiver units with HDMI Cable 7 Connect the IR TX cable into IR TX port of t...

Page 16: ...d the switch router with Cat5e 6 cable 6 Connect the HDMI displays and the HDMI Receiver units with HDMI Cable 7 Connect the IR TX cable into IR TX port of the transmitter Connect the IR RX cable into...

Page 17: ...844 200 1945 sales zenty com Page 17 of 31 Copyright Zenty AV...

Page 18: ...r default IP TX 192 168 1 11 RX 192 168 1 12 to modify the Baud Rate which range from default 2400 to 115200 We provide the firmware to upgrade the units when it is necessary Please follow these steps...

Page 19: ...vailable to recover the setting to factory setting use a tiny pin to insert the reset hole and hold about 10 seconds when the unit is connected Step 1 Make sure the Transmitter and PC are in the same...

Page 20: ...844 200 1945 sales zenty com Page 20 of 31 Copyright Zenty AV Step 4 Choose the TX or RX Name Upgrade for TX Step 1 Click Firmware Upgrade...

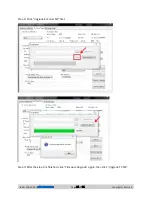
Page 21: ...844 200 1945 sales zenty com Page 21 of 31 Copyright Zenty AV Step 2 Click Upgrade Encoder FW first Step 3 After the step 2 is finished click Firmware Upgrade again then click Upgrade TX FW...

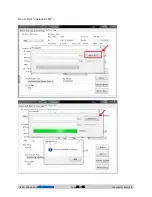
Page 22: ...844 200 1945 sales zenty com Page 22 of 31 Copyright Zenty AV Upgrade for RX Step 1 Click Firmware Upgrade...

Page 23: ...844 200 1945 sales zenty com Page 23 of 31 Copyright Zenty AV Step 2 Click Upgrade Rx FW...

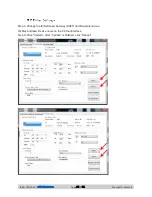
Page 24: ...es zenty com Page 24 of 31 Copyright Zenty AV Step 1 Change the IP Netmask Gateway DHCP Uart Baudrate Group ID Mac Address Device name on the PC tool interface Step 2 Click Update after Update is fini...

Page 25: ...e in the same domain Refer to 5 1 1 Step2 Connect the HDMI Source without HDCP with the transmitter and power on the device Step3 Connect the transmitter to the PC Step4 Check the Multicast Group on t...

Page 26: ...844 200 1945 sales zenty com Page 26 of 31 Copyright Zenty AV...

Page 27: ...844 200 1945 sales zenty com Page 27 of 31 Copyright Zenty AV Step 6 Click Next Step 7 Choose RTP MPEC Transport Strcan...

Page 28: ...844 200 1945 sales zenty com Page 28 of 31 Copyright Zenty AV Step 8 Click Next Step 9 Click Stream...

Page 29: ...844 200 1945 sales zenty com Page 29 of 31 Copyright Zenty AV Step 10 Click Open Network Stream then you can click Play to view the video...

Page 30: ...ling the complaint and provide a day time phone and or email address where you can be reached This Limited Warranty ONLY COVERS failures due to defects in material or workmanship and DOES NOT COVER no...

Page 31: ...844 200 1945 sales zenty com Page 31 of 31 Copyright Zenty AV WWW ZENTY COM 9807 EMILY LANE STAFFORD TX 77477 844 200 1945 SUPPORT ZENTY COM SALES ZENTY COM...

Reviews: