


I N S TA L L AT I O N
P A G E 1 1
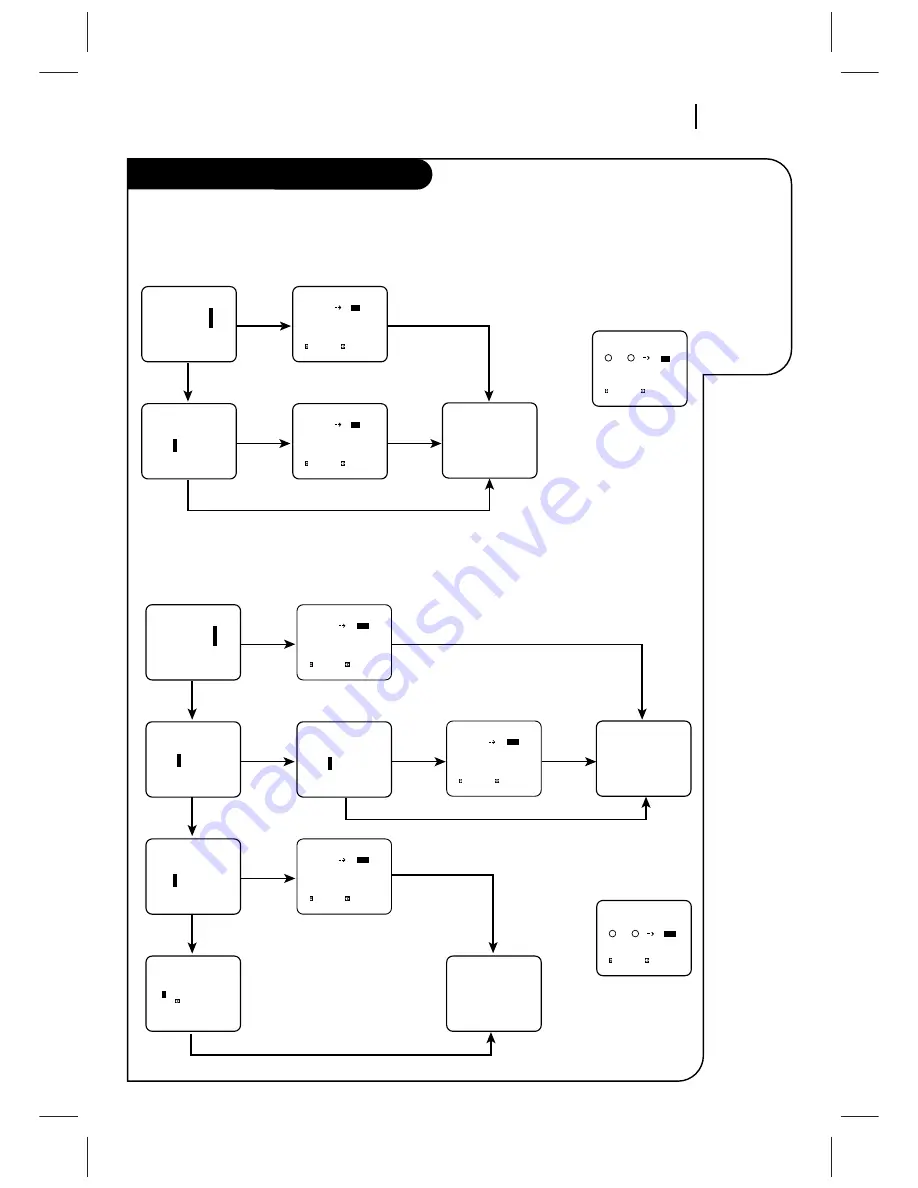
Before you
can record
programs with
VCR Plus+®,
you must tell
this VCR the
PlusCode
TM
channels for
your area.
Setup for VCR Plus+® recording
On-Screen Instructions for TV Tuning Band
On-Screen Instructions for CATV Tuning Band
VCR PLUS
VCR+ program:
1
Ch Map Setup:
2
Ch Map Review:
3
Press number keys
QUIT = exit
VCR PLUS
Setup complete
Are your channels on
TV the same as in TV
listing?
1
Yes
2
No
Press number keys
QUIT = exit
Channel Map
to select to adjust
QUIT=exit
TV Ch
VCR+ Ch
2
- -
3
- -
4
- -
5
- -
6
- -
7
- -
Channel Map
to select to adjust
QUIT=exit
TV Ch
VCR+ Ch
2
- -
3
- -
4
- -
5
- -
6
- -
7
- -
Double Map
to select to adjust
QUIT=exit
TV Ch
VCR+Ch
2nd VCR+Ch
2
2
- -
3
3
- -
4
4
- -
5
5
- -
6
6
- -
7
7
- -
START
Press VCR+
on remote
Press 0000 to show
Double Map Screen
3-Review
2-Setup
1-Yes
2-No
QUIT
QUIT
Channel mapping a
second PlusCode
Channel for
TV channel 3.
TM
Are your channels on
TV the same as in TV
listing?
1
Yes
2
No
Press number keys
QUIT = exit
Do you have a Cable
Box or DBS receiver?
1
Yes
2
No
Press number keys
QUIT = exit
Is the Cable Box or
DBS receiver connected
to VCR ‘ANT IN’?
1
Yes
2
No
Press number keys
QUIT = exit
Enter your Cable Box
or DBS receiver
output channel:
-
(Use to erase)
Press number keys
then ENTER
QUIT = exit
VCR PLUS
VCR+ program:
1
Ch Map Setup:
2
Ch Map Review:
3
Press number keys
QUIT = exit
VCR PLUS
Setup complete
VCR PLUS
Setup complete
START
Press VCR+
on remote
Press 0000 to show
Double Map Screen
3-Review
2-No
1-Yes
1-Yes
1-Yes
ENTER
2-Setup
2-No
QUIT
QUIT
2-No
QUIT
Channel mapping a
second PlusCode
Channel for Cable
channel 3.
TM
Double Map
to select to adjust
QUIT=exit
Cable
VCR+Ch
2nd VCR+Ch
1
1
- - -
2
2
- - -
3
3
- - -
4
4
- - -
5
5
- - -
6
6
- - -
Channel Map
to select to adjust
QUIT=exit
Cable Ch
VCR+ Ch
1
- - -
2
- - -
3
- - -
4
- - -
5
- - -
6
- - -
Channel Map
to select to adjust
QUIT=exit
Cable Ch
VCR+ Ch
1
- - -
2
- - -
3
- - -
4
- - -
5
- - -
6
- - -
Channel Map
to select to adjust
QUIT=exit
Cable Ch
VCR+ Ch
1
- - -
2
- - -
3
- - -
4
- - -
5
- - -
6
- - -


