13
Channel Search
12
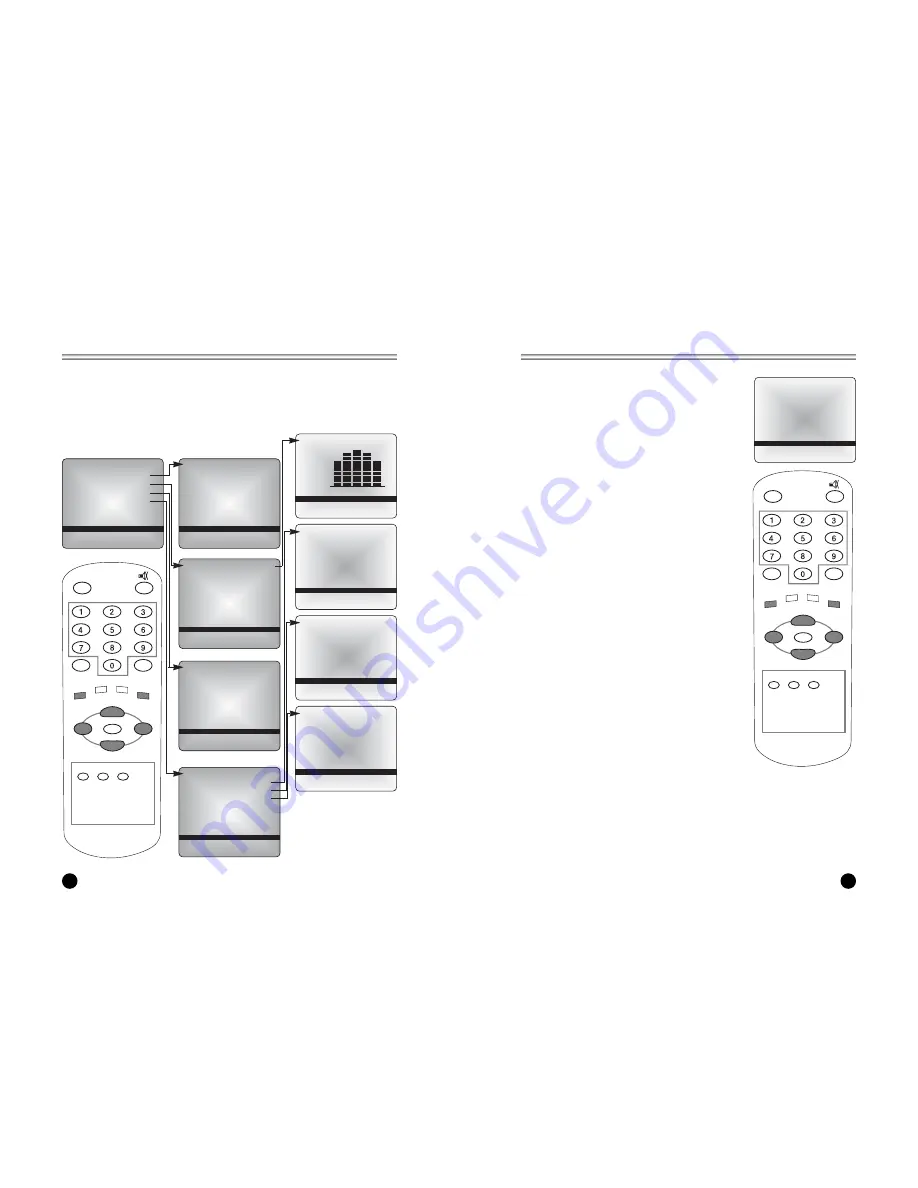
On Screen Menus and Displays
* This function can be operated only when the TV is set up
to receive incoming signals from broadcasting stations
and the antenna cable is connected.
* Auto program memorizes all the channels from terrestrial
TV signals or CATV.
Auto Program
All channels that can be received are stored by this
function. It is recommended that you use Auto Program to
find available channels during installation of this TV.
1. Press the MENU button.
2. Select the Setup menu.
3. Select Auto program.
4. Press the CH
x
xy
y
button to select Tuner Mode.
5. Select a TV system with the VOL
Ïq
button.
All Channels that can be received are stored by this
method. It is recommended that you use auto
Program during installation of this set.
TV
↔
CATV
6. Select the menu using the CH
xy
button.
7. Start Auto Program by press the VOL
Ïq
button.
8. Press the MENU button when channel search is
complete.
9. Press the TV/AV button to return to normal TV
viewing.
* Press the CH
x
xy
y
buttons to check the memorized
channels after auto program is finished.
* If you press the MENU button during auto programming,
the function will stop and only channels programmed up
to that time will remain.
* Auto programming function can memorize only the
channels, which are being received at that time
POWER
SSM
C
VOL
VOL
B
MENU
CC
MEMORY SLEEP
TV/AV
ST/SAP Q.VIEW
PSM
OK
CH
W
CH
V
▲▼
:
Move
###### ◀▶
:
Select
MENU:Return
#####
TV/AV:Exit
Auto program
Tuner mode
TV
Start
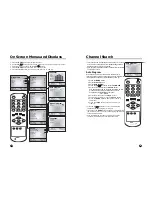
1. Press the MENU button to display main menu.
2. Use the CH
x
xy
y
button to select menu options for Picture, Sound, Special, Setup.
3. Adjust each menu option with the VOL
Ï
Ïq
q
button.
4. Press the MENU button to return to preceding menu.
5. Press the TV/AV button to exit menus and return to TV viewing.
POWER
SSM
C
VOL
VOL
B
MENU
CC
MEMORY SLEEP
TV/AV
ST/SAP Q.VIEW
PSM
OK
CH
W
CH
V
▲▼
:
Move
###### ◀▶
:
Adjust
MENU:Return
#####
TV/AV:Exit
Main menu
Picture
q
Sound
q
Special
q
Setup
q
▲▼
:
Move
###### ◀▶
:
Adjust
MENU:Return
#####
TV/AV:Exit
Picture
Contrast
90
Brightness
75
Color
70
Sharpness
50
Tint
0
▲▼
:
Move
###### ◀▶
:
Adjust
MENU:Return
#####
TV/AV:Exit
Equalizer
Flat
Music
Movie
Speech
User
▲▼
:
Move
###### ◀▶
:
Adjust
MENU:Return
#####
TV/AV:Exit
Auto program
Tuner mode
TV
Start
▲▼
:
Move
###### ◀▶
:
Adjust
OK:Store
##########
TV/AV:Exit
Manual program
Fine
▶▶▶
Storage
On
▲▼
:
Move
###### ◀▶
:
Adjust
MENU:Return
#####
TV/AV:Exit
Language
English
Françals
Español
▲▼
:
Move
###### ◀▶
:
Adjust
MENU:Return
#####
TV/AV:Exit
Sound
Equalizer
▶
Balance
0
AVL
Off
MTS
MONO
▲▼
:
Move
###### ◀▶
:
Adjust
MENU:Return
#####
TV/AV:Exit
Special
Input
TV
Auto sleep
Off
Blue Back
Off
Auto flip
Off
Vertical flip
Off
Horizontal flip
Off
▲▼
:
Move
###### ◀▶
:
Adjust
MENU:Return
#####
TV/AV:Exit
Setup
Auto program
▶
Manual program
▶
Language
▶
Captions
Off
0.1 0.5 1.5
#
5.0
##
10Khz


